Stitching 101

A forum to ask questions, post setups, and generally discuss anything having to do with photomacrography and photomicroscopy.

Moderators: rjlittlefield, ChrisR, Chris S., Pau

rjlittlefield
Site Admin
Posts: 23597
Joined: Tue Aug 01, 2006 8:34 am
Location: Richland, Washington State, USA
Contact:

Stitching 101

Post by rjlittlefield »

In the macro forum over the last few days, there have been some posts and some questions about stitching. Let's see if I can summarize what's going on.

Suppose you want to make an image that contains more good pixels than your camera captures in a single shot.

Maybe you want 5000 x 3500 pixels, but your camera only shoots 3000 x 2000.

You could shoot a single frame and interpolate up, but that'll just get you "empty magnification", no extra detail.

To get an honest 5000 x 3500, what you do is shoot four frames, each at 3000 x 2000, slightly overlapping, then "stitch" them together side-by-side and top-to-bottom to make the final image. If you need extended depth of field, then you shoot four stacks, process each stack through software like Helicon Focus, then stitch together the four output images.

"A piece of cake," you say -- "What could possibly go wrong?"

Well, to be honest, at least a half-dozen things that are worth mentioning:
  • barrel or pincushion distortion in your lens
  • radial falloff in brightness (darker corners than centers]
  • shifts of apparent brightness due to changing lighting/viewing angles as you move the camera and/or subject
  • shifts of surface sheen and optical colors, again due to movement of camera and/or subject
  • shifts of actual geometry caused by moving the viewing position with respect to the subject
  • shifts of apparent geometry caused by auto-alignment in the stacking software
If you have really good equipment, a careful setup, and a bit of luck, none of these potential problems will actually happen. In that case, you can just pull the images into Photoshop, shift them in X and Y until they line up, and merge them together.

If your equipment is not so good, not so carefully set up, or you're not so lucky, then one or more of the potential problems becomes real. In that case, when you pull the images into Photoshop, you find that maybe simple shifting doesn't suffice to make them line up, or that even after they line up you have obvious transitions where one image was brighter than the other. What to do then?

Fortunately, our good friends in the panorama photography community have spent the last several years developing software to handle most of these problems. The current generation of panorama generation software can
  • automatically identify subject details that appear in multiple frames, turning these into "control points"
  • simultaneously determine the X and Y shifts and rotation of each image, plus lens corrections for barrel or pincushion distortion, to make all the control points line up as well as possible
  • generate a single "blended" output image that automatically corrects for brightness differences where images come together, while preserving whatever fine detail may be present at the seam, and/or
  • generate a layered Photoshop file so you can edit the masks yourself, and/or
  • generate a blended output plus a set of individually corrected source images, so you can just "tweak up" the blended output by masking in pieces of individual images if you like. (This is not so important in macro stitching. In real panoramas, things happen like people being in two different places in two overlapping frames. The software is not good enough yet to automatically avoid creating "ghosts" in these cases, so manual intervention is needed.)
My favorite stitching tool is PTGui (from "Panorama Tools Graphical user interface").

Here is an example of how I use it.

First, I use the PTGui "Project Assistant" to load my source images (Helicon Focus output, in this case). For reasons that are a bit too complicated to explain in detail here, I lie to it and claim that my images were shot with a long telephoto lens. Clicking the "Generate Control Points" button causes PTGui to automatically figure out how the images fit together.

Image

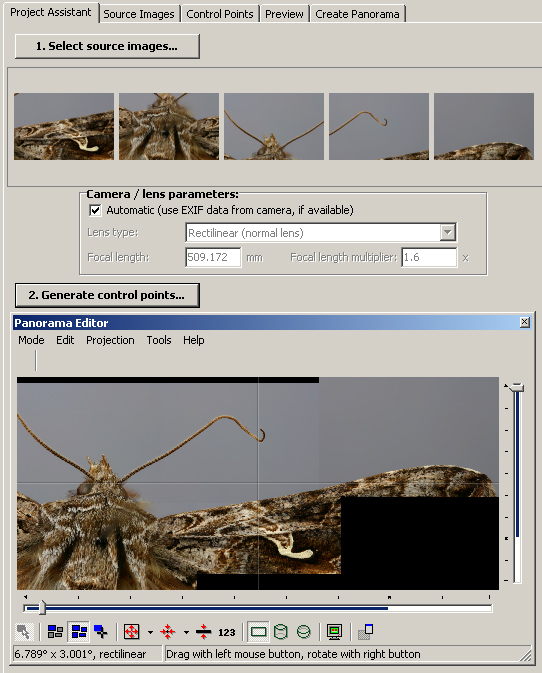
Notice in the preview pane above, that there is a noticeable difference in brightness between the right-most and center images. That's because the images were shot several hours apart, and the room lighting had changed a bit. (Oops!) No problem, that'll disappear in a moment.

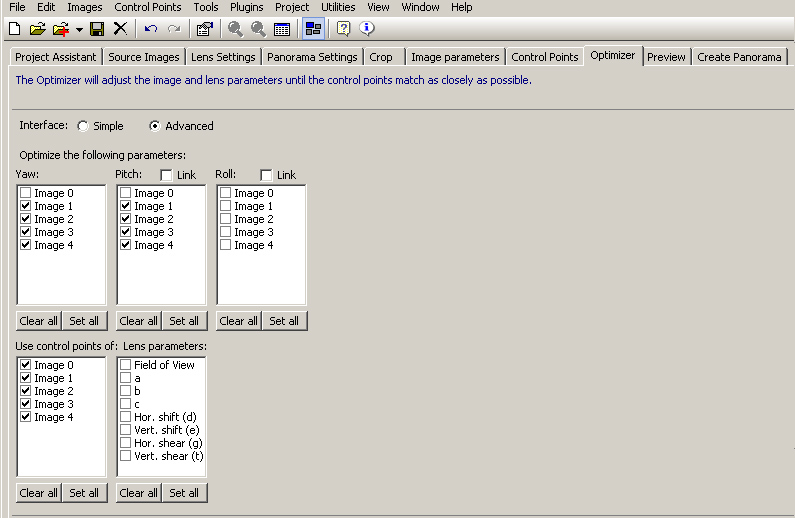
By default, PTGui assumes that it's dealing with a handheld panorama and a lens with moderate distortion, so it automatically corrects for those things. I happen to know that my apparatus does not allow rotation, and from previous tests I know that the lens I'm using has negligible distortion. So I switch to the Advanced interface, force the image rotations and lens distortion parameters to zero, and tell PTGui to just optimize the "yaw" and "pitch". (That's X and Y, for you non-flyer types.)

The optimization says that my control points line up to within a fraction of a pixel, on average, which is plenty good enough for my purposes.

Image

Then I tell PTGui to generate a blended .jpg. The output is shown at the top of this image. Notice that the hard line between background grays is gone.

Image

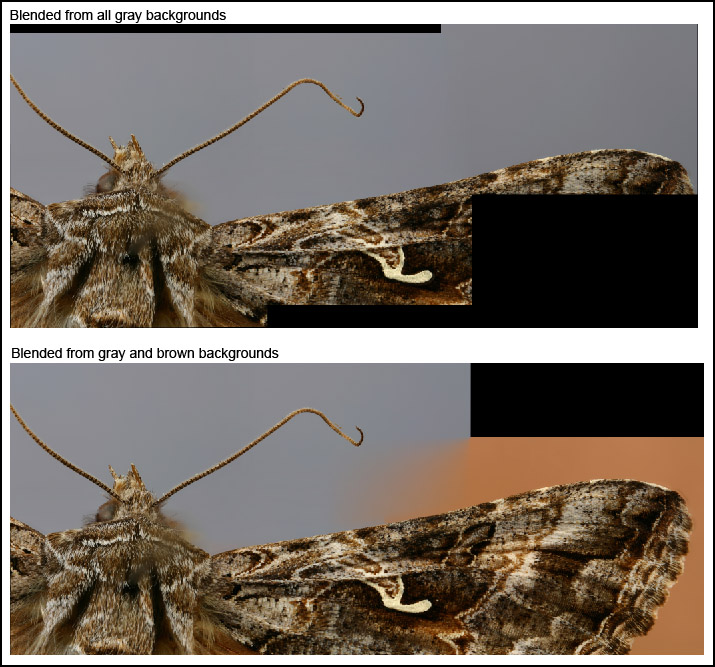
What's shown at the bottom of the above image is the output of another run, using a different right-hand image -- one whose background was brown, not gray. Notice how well the software has blended the transition between brown and gray. If it can do this well on such a hard problem, imagine how well it'll handle minor problems like corner falloff or changes in illumination.

I think that's it in a nutshell. Probably the most important thing is to lie to PTGui and tell it that the images are shot with a long telephoto. Roughly speaking, that keeps PTGui from attempting to apply the complicated nonlinear warps that are necessary to make real panoramas line up when they are shot with normal or wideangle lenses. It may also help to tell Helicon Focus to not auto-adjust, but whether this helps or hurts depends on magnification, working distance, and DOF per frame. You'll have to test to be sure.

If you're interested in seeing how PTGui handles a really tough wide-angle panorama, go look at http://www.janrik.net/MiscSubj/Colchuck ... iption.htm, which describes the process that produced this picture. That was a really nasty problem, due largely to the use of an auto-exposure film camera, combined with sloppy technique in holding the camera in one place, and using early software. Many hours, says the description. (It quotes an embarrasingly large number.) I have since shot in equally tough situations, using a digital camera, better technique, and current software, and was shocked to find that the panorama generation process had shrunk to a few minutes. Technology marches on! :D

--Rik

georgedingwall
Posts: 207
Joined: Tue Aug 01, 2006 11:15 am
Location: Invergordon, Scotland
Contact:

Post by georgedingwall »

Hi Rik,

Thanks for posting this explanation of how you use PTGui. I've been struggling a bit trying to understand which parameters to use when compiling an image and haven't got satisfactory results yet.

I'm sure the method you described here will help me understand the program better.

Bye for now.

P.S. After I wrote the first part of this post, I noticed that the layout of PTGui is different in my version compared to the screenshots you used. I have Version 6.03. Do you have a newer version than I do?

Although the layout is different I managed to find the various settings you refer to, so I will have a play and see if I can get the hang of it al last.

Bye again.
George Dingwall

Invergordon, Scotland

http://www.georgedingwall.co.uk/

Carl_Constantine
Posts: 304
Joined: Tue Aug 01, 2006 8:02 am
Location: Victoria, British Columbia, Canada
Contact:

Post by Carl_Constantine »

Yes, PTGui and the PanoTools are great. I did a panorama of a lagoon area as a test a while back. Turned out not too bad after I corrected a few things in my understanding.

However, one thing is these tools assume a particular setup for panoramas. To do a true pano, you rotate the camera around a point. There is an adapter you can get called a Panorama Bracket that lets you do just that. If you don't do it right, you do end up with some extra distortion due to the rotation of the camera. The tools compensate for this and correct the distortion. There is also a database of lens particulars to use with PTGui and the pano tools that help with the distortion values.

This use of stitching is slightly different as you're not rotating the camera, you're moving the camera latterally so I'm not sure how the software deals with the lack of rotation of the camera (rik?)
Carl B. Constantine

rjlittlefield
Site Admin
Posts: 23597
Joined: Tue Aug 01, 2006 8:34 am
Location: Richland, Washington State, USA
Contact:

Post by rjlittlefield »

Carl_Constantine wrote:This use of stitching is slightly different as you're not rotating the camera, you're moving the camera latterally so I'm not sure how the software deals with the lack of rotation of the camera (rik?)
That's the reason to lie to the software, claiming that the source images were taken with a long telephoto. The transformation that results is not perfect, but it's a very good approximation. There's another way that's better in theory -- using the "d" and "e" shift parameters -- but that does not play nicely with lens distortions. The telephoto lie is much more likely to work well.

If you want to be really Really serious about getting it right, then instead of shifting the camera laterally, it should be rotated around the entrance pupil of the lens (the PanoTools "no-parallax point"). But then the focus stepping really should happen along that rotated axis too, or the stacking may get weird. I've never been dedicated enough to actually set all this up correctly. For shallow subjects just shifting is good enough to work well, and it's much simpler.

--Rik

georgedingwall
Posts: 207
Joined: Tue Aug 01, 2006 11:15 am
Location: Invergordon, Scotland
Contact:

Post by georgedingwall »

Hi Rik,

Using your comments on the settings you used in PTGui, I've made my first successful, (almost), stitched stack in PTGui. I also did the stitching in Panorama Factory, and I think that PTGui did a slightly better job, although there was not much in it.

I used an old watch that I have, and just did three stacks which covered the width of the watch. I've not tried an array of stacks yet. My next step is to do a 3 X 3 stack of the whole watch and then use PTGui to stitch the final image.

The watch is about 40mm across and each of the 3 stacks was made from 10 frames with an adjustment of 0.2mm between each frame. The final image is 6454 pixels wide. I'm pretty sure I can use a larger focus adjustment than 0.2 mm and still get overlap for the frames. This would also enable me to extend the focus deeper into the watches interior.

I can't see many artifacts from the stitching process. There is one small defect I've noticed so far, in the lower right quadrant of the flywheel, where it seems to be having a problem with the outer edge of it. Not sure why yet.

This is what I ended up with. I've not done any post-processing on this image except a little bit of colour balancing. I've uploaded the full size version to my site if you want to have a look at that. (3.4MB).


Bye for now.
Last edited by georgedingwall on Sun Mar 02, 2008 2:03 pm, edited 1 time in total.
George Dingwall

Invergordon, Scotland

http://www.georgedingwall.co.uk/

rjlittlefield
Site Admin
Posts: 23597
Joined: Tue Aug 01, 2006 8:34 am
Location: Richland, Washington State, USA
Contact:

Post by rjlittlefield »

George,

I am afraid that you've found a perfect subject to illustrate the fifth bullet in my list of things that can go wrong:
  • shifts of actual geometry caused by moving the viewing position with respect to the subject
I'm guessing that the balance wheel is significantly behind the main flat panel of the watch. Maybe it's the full 2 mm that your stack spans. If so, then you've got the dreaded Parallax Problem. As viewed from the camera position, there's a certain gap between the balance wheel and the panel. When the camera is shifted to the left, it sees a bigger gap than when the camera is centered. This is the exact same effect that is exploited in stereo pairs. With stereo, it's just what you need. With stitching, it's a curse.

The only sure cure for parallax is to shoot the mosaic by rotating your camera assembly around the entrance pupil of the lens, rather than by shifting it laterally. For discussion, see http://wiki.panotools.org/No-parallax_point. For even more discussion, read this paper that consumed a couple of weeks of my time last Christmas.

You can determine the proper center of rotation fairly accurately by stopping down your lens a bit, looking into the front of your macro setup, and marking where the aperture appears to be. (I say "appears to be" because of course you're looking at the actual aperture through some lens elements that may make it look closer or farther away than it really is.) Where the aperture appears to be is called the "entrance pupil". The "no-parallax point" is at the center of the entrance pupil.

Parallax problems are less severe with greater working distance, because the angles are smaller. Your watch is such a beautiful test case, however, that I suspect it would show parallax at any practical viewing distance. (That's with normal lenses, anyway. There are some special lenses called "telecentric" that get around this problem with clever optics.)

Try shooting your three stacks again, rotating the camera assembly around its entrance pupil. Most likely the entrance pupil moves while you're shooting the stack. Wherever it is in the middle of the stack would be a good approximation.

If you rotate the camera off the axis of focus stepping, then as you focus, your subject will move laterally across the frame. With a bit of luck, the current version of Helicon Focus will handle this.

Panorama brackets, like Carl speaks of, are designed to rotate the camera both horizontally and vertically around the no-parallax point. They essentially suspend the camera in the middle of a gimbal assembly. Offhand I have no idea how to make something similar that's rigid enough for macro work. Perhaps you can come up with something and show us how? :D

--Rik

georgedingwall
Posts: 207
Joined: Tue Aug 01, 2006 11:15 am
Location: Invergordon, Scotland
Contact:

Post by georgedingwall »

Hi Rik,

I wondered about the effects of camera movement on the stitching software, but I couldn't get my head round how to compensate for it. I don't have any way, at the moment, to rotate the camera around the exit pupil. That'll have to wait for another day.

I've re-done the same three stacks of the watch with a different lens. The first one used an enlarger lens reversed on the camera with no other extension except the adapters needed to make it fit. In this new image, I fitted my latest toy. The Nikon 105mm Macro VR. ( VR off of course). :)

The new image is made from 3 stacks of 6 frames each 0.5mm apart.

This lens gave me some more working distance, and seems to be a bit sharper thean the previous lens. I've gone over the image looking for the paralax problem, but I have not found any yet. The previous problem with the flywheel seems to have gone away.

Here's the revised image. I've updated the full size version on the same link as I used in my previous post if you want to have a look.


I did try to make a 3 x 3 array of stacks using the enlarger lens, but I couldn't get PTGui to build a stitched image of it. It kept putting the top row of three images off to one side in the preview pane. Have you any idea what I might be doing wrong to get this result. I know that I really needed a 4 x 3 array, as there was not a very large overlap between each of the three rows. I will probably try again tomorrow with the Nikon lens and do the extra row for the array.

It's a very interesting exercise, but it is time consuming to do.

Bye for now.
Last edited by georgedingwall on Sun Mar 02, 2008 2:03 pm, edited 1 time in total.
George Dingwall

Invergordon, Scotland

http://www.georgedingwall.co.uk/

rjlittlefield
Site Admin
Posts: 23597
Joined: Tue Aug 01, 2006 8:34 am
Location: Richland, Washington State, USA
Contact:

Post by rjlittlefield »

George,

Can you temporarily post out the 3x3 source images that you fed to PTGui? I'd be interested to pick them up and see exactly what PTGui is doing with them. It sounds like there's a problem with the control points. Could be something specific to the type of subject. I haven't tried metal before, and I can imagine that shifting specular reflections might be an issue.

The proper rotation point is entrance pupil, by the way. The exit pupil is the apparent location of the aperture as seen from the camera side of the lens. Exit pupil location doesn't matter for this problem.

--Rik

georgedingwall
Posts: 207
Joined: Tue Aug 01, 2006 11:15 am
Location: Invergordon, Scotland
Contact:

Post by georgedingwall »

Hi Rik,
rjlittlefield wrote:George,

Can you temporarily post out the 3x3 source images
I've uploaded them to this link. They are in a zip file.


I've reduced them in size to 800 pixels wide. I think part of the problem may be that I don't have much of an overlap between the top and middle rows. I will run this again using four rows this time to see if that makes any difference.
The proper rotation point is entrance pupil, by the way.
That was just a slip by me. When I used to do a bit of astronomy, we were always concerned with the exit pupils on eyepieces, so I must have been typing on auto-pilot and got the two terms mixed up. :?

Bye for now
Last edited by georgedingwall on Sun Mar 02, 2008 2:03 pm, edited 1 time in total.
George Dingwall

Invergordon, Scotland

http://www.georgedingwall.co.uk/

rjlittlefield
Site Admin
Posts: 23597
Joined: Tue Aug 01, 2006 8:34 am
Location: Richland, Washington State, USA
Contact:

Post by rjlittlefield »

George,

There are several aspects of your images that are causing problems for PTGui.
  • The narrow overlap between top and center rows has two bad effects:
    - PTGui fails to find any control points at all in that area, and
    - it doesn't give much opportunity for blending out mismatched illumination.
  • There's a lot of shift in reflections of the lights off the burnished metal.
  • There's quite a lot of parallax.
I was able to get all 9 images aligned OK by just adding two control points between the top and middle rows. Then I discovered that PTGui had gotten three other control points wrong, probably due to shifting reflections and repeating patterns in the textured metal surface. Deleting those produced what at first seemed to be a good stitch, but when I looked closer I found other glitches that made me dig deeper & brought me back to the parallax problem.

I aligned & layered three of your source images in Photoshop to illustrate what I'm talking about. This animation flashes between your center image and a manual stitch of the ones to the left and right of it.

Image

Notice the right-left shifting of the balance wheel and some of the other details behind the main panel, due to parallax, and also the shifting reflections on the balance wheel and other parts.

This is a very challenging subject! I'm starting to think there's no way to handle it well without rotating the camera assembly around its entrance pupil. In theory, that should kill both the parallax and the changing reflections. In practice, um, I dunno -- I've never tried it with anything like this, and I'm still a bit baffled about how to set up the mechanics. I think my setup could do left-right rotation without much trouble, but doing up-down rotation to get multiple rows is a different story.

Thanks for posting out those images. I'm learning lots!

--Rik

georgedingwall
Posts: 207
Joined: Tue Aug 01, 2006 11:15 am
Location: Invergordon, Scotland
Contact:

Post by georgedingwall »

Hi Rik,

Your demonstration of the paralax effect is most interesting. I suppose if you were doing this from an artistic rather than technical point, it wouldn't matter all that much provided the overall image was basically sound and free of obvious stitching artifacts.

I agree about the lack of overlap being a problem. I think I made the mistake of extending the top row all the up to the top of the tangs that hold the strap in place. If you notice the bottom ones are stuck in a block of polystyrene. If I had stopped the repositioning of the subject just clear of the watch body, there probably would have been enough overlap to get a stitch.

I re-did the image today using 4 rows and 3 columns, and PTGui had no problem in getting the aligment first time.

Here's what it looks like. Just in case you want to see the full size version, you can find it at this link. It's 6987 x 6766 pixels and comes in at nearly 5MB, even with a relatively severe jpeg compression rate.

I'm still fascinated by this method of stacking and stitching, and feel there is quite a lot of scope for interesting compositions, the paralax and other issues not becoming a major factor in the visual appearance of any specific subject.

Bye for now.

PS. I'll leave these large files on my site for a few more days, just in case anyone else is mad enough to want to look at them. I will remove them at some point, and the links may no longer work.
Last edited by georgedingwall on Sun Mar 02, 2008 2:06 pm, edited 1 time in total.
George Dingwall

Invergordon, Scotland

http://www.georgedingwall.co.uk/

rjlittlefield
Site Admin
Posts: 23597
Joined: Tue Aug 01, 2006 8:34 am
Location: Richland, Washington State, USA
Contact:

Post by rjlittlefield »

George,

This looks very nice. :D In the full-sized version, I can spot a couple of seams between horizontal rows, but then I've had a lot of practice looking for seams.

I agree with your assessment of potential use. These problems (parallax, changing illumination, moving subjects) come up all the time in the panorama community. The concensus there goes along the lines of "Do whatever's reasonable to minimize problems when you shoot, then do whatever's reasonable to make them less visible when you stitch, then don't sweat it -- almost nobody will care."

I've seen some pretty bad stitching errors hidden by carefully located masks or cloned-in textures. My personal most extreme case is in the handheld full spherical panorama of the butterfly rainforest at the Florida Museum of Natural History. Visit http://www.janrik.net/PanoPostings/FMNH ... rflies.htm, look at the pictures, read the text, study the railing, and you'll see what I mean. :wink:

--Rik

georgedingwall
Posts: 207
Joined: Tue Aug 01, 2006 11:15 am
Location: Invergordon, Scotland
Contact:

Post by georgedingwall »

Hi Rik,

I'll have a closer look to see if I can find the seems you noticed.

Thats still a pretty cool panorama of the butterfly garden, even though you say that the stitching has problems.

I noticed a bit of a problem in the rail behind the lady in blue. Is that the one you meant? I also noticed a bit of misalignment on the bench which is partly covered with the dropped in butterfly.

I've not done may 360 deg panos. Here is a link to a partial panorama that I quite like. It's of the harbour area near where I live. You'll need Java enabled to view it. I'm sure there must be a few problems hidden in it that your eagle eye will find. :evil:


The one problem that I remember with this one was that Panorama Factory kept putting in two images of the oil rig supply boat. In the sequence I shot, the boat was moving, but the software just would not drop the unwanted second boat. The second was partly obscured by the grassy hill in the foreground. I ended up cloning it out.

I've enjoyed playing with this method over the last couple of days. It's not something that I would want to be doing every day. Some of what you need to do can be quite tedious. It's given me a bit of an insight into better stitching methods and I was quite impressed with the final version of the stitched stacks once I shot it for a 4 x 3 array.

Bye for now.
Last edited by georgedingwall on Sun Mar 02, 2008 2:06 pm, edited 1 time in total.
George Dingwall

Invergordon, Scotland

http://www.georgedingwall.co.uk/

rjlittlefield
Site Admin
Posts: 23597
Joined: Tue Aug 01, 2006 8:34 am
Location: Richland, Washington State, USA
Contact:

Post by rjlittlefield »

georgedingwall wrote:Thats still a pretty cool panorama of the butterfly garden, even though you say that the stitching has problems.
Thanks! It's still one of my favorites. The source images were shot with the camera held at arm's length out over a railing, with no alignment aids at all. It's a bit of a miracle that it eventually went together so well.
I noticed a bit of a problem in the rail behind the lady in blue. Is that the one you meant? I also noticed a bit of misalignment on the bench which is partly covered with the dropped in butterfly.
Yep, good eyes. The "bench" is actually a foreground railing, like the one behind the lady but much closer to the camera. The foreground rail is the one that I was intending. I had forgotten about the other glitch, but now that you remind me, I do have vague memories of painful wrestling with that one.
I've not done may 360 deg panos. Here is a link to a partial panorama that I quite like. It's of the harbour area near where I live. You'll need Java enabled to view it. I'm sure there must be a few problems hidden in it that your eagle eye will find.
Nope, looks great to me! A very pretty place. :D
The one problem that I remember with this one was that Panorama Factory kept putting in two images of the oil rig supply boat. In the sequence I shot, the boat was moving, but the software just would not drop the unwanted second boat. The second was partly obscured by the grassy hill in the foreground. I ended up cloning it out.
Cloning works. Using PTGui, the preferred solution would be to use masked tiff's as input, and just mask out the unwanted boat. That way you'd still have honest image in the problematic area, with good blending between the non-masked areas of adjacent images.

--Rik

Post Reply Previous topicNext topic