ZS vs. HF - continued.

A forum to ask questions, post setups, and generally discuss anything having to do with photomacrography and photomicroscopy.

Moderators: rjlittlefield, ChrisR, Chris S., Pau

Tesselator
Posts: 388
Joined: Sat Mar 27, 2010 11:40 pm
Location: Japan
Contact:

ZS vs. HF - continued.

Post by Tesselator »

A little while ago I created a thread called "Iron Flash" which was a flashed stack 40 images deep. In that thread I compared ZS to HF - being new to both for the most part. I guess some folks were surprised by the results and some requests were made for the original stack frames. My solution is this thread. :)

I created a 10 frame stack that I feel is easier to transfer and one which I think exhibits all of the same basic differences between the two stackers - that were apparent in the Iron Flash stack.

Here is the Iron Flash thread: http://www.photomacrography.net/forum/v ... php?t=9333

Here's a link to the stack frames: http://tesselator.gpmod.com/Images/_Equ ... cker_Test/

And here is the flip comparison:

Image

Anyone so inclined please feel free to DL these images and do with them as you like. If you make a million dollars with them I want thirty percent though! :D

ChrisR
Site Admin
Posts: 8671
Joined: Sat Mar 14, 2009 3:58 am
Location: Near London, UK

Post by ChrisR »

Hmm. Some of the "features" of the images have brought out the worst in the stackers, perhaps. Features like blown highlights and out-of-focus bands, eg between frames 34 and 35.
As a way of contributing more than just negatives, I ran it through Photoshop's stacker, and got this. Surprisingly, unusually, it's at least as good, at first look, I think.
NB this breaks the forum rules about not posting images in other people's threads. Say the word and it goes.
Image

To see them side by side, assuming you're using Internet Explorer, hit Ctrl-N for a duplicate view. Then resize the two windows.
FWIW I tried Dmap too - lots of nasty areas as usual, though it may be better with tinkering.
PS was the only one which didn't create blown repeated fringes on the washer, on the right.

rjlittlefield
Site Admin
Posts: 23597
Joined: Tue Aug 01, 2006 8:34 am
Location: Richland, Washington State, USA
Contact:

Post by rjlittlefield »

ChrisR wrote:NB this breaks the forum rules about not posting images in other people's threads.
It's OK here in Technique and Technical Discussions. We modified the guidelines some time back so that rule only applies to the image galleries.

I'll post a discussion later.

For now, let me post what I think is a good result. This one comes from ZS DMap ER=10 SR=5, retouched mostly from individual frames and a little bit from PMax, but using PMax broadly as a tool to highlight areas that needed attention.

Image

For reference purposes, let me also include this gridded version so that we can clearly indicate which areas we're talking about.

Image

--Rik

rjlittlefield
Site Admin
Posts: 23597
Joined: Tue Aug 01, 2006 8:34 am
Location: Richland, Washington State, USA
Contact:

Post by rjlittlefield »

OK, I have time now for some discussion. I also ran the stack through HF Method A, using default parameters, just to cover the bases.

Let's play "stacking bingo".

G7 and G8. The hard-edged blown out specular reflection is tough on all the software. HF method A produces a fine pattern of "rings" in G7, but gets the lower edge of the washer correct in G8. HF Method B produces a bolder coarse pattern of rings in G7, and it also misses focus on the lower edge of the washer in G8. Photoshop does good with the reflection in G7, but misses focus in G8. ZS PMax is sort of like HF A, with fine rings in G7 and correct focus in G8. ZS DMap is similar, fine rings in G7 and correct focus in G8. No software succeeds in correctly using just the one frame that shows the reflection in focus in G7, and also the bottom of the washer in focus in G8.

B8 and B9. HF A gets this area pretty much correct. HF B fails to capture background texture in B8. In the example posted by Tesselator, HF B also produces a dark smooth ring, but I think that's because one source frame is a bit dark and probably brightness correction is turned off. Photoshop is a disaster in this area, giving a broad loss-of-detail halo. ZS gets this area correct in both PMax and DMap.

B7 and C7, above the reflection. Everything except Photoshop gives rings above the reflection. Photoshop does not give rings, but it somehow manages to grossly darken the flat surface of the washer in C6 and C7, completely losing tone and detail that is clearly shown in the original source frame PICT0735.JPG. Neither HF nor ZS loses tone and detail here.

C1. HF A and B missed focus at the end of the bolt and down into the apex of the first thread. Photoshop also missed the end of the bolt, but got the apex of the first thread OK. ZS got these parts correct, both PMax and DMap.

D2 and D3. The threads here do not appear sharply focused in any source frame. All packages except Photoshop put bright rings around the reflection.

H4. There's a fine hair in this cell, sharply captured in one source frame. HF A gets most of it, but merges it with an intense halo around the bolt. HF B misses most of it, Photoshop misses all of it. ZS PMax catches the whole thing clean, ZS DMap gets most of it but loses the base of it as the depth map transitions to the rear of the washer.

E9. Photoshop did something funny with the tones and colors in this area. In the original source frames and in the HF and ZS outputs, the metal is a fairly uniform color with a slight pinkish cast. Photoshop's version is much darker and has some mottling between green and magenta.

Oops, nobody got a Bingo!

Just personally, I would not be happy with any of the fully automated results. So the question becomes, which tool or combination of tools gets me what I want with the least work?

In ZS, I can start with the DMap result, flash to compare with PMax to identify problematic regions, and fix those up by brushing from either individual source frames or from the PMax output. In this particular case, most of the retouching was from individual source frames. The only PMax output I used was for that troublesome hair in H4.

In HF, there is no "flash to compare" function, or at least I don't know of one, so it's harder to spot where the problems are. There is also no convenient way to retouch from another output. I can do it by exporting to Photoshop, but that loses alignment with my source frames. Or there's a multistep workaround that involves saving outputs, bringing them back in as inputs, repeating some of the stacking, and hoping nothing gets scrambled in the process.

In Photoshop, well, I don't think I want to go there. Just handling those big loss-of-detail halos around the bottom part scares me off. If I were prepared to ignore those, then I could probably figure out how to clone the other stuff.

For this particular example, given my standards and skills, the choice is pretty clear: I can get a better result with less work in ZS than I can in either of the other tools.

People with different standards and skills can quite reasonably reach other conclusions.

It's clear that there is a lot of room for improvement in all three packages.

The default parameters for ZS DMap don't work very well for this stack -- I had to double the region sizes. It's a completely fair question to ask how I knew to do that. The answer is what I've written before here in the forum -- shrink the image until it looks sharp, then expand the default parameters by the same ratio. In this case, shrinking the source images by 2X makes them look reasonably sharp, so I doubled the region sizes. But there are no hints built into the software to suggest that this might required, and documentation on the ZS website is still pretty vague on this issue.

In general, I am frustrated by software's inability to recognize situations that a human can figure out quickly and effortlessly. What causes the "rings" around specular reflections is that even the OOF versions of those reflections have pretty sharp edges, which the software takes as detail to be preserved. In contrast, a human will immediately look at the sequence of source frames and say "oh, that big white thing is just an OOF highlight, we should ignore that". I will be a happy man (for a few minutes) when I finally figure out how to do that automatically.

--Rik

rjlittlefield
Site Admin
Posts: 23597
Joined: Tue Aug 01, 2006 8:34 am
Location: Richland, Washington State, USA
Contact:

Post by rjlittlefield »

For completeness, I guess I really should post out the HF Method A result (default R=8, S=4).

Image

--Rik

rjlittlefield
Site Admin
Posts: 23597
Joined: Tue Aug 01, 2006 8:34 am
Location: Richland, Washington State, USA
Contact:

Post by rjlittlefield »

One last little oddity...

I am intrigued by the apparent geometry of the hex nut in this image.

I presume that this is a traditional hex nut, in which opposite faces are parallel.

But in this image, the left and right faces appear to be non-parallel, with the rear parts farther apart then the front parts.

This is not an "optical illusion" in the common sense of misleading the eye by strange surroundings.

Instead, I am pretty sure it is the result of using a lens combo that has inverted perspective --- farther is bigger.

This is a fairly common occurrence when using a lens combo or adding strong closeup lenses in front of a telephoto lens whose entrance pupil (by itself) is pushed back farther than the focal length of the added front lens. See discussion HERE.

Tesselator, can you tell us exactly what optics were used to shoot this image?

--Rik

elf
Posts: 1416
Joined: Sun Nov 18, 2007 12:10 pm

Post by elf »

The combination I'd like to see is ZS + Photoshop where the initial stack is done in ZS, then importing the stack plus aligned images into Photoshop for editing. I'm much more comfortable working with the editing tools in PS than in ZS.

ChrisR
Site Admin
Posts: 8671
Joined: Sat Mar 14, 2009 3:58 am
Location: Near London, UK

Post by ChrisR »

Looking at the PS effort (because it's simple) a bit more, what it seems to do is simply use a BROAD brush to decide which parts of which frames have the details, and patch them together. Small scale detail like that hair are lost, if they're in an area where there's more sharp stuff in another frame.
Then it does a "blend tones and colors" to hide the edges of the selections from the different frames. This bolt is pretty monochromatic, but comparison between tonally blended, and unblended outputs show some strange lightenings and darkenings, as on that washer.

It would appear that because its selection brush is so broad, it doesn't generally see OOF highlight edges as detail. They are quite objectionable, so the writers would have compromised a lot to avoid them. It certainly isn't easy to retouch the output image in PS without hitting problems.
In an area that has only fine low contrast detail, it seems to be a lottery whether you'll get that, or a completely OOF patch from another frame.

This shows the edges of the masks which PS applied: (Here the layers are NOT "blended" for colour and tone.
Image


Dmap "shrink the image until it looks sharp". Still scratching my chin over that. Sharp all over, or just sharp somewhere? What's the downside of moving the slider too far to the right? Does it become like the PS "broad brush"? (Maybe I don't produce enough images with large OOF areas!).

Probably by getting the numbers wrong, I've found that Dmap outputs can need retouching in lots of small areas - too many to find. Pmax digs out more detail, with less "mush". Pmap highlights usually need retouching with original image stuff. Maybe more so than Dmap, but not a lot? Avoid having OOF highlights!
So why use Dmap at all? It's true that Pmax can boost the contrast rather, but everything goes through "Curves" anyway.

(There are some odd colour shifts around. Some of the above are much yellower than others. I think it's PS doing it but I'm not sure where!)

Tesselator
Posts: 388
Joined: Sat Mar 27, 2010 11:40 pm
Location: Japan
Contact:

Post by Tesselator »

Color shifts? If you mean from surface to surface (part to part) then it's probably my lighting as well. I used two halogen mic lamps to simulate the harsh contrasts and OOF specular hits of the Iron Flash stack. Halogen is very yellow and some parts of the bolt assembly steel is very blue. I think the WB for the white paper was 2650 or 2700 kelvin. Also I think that bottom potting nut is plated brass - maybe nickel plated? So the gouges that penetrate the platting reveal the yellowish metal beneath.


Also just to add my own comments besides agreeing with everything that's been said so far: I think the small detail in HF B is more resolved overall than in ZS. You can see this very well across the entire bottom potting nut. The specks and scratches seem sharper and more contrasty to me - "more resolved". Some of it is of curse due the fact that there's a less halos too but not all of it.

Which software is "better" I'm not qualified to offer an opinion about nor do I really have any clue at this point. From these limited experiments my initial impression is that they both have their strengths and weaknesses and also that there's usually a solution for any of their weaknesses - not to mention more than a few ways to combine their strengths.

I recently did a flower in just a few (10) slices so I'll put that through both stackers as well and see how that goes. It's not a high contrast faceted subject with many harsh specular hits so the results will likely be very different than those in this and the Iron Flash threads.

ChrisR
Site Admin
Posts: 8671
Joined: Sat Mar 14, 2009 3:58 am
Location: Near London, UK

Post by ChrisR »

Colour shifts - no, I meant in post processing! Compare the parts where the brass is exposed, say between the initial image(yours) and mine in the next post.

For pixel-peeping sharpness, avoid jpegs as much as poss, use Tiffs for Zerene. Use lots of frames too. A "standard" circle of confusion used for depth of field calcs is 1/1000 of frame width, but that's mebbe 4 pixels... :evil:

Tesselator
Posts: 388
Joined: Sat Mar 27, 2010 11:40 pm
Location: Japan
Contact:

Post by Tesselator »

OIC, thanks for clarifying.

These are jpegs for the sole reason of web transfer. I wanted something with a large enough frame size yet small enough file-size to transfer. I probably should have used JPG2000 but oh well. :)

The blown out specular hits were on purpose as well - trying to simulate the Iron Flash stack. So was the lens bloom. :)

Those attributes/phenomenon combined with micro surface detail are primarily the characteristics (I think) that led to the discussion in the original thread. So that's what I was trying to simulate in this smaller stack.

But of course i know you're right. For the best results, no lossy compression, proper lighting, and proper exposure settings are very important!

ChrisR
Site Admin
Posts: 8671
Joined: Sat Mar 14, 2009 3:58 am
Location: Near London, UK

Post by ChrisR »

The combination I'd like to see is ZS + Photoshop where the initial stack is done in ZS, then importing the stack plus aligned images into Photoshop for editing. I'm much more comfortable working with the editing tools in PS than in ZS.
The tools are thereish in PS, but I don''t know how a PC would handle hundreds of images all open at once. Slowly, I'd imagine! For a few frames, no problem though? ZS produces Aligned Preview images. You could open them (all) in Bridge to scan through to see which one you want. You could then copy a source image from your camera to PS, and align it in there with the Output image. Probably not exactly, though!

You can copy chosen files to Layers in PS. In CS3 it was a sort of add-on script, but it's a "feature" of CS4

It's true of course that the "brush" in PS is very flexible. Variable hardness for one, and "Darken", "Lighten", "Color" etc, modes. I know these are somewhere on Rik's list!

For non-PS users, eg "Darken" is a mode when you can copy one area to another only where the source is darker than the destination. So if your destination is grey, and your source is a dark bristle with a light halo round it, you can copy the bristle across without the halo. Good for giving baldies more hair!

Tesselator
Posts: 388
Joined: Sat Mar 27, 2010 11:40 pm
Location: Japan
Contact:

Post by Tesselator »

ChrisR wrote:
The combination I'd like to see is ZS + Photoshop where the initial stack is done in ZS, then importing the stack plus aligned images into Photoshop for editing. I'm much more comfortable working with the editing tools in PS than in ZS.
The tools are there in PS, but I don''t know how a PC would handle hunderds of images all open at once. Slowly, I'd imagine! For a few frames, no problem though?
You can copy chosen files to Layers in PS. In CS3 it was a sort of add-on script, but it's a "feature" of CS4
Do I hear a request for ZS as a PS plug-in? :D But actually I've been wondering the same thing since you fist said that. I've had 200, 300, and 500 layers open in a single file in CS4 and it's really not all that slow - nor a speed demon for that matter. Move to 16bit however, and things really begin to slow down a lot. I guess most stacks are between 20 to 60 images so as long as that's like 12 mpx or under and in 8-bit it should be relatively fast. As you noted it's not doing high precision calculations.
It's true of course that the "brush" iin PS is very flexible. Variable hardness for one, and "Darken", "Lighten", "Color" etc, modes. I know these are somewhere on Rik's list!
Ah, ZS IS Rik's development then? I was wondering about that. I couldn't decide if he was just a very ardent user and interested in teaching/spreading technique and limitations or if he was developing ZS or HF. Are there others on the project as well or is it just RJ? Anyway, this more fully explains the desire for the original stack data. I didn't know.
For non-PS users, eg "Darken" is a mode when you can copy one area to another only where the source is darker than the destination. So if your destination is grey, and your source is a dark bristle with a light halo round it, you can copy the bristle across without the halo. Good for giving baldies more hair!
Yup, you can use brushes (or layer masks) in that mode as well. Set to a lower (than 100%) opacity and given some softness (hard = <50% "feather") the edits can look very natural for this kind of thing. Good tip Chris!

elf
Posts: 1416
Joined: Sun Nov 18, 2007 12:10 pm

Post by elf »

Tesselator wrote:
ChrisR wrote:
The combination I'd like to see is ZS + Photoshop where the initial stack is done in ZS, then importing the stack plus aligned images into Photoshop for editing. I'm much more comfortable working with the editing tools in PS than in ZS.
The tools are there in PS, but I don''t know how a PC would handle hunderds of images all open at once. Slowly, I'd imagine! For a few frames, no problem though?
You can copy chosen files to Layers in PS. In CS3 it was a sort of add-on script, but it's a "feature" of CS4
Do I hear a request for ZS as a PS plug-in? :D But actually I've been wondering the same thing since you fist said that. I've had 200, 300, and 500 layers open in a single file in CS4 and it's really not all that slow - nor a speed demon for that matter. Move to 16bit however, and things really begin to slow down a lot. I guess most stacks are between 20 to 60 images so as long as that's like 12 mpx or under and in 8-bit it should be relatively fast. As you noted it's not doing high precision calculations.
Currently saving a ZS project saves the aligned (and unaligned) images in a compressed format with a file size of 200 bytes. It would be nice to have an option to save the full size aligned images.

Just loading the originals loses the alignment and PS isn't really good enough to realign them exactly the same as ZS. Using PS to do the original focus stacking is a total waste of (lots and lots of) time for anything more than 5 images. I don't have any problem loading 100 images into a single image in PS4. PS3 had a hardcoded limit of 100.

rjlittlefield
Site Admin
Posts: 23597
Joined: Tue Aug 01, 2006 8:34 am
Location: Richland, Washington State, USA
Contact:

Post by rjlittlefield »

ChrisR, thanks for the further explanation of what Photoshop does. The approach of generating masks that fit into the standard Photoshop "layers" model is one that I played with back in 2004, as an experimental modification to the Panorama Tools package. It was promising at first, but I never could figure out how to make retouching convenient, so eventually I went in other directions.
ChrisR wrote:Dmap "shrink the image until it looks sharp". Still scratching my chin over that. Sharp all over, or just sharp somewhere?
Sharp at the places you care about. The biggest drawback to all the depth map algorithms currently out there is that they use the same neighborhood sizes over the whole image. This works well if the subject has similar types of detail everywhere, not so well if some areas are rich in fine high contrast detail while others have only fuzzy smears. An exemplary "tough subject" for depth map algorithms would be something like a fuzzy-patterned cowrie shell on a pile of fishing net. In the area of the net, the evaluation neighborhoods need to be small in order to capture the overlapping layers of netting. But on the cowrie shell, those small neighborhoods will not be able to detect detail reliably and the depth map will have lots of mistakes. For the shell, larger neighborhoods are needed.
What's the downside of moving the slider too far to the right? Does it become like the PS "broad brush"?
There are three sliders: contrast threshold, estimation radius, and smoothing radius. Generally it is safe to just set smoothing radius = 1/2 estimation radius, so we can ignore that one. Yes, sliding estimation radius too far right gives big neighborhoods, and "broad brush" is a good description. Sliding contrast threshold too far right causes too many locations to become "unknown depth", at which point Murphy's Law implies that incorrect depths will be filled in and you'll get OOF blurs in those regions.
So why use Dmap at all? It's true that Pmax can boost the contrast rather, but everything goes through "Curves" anyway.
PMax boosts contrast by different amounts at different places in the image. Sometimes a PMax output will look like significantly different illumination was used. PMax also alters colors in ways that can be difficult to put back to the originals. PMax is always noisier at the pixel level than DMap. In general, DMap is more faithful to the original pixels, when it makes the correct determination of which frame is sharpest.
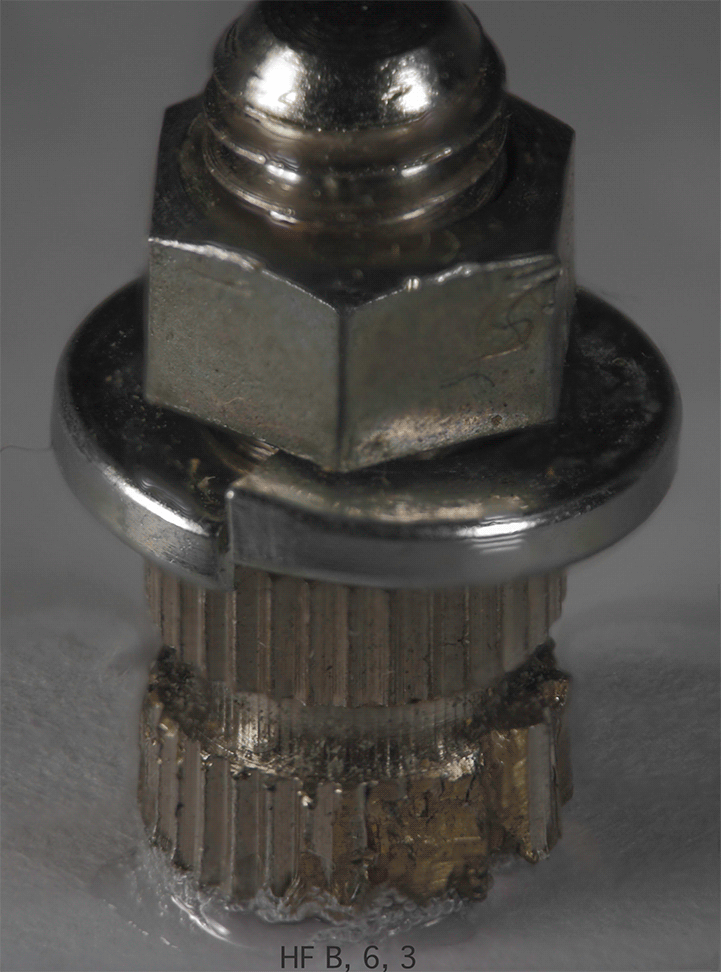
Tesselator wrote:I think the small detail in HF B is more resolved overall than in ZS.
That's definitely true for this test stack, and I'm looking into that to see what's going on. There are interactions between a lot of aspects: image alignment, perspective changes within the stack (due to entrance pupil movement), focus step spacing, and feathering of region boundaries. Brightness correction may play some role too.
I recently did a flower in just a few (10) slices
One common glitch is to underestimate the number of slices needed to get a clean result. In extreme cases, I have seen people shoot just a few slices, unevenly spaced, focusing on what they considered interesting detail. The resulting composites show the interesting detail, but they generally have some unpleasant halos as well. Best results are achieved by using a fine uniform focus step, so that the software gets to see subject details go out of focus gradually.

Note ChrisR's comment that the standard DOF calculation yields blur circles that are several pixels wide at the midpoints between focus planes. To get results that look uniformly sharp at the pixel level, it's necessary to shoot at what are often surprisingly small focus steps.
[brushes] I know these are somewhere on Rik's list!

True. It's a long list. I need never fear boredom.
...it's not doing high precision calculations.
The precision is higher than you might imagine. The best algorithms require substantially more bits than each pixel does, so 16-bit pixels turn into 32-bit arithmetic and storage. I don't know what Photoshop does. ZS does not discriminate between 8- and 16-bit input. Everything gets processed the same way. I believe that HF does the same thing. CombineZP does not handle 16-bit input at all, but even so, there are stages where it goes through 32-bit precision.
I couldn't decide if [Rik] was just a very ardent user and interested in teaching/spreading technique and limitations or if he was developing ZS or HF.

Most of the above. I was an ardent user and promoter of stacking software long before ZS was even imagined. I starting posting comparisons of stacking software back in 2004, with CombineZ4 and Helicon Focus 2.03. Things were fairly crude back then -- if I recall correctly, HF had no image alignment until version 3. I started developing Zerene Stacker in late 2008, when my situation changed so that that made sense. ZS got released as a basic-functionality beta in early 2009 and has been slowly expanding since then. Obviously I know the guts of ZS pretty intimately. I've read a lot of CombineZP and contributed some of its key algorithms. About HF, all I have is "outside information" -- whatever I can glean from its documentation and behavior.

Regarding technique and limitations, I'm afraid that I have incurable "truth in advertising" syndrome. The group I used to work for quickly discovered that I was not the best person to write proposals, if you catch my drift...
elf wrote:Currently saving a ZS project saves the aligned (and unaligned) images in a compressed format with a file size of 200 bytes. It would be nice to have an option to save the full size aligned images.

A clarification... ZS does save a description of each aligned image in about 200 bytes, as part of the project file. The actual high quality aligned images are recomputed on the fly as needed. ZS also saves very low quality JPEG copies of the aligned images, solely to provide fast navigation when retouching. Those images are typically 100-400 KB, depending on image size and complexity. Exporting high quality aligned images is on the to-do list.

--Rik

Post Reply Previous topicNext topic