Hard Drive Read / Write Head

Images taken in a controlled environment or with a posed subject. All subject types.

Moderators: rjlittlefield, ChrisR, Chris S., Pau

steveminchington
Posts: 215
Joined: Sun Jul 22, 2012 2:30 pm
Location: Bedford UK

Hard Drive Read / Write Head

Post by steveminchington »

I was going to list this as a mystery object, but unless you take hard drives apart, you probably won't have seen one before. I can't believe how they manufacture things this small - check out the writing on it too - you can see it's made by IBM. I think this is one piece of computer technology that will eventually disappear like the CRT monitor, and be replaced by solid state memory.

Nikon CFN Plan 10x 0.3, Pmax + Dmap, retouched in Zerene and finished off in GIMP.

Image

mawyatt
Posts: 2497
Joined: Thu Aug 22, 2013 6:54 pm
Location: Clearwater, Florida

Post by mawyatt »

Beautiful image Steve!! What lighting did you use?

steveminchington
Posts: 215
Joined: Sun Jul 22, 2012 2:30 pm
Location: Bedford UK

Post by steveminchington »

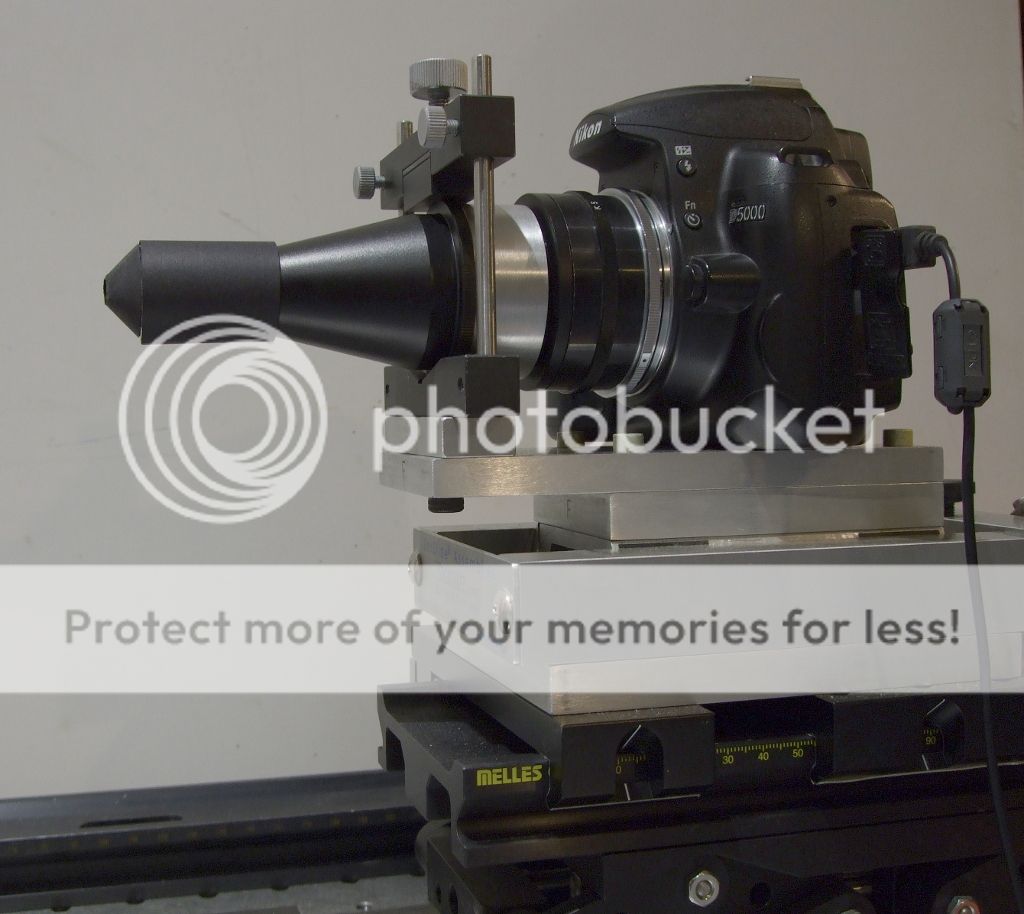
Thanks Mawyatt... I used a low powered LED ring light with vellum paper diffuser - a black paper mask on the end of the objective to stop it reflecting any light, and a small white card reflector above to put a bit more light in the top. I checked the lighting a couple of times on the computer before running the stack.

mawyatt
Posts: 2497
Joined: Thu Aug 22, 2013 6:54 pm
Location: Clearwater, Florida

Post by mawyatt »

steveminchington wrote:Thanks Mawyatt... I used a low powered LED ring light with vellum paper diffuser - a black paper mask on the end of the objective to stop it reflecting any light, and a small white card reflector above to put a bit more light in the top. I checked the lighting a couple of times on the computer before running the stack.
You are welcome sir.

The black paper mask , was that on the objective barrel and/or on the lens front? How many stacks did you use?
My questions are related to the silicon chip images I do. I am trying to improve the micro-contrast.

Cheers,

Rylee Isitt
Posts: 476
Joined: Fri Apr 13, 2012 3:54 pm
Location: Canada
Contact:

Post by Rylee Isitt »

Great image... a wonderful source of inspiration for me, as I normally limit myself to biological things... but I have so many electronics around that I should be exploring as well!

This might seem crazy, but I have used a black sharpie (it's removable with ethanol anyway) to dull the shiny aluminum barrel tips on some of my objectives. I tried doing some dark field at some point and found that doing this slightly improved the contrast. I just was very careful not to get ink on the surface of the lens, haha. I don't think I'd want to do this with more expensive objectives, though.

steveminchington
Posts: 215
Joined: Sun Jul 22, 2012 2:30 pm
Location: Bedford UK

Post by steveminchington »

mawyatt wrote:
The black paper mask , was that on the objective barrel and/or on the lens front? How many stacks did you use?
The hard drive shot was a stack of 19, and the paper is around the barrel and on the end of the objective as in this picture...

Image

That's a great shot of the chip - I had the same problem with the gold wires though - they reflect a lot of light.

Thanks Rylee - I like engineering and electronic things to photograph, especially the really tiny stuff being made now.
I don't think it's crazy using a sharpie - I was going to paint mine with acrylic paint but then I thought it was a bit risky so I used paper instead. I glued the cone on the end with some non-acidic photo glue. It comes off really easily.
There's a plentiful supply of scrap electronics at the local recycling centre! Have fun!

Rylee Isitt
Posts: 476
Joined: Fri Apr 13, 2012 3:54 pm
Location: Canada
Contact:

Post by Rylee Isitt »

Yeah, I've got my own scrap yard going on, too, in a way... I often help friends and family out with their computers, but sometimes they are beyond sensible repair, like the last laptop with a completely dead motherboard. In those cases they usually just want their files off the HD, and to be rid of the machine. So I currently have a broken down Dell from 2003 sitting in my home... the HD, RAM, and LCD screen still work so I was thinking I might do something with it. Rig the LCD screen up to an RPi, perhaps.

This is also how I got my ample supply of bright white backdrops, diffusion plastic and polarizing film. LCD screens are full of this good stuff, and the power inverters sometimes go bad after a number of years (bad capacitors is my guess). An easy enough part to replace but after the cost, shipping, and whatnot it is often easier to just buy an entirely new screen.

I assume this view is of the surface of the read head that faces away from the platter, and that those mesh contacts go through to the other side?

mawyatt
Posts: 2497
Joined: Thu Aug 22, 2013 6:54 pm
Location: Clearwater, Florida

Post by mawyatt »

steveminchington wrote:mawyatt wrote:
The black paper mask , was that on the objective barrel and/or on the lens front? How many stacks did you use?
The hard drive shot was a stack of 19, and the paper is around the barrel and on the end of the objective as in this picture...

Image

That's a great shot of the chip - I had the same problem with the gold wires though - they reflect a lot of light.

Thanks Rylee - I like engineering and electronic things to photograph, especially the really tiny stuff being made now.
I don't think it's crazy using a sharpie - I was going to paint mine with acrylic paint but then I thought it was a bit risky so I used paper instead. I glued the cone on the end with some non-acidic photo glue. It comes off really easily.
There's a plentiful supply of scrap electronics at the local recycling centre! Have fun!
Steve,

Thanks for the info, your setup looks really good and stable. Yeah the wire bonds are highly reflective, but the small (75 micron) solder balls that are used for flip chip mounting some chips face down are really a problem. They are like little spherical mirrors. I was able to deal with this by using a double light tent (one inside the other) with 4 double diffused strobes and 3 double diffused light sources. This produced a very even light source across the chip and the shinny solder balls.

I like the black paper idea, I'll give this a try to see if it helps with the micro-contrast.

Thanks again for all the help. BTW the moderator doesn't want me to post images on this thread, that's why the chip image was removed and I can't show some of the chips with solder balls on this thread.

Cheers,

Mike

rjlittlefield
Site Admin
Posts: 23604
Joined: Tue Aug 01, 2006 8:34 am
Location: Richland, Washington State, USA
Contact:

Post by rjlittlefield »

mawyatt wrote:BTW the moderator doesn't want me to post images on this thread, that's why the chip image was removed and I can't show some of the chips with solder balls on this thread.
I must have blinked and missed that one. Anyway, right, the forum has a policy of not posting images in other people's gallery threads without prior permission from the original poster (the thread owner). But I've seen some of your images and I know they're well worth posting in their own right. How about creating a new thread and referencing it from here?

--Rik

GemBro
Posts: 261
Joined: Wed Aug 20, 2014 5:20 pm
Location: Surrey [UK]

Post by GemBro »

I can't believe this :shock: ... I've just spent the last 2 days stripping an old HDD down to photograph the head (being IT driven I have a ton of stuff like this) ...

Great image btw Steve ... full on head shot ... nice ...

Although mine has not come out like yours (at all) mine is at an angle ... but I'm getting light spikes on the wires from somewhere ... I'm using a Vellum tracing paper & a ping pong ball ... but now reading how you masked your lens that's probably where I am going wrong ... got nothing at all around the lens like that ... also I was stacking at about 100+ so maybe I need to lower that a bit lol ...

Anyhow I think I'll go and look for a different subject now :D
Last edited by GemBro on Wed Dec 17, 2014 9:57 am, edited 1 time in total.
Canon 550D(T2i) ML (Nightly Builds) | Canon 5D MKII | Raynox 250 | Palinar 35mm f2.8 (reversed) | EL-Nikkor 50mm f2.8 N | EL-Nikkor 50mm f4 N | EL-Nikkor 50mm f4 | Bellows | Objectives: LOMO 3.7x 0.11 : 8x 0.20 : 40x 0.65
RiG II - 'Bamboo': Olympus CH Focus Block with Inverted Arca/Swiss | Canon 430 EX (x2) | Olympus T20 flash (x2) | Youngnuo YN-622C Wireless triggers (x3) | Ikea Jansjo 3W LED Lighting (x3)
Stepper Motor Focusing System (Helicon Remote)

Chris S.
Site Admin
Posts: 4045
Joined: Sun Apr 05, 2009 9:55 pm
Location: Ohio, USA

Post by Chris S. »

Steve, nice job on an interesting subject. :D

Gem, let's see your angle on this, too!

--Chris

steveminchington
Posts: 215
Joined: Sun Jul 22, 2012 2:30 pm
Location: Bedford UK

Post by steveminchington »

Rylee - Yes, I had a whole room full of computer stuff but I had to be ruthless and scrap it all! People give me a lot of stuff to fix too. The view is on the end of the arm - the platter fits between the 'pickup coils' - they are sprung together.

Mike - You're welcome - I wondered where your image had gone! It would be good to see it on another thread. I like the idea of the double light tent.

GemBro - Thanks... looks like I just beat you to it! I'd like to see your shot at an angle - I did try myself but found the arm was too difficult to mount at an angle without it moving, so I ended up clamping it flat down.

ChrisS - Thank you... I'm going to try a shot of the whole arm next. Hmmm... lots of shiny metal - maybe I will need to try Mike's light tent!

GemBro
Posts: 261
Joined: Wed Aug 20, 2014 5:20 pm
Location: Surrey [UK]

Post by GemBro »

Chris ... creating a post now ...

Steve ... I took the whole arm out of mine, as it's made from Aluminium and so it held in place a lot easier with a big clamp, I have on the Rig ...

I am doing a post now, which involves my new stacking system and this subject seemed like a good idea (at the time) mainly because it is a solid subject and doesn't move at all ... plus found the drive while having a clear out of old I.T. gear ...
Canon 550D(T2i) ML (Nightly Builds) | Canon 5D MKII | Raynox 250 | Palinar 35mm f2.8 (reversed) | EL-Nikkor 50mm f2.8 N | EL-Nikkor 50mm f4 N | EL-Nikkor 50mm f4 | Bellows | Objectives: LOMO 3.7x 0.11 : 8x 0.20 : 40x 0.65
RiG II - 'Bamboo': Olympus CH Focus Block with Inverted Arca/Swiss | Canon 430 EX (x2) | Olympus T20 flash (x2) | Youngnuo YN-622C Wireless triggers (x3) | Ikea Jansjo 3W LED Lighting (x3)
Stepper Motor Focusing System (Helicon Remote)

mawyatt
Posts: 2497
Joined: Thu Aug 22, 2013 6:54 pm
Location: Clearwater, Florida

Post by mawyatt »

steveminchington wrote:Rylee - Yes, I had a whole room full of computer stuff but I had to be ruthless and scrap it all! People give me a lot of stuff to fix too. The view is on the end of the arm - the platter fits between the 'pickup coils' - they are sprung together.

Mike - You're welcome - I wondered where your image had gone! It would be good to see it on another thread. I like the idea of the double light tent.

GemBro - Thanks... looks like I just beat you to it! I'd like to see your shot at an angle - I did try myself but found the arm was too difficult to mount at an angle without it moving, so I ended up clamping it flat down.

ChrisS - Thank you... I'm going to try a shot of the whole arm next. Hmmm... lots of shiny metal - maybe I will need to try Mike's light tent!
Steve,

Don't want the moderators mad at me, I remember from Star Wars, "Don't tick off the Wooky!!" :D . So I'll create another thread with some chip images

Best,

Mike

ChrisR
Site Admin
Posts: 8671
Joined: Sat Mar 14, 2009 3:58 am
Location: Near London, UK

Post by ChrisR »

You won't, if you stick to the "forum etiquette"!
Posting your own image and asking for help with it which you did, should be done in your own thread rather than someone elses. As I suggested, you can make links between threads. You can also post an image in another's thread with prior permission from the thread owner.

Post Reply Previous topicNext topic