How far can i get with a set like this

Starting out in microscopy? Post images and ask questions relating to the microscope and get answers from our more advanced users on the subject.

Moderators: rjlittlefield, ChrisR, Chris S., Pau

Daumantas
Posts: 39
Joined: Thu Dec 11, 2014 3:46 pm
Location: Lithuania
Contact:

How far can i get with a set like this

Post by Daumantas »

Hi, guys!
i'm new to this forum (and very impressed by it's content and data base of knowledge). I was experimenting in microphotogrpahy with binocular microscopes and cameras i have. I purchased that equipment mainly for insect identification and only much later got interested in photography abilities.

So my humble set contains:
Zenith ST-400 and Motic SFC 18/28 micrscopes (both binocular)
2mpix CMOS camera (microQ) and Pentax K7.

So far, best results i could reach in microphotography are here:
http://www.dliekis.lt/wp-content/upload ... -x-446.jpg
http://www.dliekis.lt/wp-content/upload ... -x-464.jpg
http://www.dliekis.lt/wp-content/upload ... 00x525.gif
http://www.dliekis.lt/wp-content/upload ... -x-525.jpg

I'm not very pleased with it. After watching some pictures on this forum i feel a complete novice :D

Could someone please tell me how could I improve my images with a set i have (maybe I need to use more lighting). I also plan to upgrade myslef to trinocular micrsocope soon, so any advises regarding this are also welcome.

rjlittlefield
Site Admin
Posts: 23603
Joined: Tue Aug 01, 2006 8:34 am
Location: Richland, Washington State, USA
Contact:

Post by rjlittlefield »

Welcome aboard!

To my eye, the images that you've linked to look pretty good, realizing that they're not focus-stacked and that they're only shown at 700 pixels wide.

In particular there's a notable lack of serious chromatic aberration in the first image, and the lower left corner looks reasonably sharp. Upper right is not so good, but that could be just out of focus.

I would be curious to know what they look like when shown bigger, say as actual-pixels crops.
After watching some pictures on this forum i feel a complete novice
Yeah, me too. The feeling never goes away, but after a while it doesn't bother anymore.

--Rik

Daumantas
Posts: 39
Joined: Thu Dec 11, 2014 3:46 pm
Location: Lithuania
Contact:

Post by Daumantas »

Thanks for your comment, Rik!

Chromatic aberration might occur in first picture, because it was taken using DIY DSLR adapter to eyepiece.

At the moment i'm lost - should i concentrate on tiking pictures with CMOS, or should i continue with DSLR?

What is the best software for stacking? I used PS6, but results were not so good. Are there any good links for focus stacking you would recommend?

I give you some pictures in higher resolution (i used to think my biggest problem is poor light source).

These were taken with CMOS camera:
http://www.dliekis.lt/wp-content/upload ... -06-46.jpg
http://www.dliekis.lt/wp-content/upload ... ogunas.jpg
http://www.dliekis.lt/wp-content/upload ... 2/ckr2.jpg

These with dslr:
http://www.dliekis.lt/wp-content/upload ... /zuvis.jpg
http://www.dliekis.lt/wp-content/upload ... druska.jpg
http://www.dliekis.lt/wp-content/upload ... rbuzas.jpg
http://www.dliekis.lt/wp-content/upload ... /kerpe.jpg

rjlittlefield
Site Admin
Posts: 23603
Joined: Tue Aug 01, 2006 8:34 am
Location: Richland, Washington State, USA
Contact:

Post by rjlittlefield »

should i concentrate on tiking pictures with CMOS, or should i continue with DSLR?
I would continue with the DSLR.
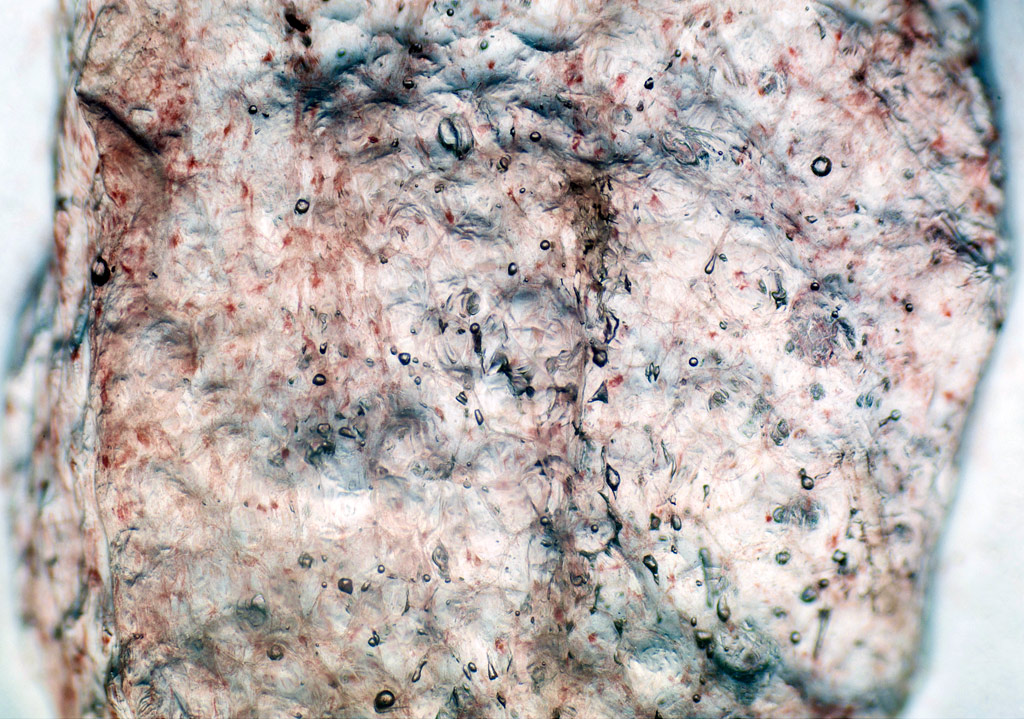
Your image at http://www.dliekis.lt/wp-content/upload ... /zuvis.jpg shows that you're getting uniform sharpness all across the frame.

There is some lateral chromatic aberration, visible as colored fringes around bright areas away from center. But this is not severe and it corrects nicely using Photoshop's filter for Lens Correction. (I used Filter > Lens Correction..., Custom tab, Chromatic Aberration section, adjust sliders for Fix Red/Cyan Fringe and Fix Blue/Yellow Fringe until the corners looked good, about +75 and -100.)

Your images are not as sharp as many shown by other people, but I think the problem there is just that you're using a low power stereo scope. The optics in those are optimized for long working distance and large depth of field, which necessarily sacrifices resolution. Nonetheless there is plenty of resolution to make an image that looks sharp at web resolution, say 1024 pixels wide.

Here is a copy of your zuvis.jpg that I have run through a typical post-processing workflow. First I corrected CA as described above. Then I resized the image from 5006 pixels wide to 1024 pixels wide using two steps of Photoshop's Image > Image Size > Bicubic (smooth gradients). The first step was 50%, to 2503 pixels wide, then the second step was from 2503 to 1024 pixels wide. Then I added just a bit of sharpness with Filter > Sharpen > Unsharp Mask, 40% at 0.7 pixels. Finally I saved as JPEG using File > Save for Web, adjusting the Quality setting so as to produce a file that is just under 300KB in length, suitable for uploading to the forum.

Image
What is the best software for stacking? I used PS6, but results were not so good. Are there any good links for focus stacking you would recommend?
I am not surprised. For this sort of work PS6 tends to leave lots of blurred areas, even where some source image had them sharp.

For software, I recommend Zerene Stacker. The standard disclaimer is that I'm biased because I wrote it, but objectively, it now produces more Nikon Small World awards than any other stacking software. Start with the PMax method, then make friends with DMap. There is a Tutorials section on the website.
i used to think my biggest problem is poor light source
For what you're doing, I think your light source is not a problem. The big things to watch for are these:

1. You want enough light that you can run the camera on its lowest ISO setting. This will give the lowest pixel noise, which is especially valuable for stacking.

2. Be sure that you have enough diffusion to minimize blowing out highlights. But don't make it so "flat" that you lose all indications of shape. This tradeoff is something that you'll just have to play with.

3. In the event that you're suffering from motion blur (vibration), then using an ordinary consumer-grade electronic flash unit set on low power can freeze out almost any motion. I'm not seeing evidence of motion blur in your images, but I mention this for completeness.

I hope this helps. Show us more pictures, please.

By the way, what is the subject shown in the image above?

--Rik

Daumantas
Posts: 39
Joined: Thu Dec 11, 2014 3:46 pm
Location: Lithuania
Contact:

Post by Daumantas »

Rik,
i don't know how to thank you enough for your time, effort and valuable advices! :)
So i guess, to achieve something sharp i will have to swith to trinocular?

Should i change picture resolution on my dslr to 1024? Or should i do it during the post-processing?
2. Be sure that you have enough diffusion to minimize blowing out highlights. But don't make it so "flat" that you lose all indications of shape. This tradeoff is something that you'll just have to play with.
I did not fully understand second point about diffusion?

BTW - what do you think about this shot of watermelon: http://www.dliekis.lt/wp-content/upload ... rbuzas.jpg

In the picture zuvis.jpg are scales of Gourami fish.

P.S.
I'm getting Zerene Stacker :)

rjlittlefield
Site Admin
Posts: 23603
Joined: Tue Aug 01, 2006 8:34 am
Location: Richland, Washington State, USA
Contact:

Post by rjlittlefield »

Daumantas wrote:So i guess, to achieve something sharp i will have to swith to trinocular?
Well, I'm still not sure exactly what you are using now. I am only guessing what you have now based on your comment that "I purchased that equipment mainly for insect identification". If you post a picture of your equipment and especially the markings on the objectives, then we can give better advice about what direction to consider next.
Should i change picture resolution on my dslr to 1024? Or should i do it during the post-processing?
I would keep the camera at full resolution and resize only in post-processing. If you set the camera to shoot smaller, you will irretrievably lose information. For my own work, the only time I reduce the camera resolution is if I am shooting many frames quickly and have to accept the lower resolution in order to sustain a high frame rate and reduce the storage needs.
2. Be sure that you have enough diffusion to minimize blowing out highlights. But don't make it so "flat" that you lose all indications of shape. This tradeoff is something that you'll just have to play with.
I did not fully understand second point about diffusion?
The ultimate in diffused illumination is to stick a white hemisphere over the subject and light up the hemisphere uniformly. If your subject has a bump, this type of lighting will illuminate all sides of the bump uniformly. This makes the bump very hard to see at all, and even harder to know that it's a bump instead of a pit. More directional illumination that comes down from the top of the frame will show off the shape better.
BTW - what do you think about this shot of watermelon: http://www.dliekis.lt/wp-content/upload ... rbuzas.jpg
Ah, watermelon! I had no idea what the subject was. That looks good, except that the color balance is too blue. Here is a version in which I have done a levels adjustment to make the color more neutral and increase the contrast so as to use the whole 0-255 range, then resized and sharpened slightly as discussed earlier.

Image
In the picture zuvis.jpg are scales of Gourami fish.
Thanks!

--Rik

Daumantas
Posts: 39
Joined: Thu Dec 11, 2014 3:46 pm
Location: Lithuania
Contact:

Post by Daumantas »

Thanks, watermelon now looks much more like watermelon :D

I'll take some pictures of my gear soon, so you could have a better idea of what i have.

Now, i have used your advices and Zerene Stacker (which i liked A LOT) - i took 11 shots of some uranium ore from my mineral collection and stacked it. I like the general improvement :)

Image

Daumantas
Posts: 39
Joined: Thu Dec 11, 2014 3:46 pm
Location: Lithuania
Contact:

Post by Daumantas »

So, as i promised - this is my set:

Recently i built myself an afocal mount, so here it is (although holds dslr in focal setup):
Image

...and here is the quick result of this fotoshoot (stacked) (of Cryptophagus family beetle):
Image

Here is one of my binocular micrscopes, which i usualy use with DIY focal adapter (dslr instead eyepiece):
Image

That is my other microscope, I use with afocal mount (50mm 1,4f lens):
Image

Here is unstacked photo of leaf taken with this microscope (X40):
Image

So, what should i do diferent to get better pictures? Should i obtain some more/other gear/optics? Or should i use different technique? So far I havent spent any money on photomicrography, except acquiring microscopes, which i bought for specimen identification.

rjlittlefield
Site Admin
Posts: 23603
Joined: Tue Aug 01, 2006 8:34 am
Location: Richland, Washington State, USA
Contact:

Post by rjlittlefield »

I think I see 4X and 10X objectives in your "other" microscope. Those will probably give much sharper pictures than the ones in the microscope you show first. My biggest concern is that the sharper objectives may not have enough working distance for you to illuminate opaque specimens when using them. But certainly the first thing to try is making a focus stack through that "other" microscope.

--Rik

Daumantas
Posts: 39
Joined: Thu Dec 11, 2014 3:46 pm
Location: Lithuania
Contact:

Post by Daumantas »

Thank you, Rik,
biological microscope (contains 4x, 10x and 40x objectives) - i will try to remove micrscope table and mount object right on focuser. Will let you know how it goes :)

Daumantas
Posts: 39
Joined: Thu Dec 11, 2014 3:46 pm
Location: Lithuania
Contact:

Post by Daumantas »

Here are some results after trying to take pictures with lenses on biological microscope (afocal). I did not even removed microscope table. Would i get more focal distance if i would do that?

100x butterfly (Aglais urticae) wing scales:
Image

40x
Image

rjlittlefield
Site Admin
Posts: 23603
Joined: Tue Aug 01, 2006 8:34 am
Location: Richland, Washington State, USA
Contact:

Post by rjlittlefield »

Daumantas wrote:I did not even removed microscope table. Would i get more focal distance if i would do that?
I'm not sure what you mean by "focal distance".

One phrase we often use is "working distance". That always means the space between the objective and the focus point. Removing the stage (table) will not change that.

Another important number is the maximum thickness of subject that can be focused. This is equal to the maximum distance between the objective and the stage, minus the working distance. There is no common short phrase to describe this distance. Maybe we should call it "maximum subject thickness".

Anyway, about your images...

The 100X wing scales look like they are mostly out of focus. There is only a small area at the bottom of the picture that looks in-focus. This is typical of using a 10X objective, because the depth-of-field (DOF) for a 10X NA 0.25 objective is only about 0.009 mm. The color appears to be very orange, even for Aglais urticae. I suggest to check your color balance by photographing a piece of white paper.

The 40X image bothers me a little more. It does not seem as sharp as it should be, even in the best focused areas. I am wondering if you are having some issues with motion blurring. If you have an external flash unit, it could be helpful to try shooting with that, because the very short flash time will freeze out whatever motion you might be having.

One other thing that would help us understand your results: show us some actual-pixel crops of the very sharpest areas of your pictures. By "actual-pixel crops", I mean find a sharp part of the image, crop around that area so that you have say a 600x1000 pixel region, then post those 600x1000 pixels without resizing them.

--Rik

Daumantas
Posts: 39
Joined: Thu Dec 11, 2014 3:46 pm
Location: Lithuania
Contact:

Post by Daumantas »

I'm not sure what you mean by "focal distance".
- yes, i meant that - my english vocabualary is poor when speaking about optics :)

Unfortunately, i have no external flash (i will get couple soon). At the moment, i tried to play with light sources i have and adjust cameras shutter speed.

I took 21 picture of same butterflies eye and croped it as you told (600x1000px). Here is the result:
Image

I'm starting to think, this is the best i can achieve with hardware i have. BTW, what are those spots on white background in picture? It appeared afetr stacking.

rjlittlefield
Site Admin
Posts: 23603
Joined: Tue Aug 01, 2006 8:34 am
Location: Richland, Washington State, USA
Contact:

Post by rjlittlefield »

my english vocabualary is poor when speaking about optics :)
OK, no problem. We can just use more words and longer descriptions to be more sure that we are talking about the same thing.
I took 21 picture of same butterflies eye and croped it as you told (600x1000px). Here is the result:
This looks good for "actual pixels" (cropped, not resized).

Can you show me the whole frame, not cropped, but resized to fit here, so that I can see for sure exactly what is being shown?
BTW, what are those spots on white background in picture? It appeared afetr stacking.
Those are "dust trails" caused by dust on your camera sensor. In your original pictures, there will be a single small dark spot corresponding to each trail. The spot is in the same position in each original picture, but as you change focus the subject moves across the frame a little bit. The stacking process re-aligns the pictures so that the subject stays in the same place, but then the spots appear to move. The software does not understand that the spots are dust. It treats them as detail to be preserved. So in the final image, you end up with each dust spot being shown in all the places that it ever occurred, after re-alignment. These positions are close to each other, so they look like lines or trails.

Dust trails are a common problem in stacking. The best solution is to clean your sensor and keep it that way. Next best is to use Zerene Stacker retouching brush after stacking, to paint over the trail with good pixel data from one or more source images. Typically the dust trails are most obvious in unfocused areas like background, in which case it is simple to retouch from one source image. Some people like to use Photoshop's "healing brush", which picks up pixel values from surrounding areas of the image.

--Rik

Daumantas
Posts: 39
Joined: Thu Dec 11, 2014 3:46 pm
Location: Lithuania
Contact:

Post by Daumantas »

Here it is (i removed dust patches with Zerene):
Image

P.S.
Rik, I'm really grateful for your mentorship. It makes everything very clearto me :)

Post Reply Previous topicNext topic