
How do you mean Rik?I'm intrigued to see all those hairs sprouting on the thick parts of the antennae
First attempts with a microscope objective
Moderators: rjlittlefield, ChrisR, Chris S., Pau
-
rjlittlefield

- Site Admin
- Posts: 23625
- Joined: Tue Aug 01, 2006 8:34 am
- Location: Richland, Washington State, USA
- Contact:
I think I see some confusion. What I wrote wasDrLazer wrote:Of course. The image out of the camera was 12MP. After stacking I cropped for composition. That took me down to 3347 x 2598.But Craig, I'm not quite sure what I'm looking at. All these images are the same size, but one of them says there's a 30% resize involved. Can you explain, please?
The unsharpened version is then resized for posting to the web. I tend to aim for between 4MP and 5MP (mainly because 4MP is the minimum size for stock).
The USM had sharpening applied as you suggested (2px 80%) at full size, then I resized it for posting to the web, and applied the 0.7px 30%.
For the high pass method. I resized first, and then applied sharpening.
My words "reduce to the proper size for posting, say 30%" meant to do a Photoshop Image > Image Size with Document Size set to "30 percent", thus producing an image of size 1004x779, a proper size for posting directly on a web page, for example inside [img] tags at photomacrography.net.... USM 2 pixels at 80% on the full-size image (3347 x 2598). Then reduce to the proper size for posting, say 30%, and finally add a little more small USM, say 0.7 pixels at 35% ...
So, my 0.7 px 30% USM got applied to a much smaller image than yours -- 0.78 MP versus "between 4 MP and 5 MP". In your sequence, I suspect the 0.7 px 30% USM produced little effect except possibly to crank up the noise a bit.
--Rik
-
rjlittlefield
- Site Admin
- Posts: 23625
- Joined: Tue Aug 01, 2006 8:34 am
- Location: Richland, Washington State, USA
- Contact:
In most of the flies I'm used to, the thick basal parts of the antennae have no obvious hairs. For clarity, visit http://www.ces.csiro.au/biology/fly/fly.html, click on the "Calyptrate" tab at bottom, click on the "antenna" tab at right, then click on "flagellomere 1". Or same thing, at the "Acalyptrate" tab. For a live example, see HERE.DrLazer wrote:How do you mean Rik?I'm intrigued to see all those hairs sprouting on the thick parts of the antennae
In contrast, your long-legged fly has fine hairs all over those thick parts (the flagellomeres), visible even in the small version posted earlier in this topic.
--Rik
I see where we got our wires crossed. I'll fix the image and replace it when I get the chance.
Those hairs must be common accross the family.
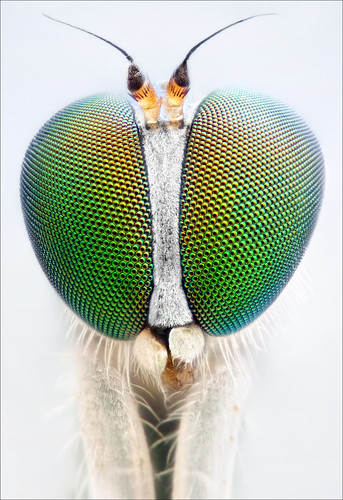
Studio stack: Neurigona by johnhallmen, on Flickr
Those hairs must be common accross the family.
Studio stack: Neurigona by johnhallmen, on Flickr
I updated the Long Legged Fly with the improved sharpening. It also broke the preview of it in this thread. Could you maybe update the link please Rik/Laurie/other admin?
I just posted a stack of a butterfly's wing to Flickr. I used my bellows full extension to see what things felt like at higher mag. This time I am at approximately 12:1, moving in increments of 5um. It's interesting that the lighter scales show the lateral lines running through them, but the red coloured scales do not. I think lighting is what is going wrong for me. The vein also shows good detail, so I'm sure more can be achieved with this lens. Struggling to figure out where I am going wrong.
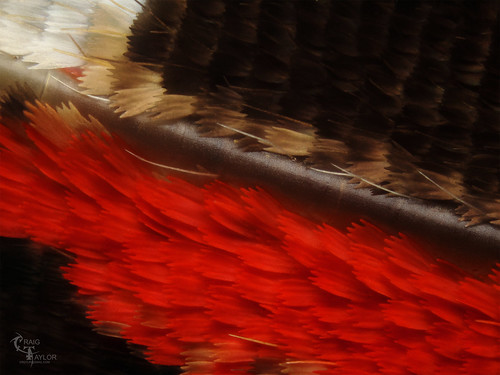
Butterfly Scales at 12:1 by Craig.Taylor, on Flickr
I just posted a stack of a butterfly's wing to Flickr. I used my bellows full extension to see what things felt like at higher mag. This time I am at approximately 12:1, moving in increments of 5um. It's interesting that the lighter scales show the lateral lines running through them, but the red coloured scales do not. I think lighting is what is going wrong for me. The vein also shows good detail, so I'm sure more can be achieved with this lens. Struggling to figure out where I am going wrong.
Butterfly Scales at 12:1 by Craig.Taylor, on Flickr

Red light delivers less resolution because its longer wave lengh and Bayer sensors only use 1/4 of the photosites to see red (this may be part of the cause)DrLazer wrote:... It's interesting that the lighter scales show the lateral lines running through them, but the red coloured scales do not. I think lighting is what is going wrong for me.
Pau
-
rjlittlefield
- Site Admin
- Posts: 23625
- Joined: Tue Aug 01, 2006 8:34 am
- Location: Richland, Washington State, USA
- Contact:
At photomacrography.net we permit members to edit their own posts to fix problems. There should be an Edit button at the upper right of your own posts. Click that, and you can repair the link yourself. Send me a PM if you have trouble.DrLazer wrote:I updated the Long Legged Fly with the improved sharpening. It also broke the preview of it in this thread. Could you maybe update the link please Rik/Laurie/other admin?
The images at Flickr look great, especially looking at the highest resolution version.It's interesting that the lighter scales show the lateral lines running through them, but the red coloured scales do not. I think lighting is what is going wrong for me. The vein also shows good detail, so I'm sure more can be achieved with this lens. Struggling to figure out where I am going wrong.
Your problem with the thin ridges only showing up on white scales is typical. I don't know for sure what causes it, and I suspect that red is only a part of the issue. Notice that the ridges are much less visible even on the light tan scales, and on the darker ones they don't show up at all.
On the white scales, it looks like you're catching direct (specular) reflections from the tops of the ridges, where the surface happens to be properly oriented. Specular reflections normally don't depend on color, so my natural inclination is to think that the darker scales should have equally bright reflections and thus the ridges should be even more visible on them. Obviously that isn't happening.
So what I think is going on is that the bright reflections from the white scales are actually subsurface phenomena resulting from layering. Then presumably the darker scales either absorb the light quickly enough to prevent those multilayer reflections, or have a different physical structure that equally suppresses them. All this is pretty speculative, though!
Anyway, with the bright directional reflections removed, all you have left to produce modeling is normal shading, and with a diffuse light source that's not a very strong effect. You can increase the surface modeling by using more oblique light, but then typically the gross shape of the wing causes big distracting shadows. So, it's a very challenging problem to show off the fine structure of an arbitrary butterfly scale.
Be cautious in comparing your work to other people's postings, by the way. Remember that people show off their best work. In many cases, that reflects choice of subject as well as technique. If you want to make nice pictures of the fine structure of scales, it helps a lot to have the right kind of scales to start with!
--Rik
I've been amazingly ill for the last 9 days or so with Flu. I just thought I had a cold but the doc informed me it was flu, my first experience with it .. I wouldn't recommend it.
I think this thread might be about done really. Lots of interesting stuff. I can't decide what is going off with those lines, it will be interesting to try out the same kind of shot on other subjects to see if the results change.
A lacewing was having a spot of eternal sleep on my front room windowpane this morning. I'm going to see about a few more attempts with him and the ping-pong ball route. I have a few ideas where I went wrong.
Cheers for everything guys!
Oh yeah, I didn't see that before. It's fixed up now.At photomacrography.net we permit members to edit their own posts to fix problems. There should be an Edit button at the upper right of your own posts. Click that, and you can repair the link yourself. Send me a PM if you have trouble.
I think this thread might be about done really. Lots of interesting stuff. I can't decide what is going off with those lines, it will be interesting to try out the same kind of shot on other subjects to see if the results change.
A lacewing was having a spot of eternal sleep on my front room windowpane this morning. I'm going to see about a few more attempts with him and the ping-pong ball route. I have a few ideas where I went wrong.
Cheers for everything guys!

Yes Laurie I'm in Sheffield.
I have been told that because I have had flu it will not make me any less likely to get it in the winter. The jab becomes available in October and is free for "high-risk" groups, of which I do not fall into any. It is an option to pay for the jab after October at any NHS practice. I am definitely doing that - this is the ill-est I have ever been. I had a 105 degree fever that ran for days, I'm not going through it again for the sake of £12.
Sorry to hear about your health. I tend to catch one good cold per year and I thought it was going to be routine until I found myself on my knees in the bedroom hallucinating about buying and selling boats (the man had them for good prices).
Hey nowrjlittlefield wrote:Um... No, not quite. I was referring to accidentally killing insect subjects. A recent example is the caterpillar that I inadvertently froze while trying to chill it into complete quiescence. But I really can't compete with the story that yeatzee tells.Simon W wrote:Were you referring to other people dying?! How many liters did you use?! :-)
--Rik
lol.
Quick question, how do you "gas" the bugs? How long does it last usually?

Re: First attempts with a microscope objective
This is truly the most useful, yet funny thread here!rjlittlefield wrote:
...Try thin paper. I get a lot of mileage from Kleenex tissue. It's often simpler to work with than a ping pong ball.
--Rik
I'm also using Kleenex tissues, as I cry getting things to work!
Simon W
EOS 5D Mk 3; Olympus BH-2; Zerene Stacker
Melbourne, Australia
EOS 5D Mk 3; Olympus BH-2; Zerene Stacker
Melbourne, Australia
Tanner: Nail Polish Remover. Get a ball of cotton wool and soak it in it. the Ethyl Acetate in the solution gasses them. Keep your eye on the bug as you gas them. I tend to wait until the antenna have stopped twitching then take them out. Have your rig setup ready of course. Take the shots and wait around a bit. 5 or 6 minutes is the normal limit. You get a pre warning before they fly off after waking as their antenna are the first things to twitch.
so just toss the bug into a jar with the cotton soaked in the nail polish remover? very interesting! Have you tried spiders?DrLazer wrote:Tanner: Nail Polish Remover. Get a ball of cotton wool and soak it in it. the Ethyl Acetate in the solution gasses them. Keep your eye on the bug as you gas them. I tend to wait until the antenna have stopped twitching then take them out. Have your rig setup ready of course. Take the shots and wait around a bit. 5 or 6 minutes is the normal limit. You get a pre warning before they fly off after waking as their antenna are the first things to twitch.
Are you sure it's ethyl acetate? In the UK nail varnish remover is acetone. I've tried a variety of volatile flammable-smelling liquids, many of which have a knocking-out effect. Plumbers' "Pipe dope" ( we call it cement) works, as does the cleaner for it.
Engine cleaner/starter often contains high %age of ether and comes in a handy spraycan, and works pretty well.
Amyl nitrite would be intersting to try -it "works" as a vasodilator on mammals but might not do it for a bug.
What's special about ethyl acetate, beloved of entomologists, I hope someone can tell us.