Objective Advice Needed—New Member

Have questions about the equipment used for macro- or micro- photography? Post those questions in this forum.

Moderators: rjlittlefield, ChrisR, Chris S., Pau

peterf
Posts: 18
Joined: Thu Aug 12, 2010 9:57 pm

Post by peterf »

Hello Chris,

Thank you yes, I am aware of Camera Control but doesn't it actually work the same way as live view? The sensor still needs to be activated to see the image and isn't that what heats things up? Please correct me if I'm wrong.
Chris S. wrote:
peterf wrote:The noise is a little high I agree, it was shot at ISO 160 but the room is quite hot. If I use live view to focus it heats up the cmos and increases noise.
Peter, you might find (as I do) that tethering works better than live view--it certainly helps avoid heating the senser up and increasing noise. If you haven't tried it, there is a free 30-day trial for the Nikon Camera Control Pro 2 software at this link:

http://support.nikonusa.com/app/answers ... e#Anchor-3

There are of course other tethering programs, but I'm not familiar enough with current versions to comment on them. The Nikon software, though overpriced, does work pretty well.

I use a right angle adapter on my camera's viewfinder, partly because it has a 2X magnification setting that helps in focusing. Then I can take a quick throw-away photo, and within about a second it appears on the computer screen, so I get a nice, big image to check. Was using my laptop for this, but recently dedicated an old-cast off computer to my rig--image capture doesn't require much horsepower. I do, of course, send the images to a more powerful computer for stacking.

Cheers,

--Chris

Chris S.
Site Admin
Posts: 4044
Joined: Sun Apr 05, 2009 9:55 pm
Location: Ohio, USA

Post by Chris S. »

No, Peter, it's quite different. Camera Control is remote control software with integrated transfer to the computer, and an option to immediately view the transferred image--it allows you to control various settings of the camera from a computer, fire the shutter from the computer, and then instantly view the freshly-taken image on the computer. It doesn't capture live, streaming data from the sensor, and so doesn't keep the sensor on for any longer than standard photography. Then the fresh images travel across the USB cord and into the computer, where they are displayed.

I use the program mostly for display--I get an immediate, large image and histogram. My shutter speeds are pretty much constant for the Bratcam (my macro rig), since the flash duration effectively determines exposure duration. And I use a method similar to one described by Charlie Krebs for minimizing vibration--use mirror up, then longish exposure in a dark room, fire the flash near the end of the exposure. Shutter curtain opens in the dark, and any vibration this causes has a second or so to quiet down before the flash fires. This may be overkill, but is rigorous in ruling out camera vibration.

Nikon Camera Control doesn't seem to know how to fire the camera when I have the mirror-up function on, so I fire the camera with an electronic release. No big deal--what I really like is seeing the images very quickly displayed on the big screen, exactly as shot.

Best,

--Chris

peterf
Posts: 18
Joined: Thu Aug 12, 2010 9:57 pm

Post by peterf »

Chris, forgive me for being so dense but how does one focus a remote camera without energizing the sensor?
Chris S. wrote:No, Peter, it's quite different. Camera Control is remote control software with integrated transfer to the computer, and an option to immediately view the transferred image--it allows you to control various settings of the camera from a computer, fire the shutter from the computer, and then instantly view the freshly-taken image on the computer. It doesn't capture live, streaming data from the sensor, and so doesn't keep the sensor on for any longer than standard photography. Then the fresh images travel across the USB cord and into the computer, where they are displayed.

I use the program mostly for display--I get an immediate, large image and histogram. My shutter speeds are pretty much constant for the Bratcam (my macro rig), since the flash duration effectively determines exposure duration. And I use a method similar to one described by Charlie Krebs for minimizing vibration--use mirror up, then longish exposure in a dark room, fire the flash near the end of the exposure. Shutter curtain opens in the dark, and any vibration this causes has a second or so to quiet down before the flash fires. This may be overkill, but is rigorous in ruling out camera vibration.

Nikon Camera Control doesn't seem to know how to fire the camera when I have the mirror-up function on, so I fire the camera with an electronic release. No big deal--what I really like is seeing the images very quickly displayed on the big screen, exactly as shot.

Best,

--Chris

Chris S.
Site Admin
Posts: 4044
Joined: Sun Apr 05, 2009 9:55 pm
Location: Ohio, USA

Post by Chris S. »

Peter, I just look through the viewfinder to focus. As mentioned, I like the right angle finder, with its 2X magnification option, to help me focus, but I could work without it. After focusing through the viewfinder, I take a quick throwaway picture to check my work on the computer screen.

--Chris

peterf
Posts: 18
Joined: Thu Aug 12, 2010 9:57 pm

Post by peterf »

Ah yes you did say that, sorry. BTW, I love the bratcam! Mine is similar but cobbled up with machine tool parts and weighs more than an old Buick :)

HF has a camera control beta built in and I've used it with some success. It will allow you to focus on the near and far points and then set the number of steps in between. You then walk away, get a cup of coffee and your captures are done automatically. It uses an autofocus lens of course so doesn't really apply to this forum but it probably isn't too far from being usable with a stepper motor. Anyway it's quite nice and fun to use but does tend to heat up the sensor while focusing. I use an angle finder as well but still find focusing with live view zoomed in to be more accurate. The viewfinders on modern cameras just don't work as well for my eyes as the old film ones. Anyway the noise really isn't too big a problem on the RAW files following the stack, I just like to do the jpegs first to see which group is usable (if any).


Chris S. wrote:Peter, I just look through the viewfinder to focus. As mentioned, I like the right angle finder, with its 2X magnification option, to help me focus, but I could work without it. After focusing through the viewfinder, I take a quick throwaway picture to check my work on the computer screen.

--Chris

Chris S.
Site Admin
Posts: 4044
Joined: Sun Apr 05, 2009 9:55 pm
Location: Ohio, USA

Post by Chris S. »

Thanks, Peter!

I can definitely understand how zooming in with live view helps you focus, since I often zoom in on the computer screen. You're getting an image real time, and I'm getting it a second later. Though for me, focusing per se isn't so important, since I like to shoot overshoot a stack a little bit to have out of focus frames at the beginning and end as insurance. I intentionally start a little bit too close to the subject and finish a little bit too far away.

Sooner or later (hopefully the former) I'll have a stepper motor on the Bratcam. I have the parts, just need some time to get them on there and write a little code. I sure like the idea of getting a cup of tea while the stack runs.

Cheers,

--Chris

rjlittlefield
Site Admin
Posts: 23597
Joined: Tue Aug 01, 2006 8:34 am
Location: Richland, Washington State, USA
Contact:

Post by rjlittlefield »

Chris S. wrote:Sooner or later (hopefully the former) I'll have a stepper motor on the Bratcam. I have the parts, just need some time to get them on there and write a little code. I sure like the idea of getting a cup of tea while the stack runs.
Perhaps you'd rather do the whole job yourself, but for those who are not so inclined...

The StackShot rail has a nice modular design in which the controller can be used to drive stepper motors attached to other mechanics. Cognisys (the makers of StackShot) sell compatible stepper motors as a separate line item in their online catalog. It would be a lot easier to plug in a StackShot controller than to build something from scratch.

--Rik

peterf
Posts: 18
Joined: Thu Aug 12, 2010 9:57 pm

Post by peterf »

I finally had a moment to get back to the "important" things and make another test. I'm hoping to get an opinion or two about what to expect from moving to microscope objectives from where I am now in terms of quality. I was never really very happy with my 50mm Nikkor either on the enlarger or reversed on bellows on the first few tries, maybe I have a bad copy but I went back to an old 28mm SMC screw mount which I had always been pretty happy with. I did get in a bit closer this time, I have not measured this particular bud but know that it is not the larger one in the 2mm range so I'm roughly estimating about a 6X magnification if that's even possible with this lens. Granted it's a pretty low contrast image compared to a lot of the images I see here but it's what I'm mostly dealing with in my stacks...

This is the full image, artifacts and all:

Image

100% crops
Image

Image

I think the rear sync solved most of the vibration problems and I was also MUCH more careful not to move air around in the room and so forth. I tightened up everything on the setup I could find and believe the captures are now pretty clean from that standpoint. I did do a small amount of noise reduction and a bit more sharpening on this stack. I have never actually seen any full size images aside from my own at this level so have no way to know what to expect from my time and cash outlay to make it more acceptable (which I do not consider these to be... right or wrong). Maybe someone can steer me to a place I could download a few images and compare for myself but I still place great value in all your advice.

Image

Rik, I am wondering if these "tracers" are normal in Zerene and if there is a setting to prevent their creation? I normally just Photoshop them out, just curious.

Chris S.
Site Admin
Posts: 4044
Joined: Sun Apr 05, 2009 9:55 pm
Location: Ohio, USA

Post by Chris S. »

Peter, from your 100 percent crops, I get the impression your sensor needs a wet cleaning. The "tracers" you point out look like dirt or dust to me, and there is a general "pebbly" texture elsewhere that I've seen before, when my sensor had a thin layer of oily grunge on it. In my case, this layer came from a previous cleaning, when I inadvertantly caught some factory-placed lubricant from around the sensor on my swab, moved it from the swab to the senser, and didn't completely get it all off. It was hard to see--even when observing the sensor under a stereo microscope--but definitely showed up in some images, and went away after a thorough wet cleaning.

To check this, I'd suggest you put on the smallest aperture lens you have--macro lens or maybe your 28 on the bellows--crank out the bellow extension pretty far, and take a picture of the sky or a something evenly lit like a flourescent light. You don't need to worry about holding anything still, of course--just a grab shot on automatic will do. Then zoom way in on the resultant image and see if you can see anthing other than featureless blankness. If you pan across that zoomed image, any imperfections will jump out at you because they seem to move. My bet is that you'll see some dust, and also some barely visible dark undulations. If so, try cleaning those off.

BTW, for a thorough wet cleaning, you can easily go through 6 or 8 swabs. So don't buy the expensive ($5 each) ones. Cheap ones the right size for your sensor are fine, and you can get some inexpensive PecPads to make new swab ends for them. Isopropol alcohol (91% strength) from the drugstore is much cheaper than the fancy voodoo fluids sold on the Internet, and will work just fine. Or if you want the fancy voodoo fluid without the fancy voodoo price, just order a bottle of reagent grade methanol over the Internet (that's all Eclipse fluid is).

Cheers,

--Chris

peterf
Posts: 18
Joined: Thu Aug 12, 2010 9:57 pm

Post by peterf »

Yes my sensor DOES need cleaning, Moab will do that to even the most careful lens changer. Those trails must be as you say, a properly stacked representation of that trip :) Thanks for the tip about the methanol as well, when my voodoo fluid bottle is empty I'll be sure to reload with the lower priced stuff. I had a very oily sensor on this thing right out of the box. Big blotches of stuff that really surprised me on a brand new camera.

You didn't comment on the sharpness of the image though, any thoughts?

peterf
Posts: 18
Joined: Thu Aug 12, 2010 9:57 pm

Follow up

Post by peterf »

The noise in the stack was much more than I expected so I just had a look at the original images to find a more normal level. I had the idea, based on other software use that stacking generally averaged the noise out and created less. Anyway, here's a 100% crop of one of the images with no noise reduction and roughly the same amount of USM.

Image

Chris S.
Site Admin
Posts: 4044
Joined: Sun Apr 05, 2009 9:55 pm
Location: Ohio, USA

Post by Chris S. »

peterf wrote:Yes my sensor DOES need cleaning, Moab will do that to even the most careful lens changer. Those trails must be as you say, a properly stacked representation of that trip :) Thanks for the tip about the methanol as well, when my voodoo fluid bottle is empty I'll be sure to reload with the lower priced stuff. I had a very oily sensor on this thing right out of the box. Big blotches of stuff that really surprised me on a brand new camera.

You didn't comment on the sharpness of the image though, any thoughts?
Moab! I spent 4 weeks camping in the windy SW deserts this spring, and am still finding Moenkopi dust in nooks and crannies (this year, even had to clean it out my ears every few hours on the worst days--ugh). But the Pelican case kept the camera gear pretty clean.

I don't know what to say about the sharpness of the images you showed--the perception of sharpness is dependent on so many things--including lighting and color contrast--that it's hard for me to evaluate without a direct comparison (i.e, under identical conditions, is lens A sharper than lens B?). Subjectively, I don't think you're yet getting the quality you're are looking for, if your excellent frontal shot of the whole flower is representative of your standards. What are your current limiting factors? Not sure. But you asked for thoughts--these would be the thoughts that would run through my mind (and frequently do, with my own work).

For starters, I think you've demonstrated that there are noise issues. I'd try shooting at base ISO and dispensing with live view, and see if either or both of those changes make any difference. I'm not comfortable with the idea of creating noise and then letting the stacking software average it out--my inclination is to work as cleanly as possible. Stacking software might see some of that noise as information and try to preserve it. I know that astronomical photogs use a form of stacking to average out noise, but that's another thing entirely--for them, the noise is what's different between photos. For us, the areas of focus are the different thing (as measured, I believe, by contrast, but I let Rik worry about that for me and just use his software).

I'd check to see if there is flare (snoot the lens with black paper, coat any spacers or shiny junctions with black flocking). I'd try using flash instead of continuous light (not meaning to pick a fight--continuous light has some advantages, but when one is on the initial sharpness quest it's not the best time for continuous light--that's a question for after other things are taken care of). I'd upgrade my lens. I'd look for any unwanted movement in my rig and work to eliminate it. I'd try different light positions, diffusion levels, contrast ratios, backlighting, etc. that enhanced the perception of sharpness, color, shape, texture, or whatever I considered important about the subject.

Reading back that list, it sounds like I'm being sarcastic and listing all the basic challenges of photomacrography. I sure don't mean it that way, and am sure you know all of them yourself. It's like one zen student asking another, "Where am I along the path?" The answer is always "one step before the one that lies ahead." Unless, of course, your name is Charlie Krebs. Then you just bow to the Buddha.

Cheers,

--Chris
Last edited by Chris S. on Sun Aug 22, 2010 10:57 pm, edited 1 time in total.

rjlittlefield
Site Admin
Posts: 23597
Joined: Tue Aug 01, 2006 8:34 am
Location: Richland, Washington State, USA
Contact:

Post by rjlittlefield »

Peter, thanks for this last image, the single frame. I was just about to ask for one of those.

About the noise...

Different forms and uses of stacking treat noise in different ways.

If you start with N frames of what should be the same image, and average them together, then what you get is reduced noise. This is common for astronomical use, as Chris notes.

If you do focus stacking using what's called a "contrast-weighted" method like Helicon Focus "Method A", then in areas where there is one frame that's distinctly sharper than the others you'll get the noise of that frame, and in other areas where there is no distinctly sharper frame, you'll get some sort of average that reduces the noise. That sounds attractive, and the noise reduction can definitely be helpful in OOF background. Unfortunately, these methods tend to get confused where the subject has low contrast smooth textures, resulting in a complete loss of detail that we've come to call "stacking mush". To see an extreme illustration of stacking mush, see HERE.

Focus stacking using a "depth map" method tends to leave noise levels unchanged, since each small area of output consists of pixels from just one or two source frames. Different depth map methods vary in the details of how they handle indistinct regions. Helicon's "Method B" again is vulnerable to stacking mush. Zerene Stacker's "DMap" method can get mush and other artifacts too, but it allows some additional user-level tuning through its "contrast threshold" selector. There's some art involved in getting that set to a proper value, though.

Focus stacking using a "pyramid" method such as Zerene Stacker's "PMax" method tends to increase noise. The reason for this is that these methods are relentless at finding detail at all scales -- small or large, crisp or smooth, high contrast or low. That's good from a lot of aspects, but it has the downside that if there's no detail to be found at some scale, it picks up on the noise instead. In these images, there's hardly any high contrast detail at the level of individual pixels, so most of what gets picked up at the pixel level is noise. Essentially, what ends up in the output is the worst noise that occurs in any frame at each pixel position. With lots of frames, that can be pretty bad.

I don't know any perfect solution to these tradeoffs. Subjects like yours with low contrast indistinct textures in the white petals are tough to handle.

The best method I do know involves running the stack several times using different methods and settings, then combining those results using human judgment and a retouching brush to select the best result for each area of the subject. The second retouching tutorial for Zerene Stacker illustrates this general approach.

In your case, I'm guessing that the best rendition of the lightly textured petals will probably be with a DMap and fairly large radii, perhaps around 4X default settings. That guess is based on the guideline that default radii are designed for images that look sharp at actual pixels, and this one crop has to be shrunk to around 25% (1/4X) before the subtle textures reach pixel level. I would also be inclined to use a fairly high contrast selection threshold, so that depth decisions get made only where they're likely to be correct, then propagated to nearby areas that are not clear by themselves. But I'll be the first to say that you'll need to experiment with this -- I certainly would.

The tracers are what we usually call "dust trails". Hot/warm pixels can cause the same effect, except those make bright streaks. Yes, they are the natural result of apparent detail that appears in different places in different frames after the images are aligned. Interestingly, it seems that Helicon has some clever algorithm for dealing with many of these automatically, even if you don't explicitly declare a dust map. Within Zerene Stacker, the only way to deal with these is retouching.

Now, about sharpness...

Your single frame actual pixels crop definitely does not look sharp to me. When I run the test of shrink to 50%, restore by 200%, layer, and flash, I cannot find any subject detail that gets lost in the shrink. In fact, the shrunk-and-restored image actually looks better than the original, simply because its noise level has been cut by half.

Can this be improved? I don't know. It's typical for images to look a little fuzzy at actual pixels, but losing nothing on a 50% shrink suggests some room for improvement. On the other hand at these magnifications it's just plain tough to get sharp at actual pixels on a sensor as fine as yours. And on the third other hand, if you can get some improvement, I think it will be modest. Mumble, mumble, fidget...

OK, here is some experimental data that may be helpful. This is with the best lens I have for this job -- an Olympus 20 mm f/2.0 bellows macro lens set wide open, at just a bit over 5X. The subject is a moth wing, which is rich in fine detail. The camera is a Canon T1i, which has a sensor similar to your D300.

Image

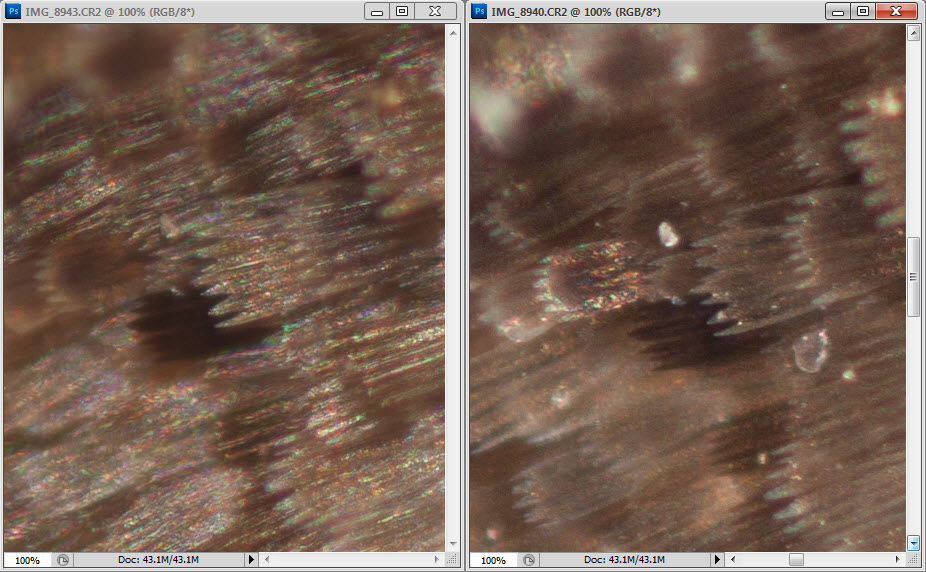
To my eye, these images are noticeably sharper than yours, and if I do the shrink-and-restore test, fine details are definitely lost in the shrink.

But if I recall correctly that's about a $600 lens, I had to wait a while to get it at that price, and I don't have any fittings to make it work below 5X. These images were already on minimum bellows extension. Would this be a good solution for you?

Adding to the confusion, I'm not completely sure how much fine detail your subject has, given the lighting you're using. The two images shown here differ mainly in the angle and nature of illumination. The left image is with on-camera flash bounced off a white card angled above the frame, so the light was largely crossing the fine ribs of the scales. The right image is with dual head halogen fiber illumination, two sources from the sides, so largely running along the ribs. They're equally sharp, but one shows a lot more fine detail than the other.

By the way, the right image looks exactly like I expected based on Live View. The left image was shooting blind because I had no modeling light to use through Live View. That effect was strictly a matter of flash, review, flash, review, and so on. What's particularly interesting to me is the appearance of the crystalline debris. I had no idea that it would essentially disappear in the flash exposures, and now having seen that it did, I am still guessing about how to get it back if I wanted it.

I hope this is helpful, somehow or other.

--Rik

peterf
Posts: 18
Joined: Thu Aug 12, 2010 9:57 pm

Post by peterf »

Rik, thank you yes, it has been very helpful. Especially your explanation about the mapping methods and the retouching tutorial. I didn't realize it was possible to use the other stacks as a retouching source. I had always gone back to the original image and worked through the in-focus areas one by one... very slow indeed.

I agree that the images are not sharp, I have some new equipment coming with the kind help of Chris and am convinced this will solve that problem. I can easily work with lighting to achieve more contrast as well but in certain situations like this I think it's the fine and subtle gradation of tones and values that actually show off more of what I'm trying to capture. It's always a give and take but that's the goal and challenge of it for me.

I have become accustomed to HF's noise averaging because I've used it for some time before I found Zerene and so I'm learning two different methods. Your explanation and tutorial is extremely concise and will make a big difference in how I do things from here on, thank you so much for that. Working at this level is new to me and profoundly interesting, I've used stacking for a while in landscapes in order to achieve similar results as I once did with swings and tilts but this method has a few distinct advantages and it has got got me re-enthused about the possibilities. This is an example of one from a few weeks ago that I don't think I ever could have gotten purely with camera movements:

Image

I repaired this 18th century compass for a client and was so amazed at the ink and engraving work that I had to make a record of it before putting the glass back on. The result is very clean and prints quite large without breaking down. I got interested in the magnification partially because when I was looking at one of the images on the monitor I saw what I thought were termite like creatures interrupting one of the inked lines. I do have a microscope in the shop and confirmed the existence of the eggs I suppose of whatever used to live there. I did what I could to get in close and take a few images but obviously would have liked a bit better result:

.Image

Anyway that's what got me going on this I think and now I'm seeing all manner of beautiful things I never noticed before and want to see and capture them well. I think I'll go look at you tutorial again...

Craig Gerard
Posts: 2877
Joined: Sat May 01, 2010 1:51 am
Location: Australia

Post by Craig Gerard »

Peter,

I enjoyed seeing your image of the compass. More please!

In reference to earlier concerns regarding 'noise'. I thought I would mention one thing I experienced, it may or may not be relevant to your situation.

The RAW processing software I use has highly configurable sharpening features, which is great for outputting single images; however, when outputting a batch of image slices with intention to stack, I noticed the pre-sharpening was introducing noticable (exaggerated) noise in the final stacked output.

The solution was to tick the 'disable sharpening on export box', so that the stacking software was supplied with unsharpened images. Altering noise reduction paremeters in the RAW software had little or no negative influence on the outcome; but the pre-sharpening was a contributing factor.

Craig
To use a classic quote from 'Antz' - "I almost know exactly what I'm doing!"

Post Reply Previous topicNext topic