Chironomidae - Dansmug.
Moderators: rjlittlefield, ChrisR, Chris S., Pau
Chironomidae - Dansmug.
Dansmug - Chironomidae 076532 by Frans, on Flickr
Zerene stack Pmax.
229 steps @ 7 um.
Nikon D7100 + AFD 200 F5.6 ISO 200
Mitutoyo M Plan APO 10X.
FOV: 2.3 mm.
FG led flash module 10 channels
Direction light D 5.3
Lighting direction profile default.
Total power 47.6%
Flash time: 1.5 msec.for 100% power.
That's brilliant!
How on earth did you not get stacking artefacts among the hairs? Was it just lots (and lots and lots) of detailed retouching, or perhaps because you left out-of-focus hairs behind the in-focus ones? Or photoshop? Or all of the above.
Please do tell - I really struggle to stack hairy insects satisfactorily and would love to get results like this.
Thanks:
GaryB, Jörgen, Beatsy and ChrisR.
Good results come by the following general setup:
- Stable lineup of stacking system, camera and lens support.
- Stage has a mechanical precision of 1 um, everything on steel balls.
- Stage has no backlash, each division on the vernier is 1 um or 8 micro steps on the stepmotor. (Stepmotor works with 1/8 micro stepping)
- The alignment seting into Zerene are all set to off except the scale option.
- Due to the stable movement the X and Y correction should not be on.
- My darkroom space is closed during the shooting, there are no air movements which can move the fine hairs.
- I created a default profile for exposure.
The optimal direction of illumination give a better contrast. It can be preset in live-view, view on the 27" PC monitor and thereafter continue to be slightly adjusted with a few test shots. The light power expressed in % of each of the 10 LEDs is defined in the profile. Power is a ratio, the real time used is calculated from a base time T max. Increase or decrease of the total exposure is done by one rotary knob. Another potentiometer indicates the direction of how the LEDs are controlled. There are 40 directional positions.
The current profile uses only 47.5% of the maximum total power of all the LEDs. In this setting, the T max exposure default time is set at 1.5 ms. The individual time of each LED is determined by the ratio in the profile, and the directional calculation. The real time for each led lies between 0 and 1.5 ms. With all the LEDs on the same time you get a flat lighting with low contrast and detail.
Frans.
GaryB, Jörgen, Beatsy and ChrisR.
There was being done very little retouching. Only a few spots on the eyes. Still, this was a very deep stack, 229x7um = 1.6 mm @ a VOF 2.36 mm.
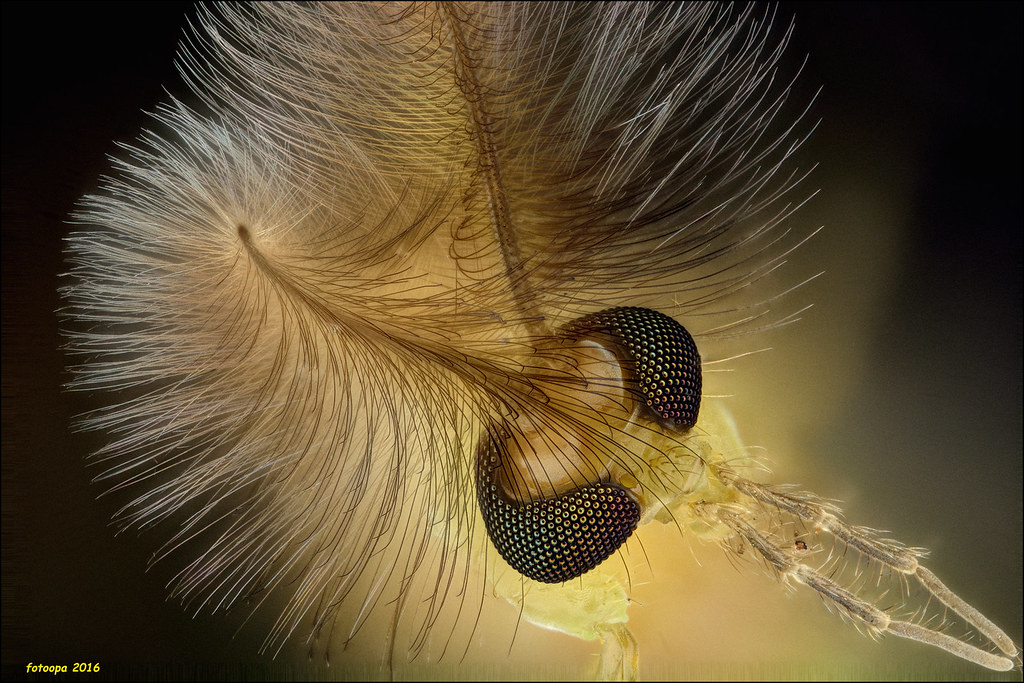
Beatsy wrote:How on earth did you not get stacking artefacts among the hairs? Was it just lots (and lots and lots) of detailed retouching, or perhaps because you left out-of-focus hairs behind the in-focus ones? Or photoshop? Or all of the above.
Good results come by the following general setup:
- Stable lineup of stacking system, camera and lens support.
- Stage has a mechanical precision of 1 um, everything on steel balls.
- Stage has no backlash, each division on the vernier is 1 um or 8 micro steps on the stepmotor. (Stepmotor works with 1/8 micro stepping)
- The alignment seting into Zerene are all set to off except the scale option.
- Due to the stable movement the X and Y correction should not be on.
- My darkroom space is closed during the shooting, there are no air movements which can move the fine hairs.
- I created a default profile for exposure.
The optimal direction of illumination give a better contrast. It can be preset in live-view, view on the 27" PC monitor and thereafter continue to be slightly adjusted with a few test shots. The light power expressed in % of each of the 10 LEDs is defined in the profile. Power is a ratio, the real time used is calculated from a base time T max. Increase or decrease of the total exposure is done by one rotary knob. Another potentiometer indicates the direction of how the LEDs are controlled. There are 40 directional positions.
The current profile uses only 47.5% of the maximum total power of all the LEDs. In this setting, the T max exposure default time is set at 1.5 ms. The individual time of each LED is determined by the ratio in the profile, and the directional calculation. The real time for each led lies between 0 and 1.5 ms. With all the LEDs on the same time you get a flat lighting with low contrast and detail.
Frans.
-
- Posts: 130
- Joined: Tue Dec 02, 2014 10:29 am
- Location: Albuquerque, NM, USA
Thanks SW_Perspective and Keith.
Mirror-up is also used. The mirror-up is 1200 msec before the shutter open. Total cycle time for 1 picture is about 2.7 sec ( inclusief the time to transfer the RAW file over the USB line to the PC). And yes I have lots of power, about 500W peak if all the LEDs are used.
The LED module is always in the same place. The exposure times are almost always right. Only the direction must be optimally adjusted according to to your subject.
Frans.
The shutter stay 500 msec open. The first 420 msec are used to avoid vibrations. There is no light during this period given my darkroom space. The remaining 80 msec are used for the real exposure, both foreground and background. Now I use 1.5msec within that zone.BugEZ wrote: How long did the shutter stay open?
On my own LED rig I open the shutter for 2 sec with the LEDs on for approximately 1.25 sec. Your LED flash is about 1000X more powerful than my bucket light.
Mirror-up is also used. The mirror-up is 1200 msec before the shutter open. Total cycle time for 1 picture is about 2.7 sec ( inclusief the time to transfer the RAW file over the USB line to the PC). And yes I have lots of power, about 500W peak if all the LEDs are used.
The LED module is always in the same place. The exposure times are almost always right. Only the direction must be optimally adjusted according to to your subject.
Frans.
I am very impressed with the 2.7 sec cycle time. I write to a SD chip my Pentax K5 camera. I generally try to have the data in the chip before I move the subject and start the the next photo, also with a mirror up mode. My cycle time is about 9 seconds. I think the largest difference is the time I allow for the "Write" to complete. I am not sure if writing directly to a computer via a USB port would be faster. I would love to gather my stacks more quickly.
Very nice and something for me to consider!
Keith
Very nice and something for me to consider!
Keith
Aloha
Keith,
This 2.7 sec is a very relaxed speed, not the max. I just did a test with 100 recordings. At a rate of 1 sec, I've occasionally a black image ( USB speed to low versus PC load), so a little too fast.
I then worked slightly slower with the following information:
Mirror-up shutter delay: 500 msec
Step delay: 100 msec
Camera Time 500 msec
Flash delay 420 msec
Cycle time 1.3 sec tested for 100 pictures Mit 10x step 7 um.
File transfert to PC in RAW format, file size ~ 26 Mb.
This works without errors. I think in the future to place the default timing at approximately a cycle time of 1.5 sec.
Result image:
Abstract paint 076668 by Frans, on Flickr
Frans.
Not sure what that is (image) but it is pretty!
On my own rig I don't see a path beyond a three second cycle without replacing some major components. We're I to up the wattage of my bucket light 100X perhaps I could reach two seconds. I shall contemplate this. A good winter project perhaps... Shorter stack times would save much time.
K
On my own rig I don't see a path beyond a three second cycle without replacing some major components. We're I to up the wattage of my bucket light 100X perhaps I could reach two seconds. I shall contemplate this. A good winter project perhaps... Shorter stack times would save much time.
K
Aloha
Very sure! Through this post, my cycle has now been reduced to 50 images per minute or 1.2 sec/picture. This is now my new default value and that goes really fast (versus 2.9 sec).BugEZ wrote:Shorter stack times would save much time.
Thanks! In a 3D version it would be better, but my right eye is not working good anymore. This makes it difficult to optimize 3D images.scitch wrote:This has my vote for the image of the month. Amazing, artistic..
Frans.