
Realativly new to microphotography, looking for feedback.
Moderators: rjlittlefield, ChrisR, Chris S., Pau
Realativly new to microphotography, looking for feedback.
Thank you for this forum, it has been both informative and interesting to read the various posts out there. Today I am looking for some input into what are some positive things I am doing...as well as the negatives, and how to fix them. I am curious what the little white lines all over the photo. Is it just a dirty lens? This is a stacked photo of 216 photos taken with a D5200 camera body with a old Takumar1:3.5/135, acting as a tube lens for a 4x microscope lens. Any feedback will be appreciated.
-
rjlittlefield

- Site Admin
- Posts: 23625
- Joined: Tue Aug 01, 2006 8:34 am
- Location: Richland, Washington State, USA
- Contact:
ranstice, welcome aboard!
First, a bit of terminology. At photomacrography.net, the image that you've posted is clearly "macro", not "micro". The rule that we use is based on the equipment used. If you're operating within the frame of a commercial microscope then it's micro, otherwise it's macro no matter what optics you're using. This results in some placements that seem crazy at first glance, like a 1/2 mm subject shot with a 50X microscope objective being called "macro". But it really does make sense in terms of problems and opportunities of making the image.
The image that you've posted is a promising start.
Sharpness looks good and I do not see significant vignetting.
The lighting in your image is harsh, which results in both overly dark shadows and blown out highlights. The cure for that is to add a lot of diffusion, typically in the form of a "light tent", made of paper or white translucent plastic, that sort of wraps around the subject and allows it to be illuminated from many angles at once. Imagine that you're the subject, and try to visualize what the lights will look like from the subject's viewpoint. The ideal situation is for the subject to see light that's like being outside on a cloudy day: lots of light coming from essentially an entire hemisphere, albeit brighter in some areas of the sky than others.
The little white lines look like "hot pixel trails". If you check your source images, you'll see that each trail is associated with a single white dot in each frame. The dots stay in exactly the same place in every source frame, but as you change focus the subject moves across the dots. The stacking process realigns the source images so that the subject stays lined up, but then the dots move. Because the dots are sharp and local, they look like detail to be preserved, so in the final image each dot gets shown in every position that it ever occupied after alignment.
Hot pixel trails are due to certain photosites on your sensor accumulating more stray charge than most, due to electrical leakage. They're called "hot" both because they're bright and because the problem is worse with long exposures at higher temperatures. The most effective solution is to add light and use much shorter exposures. Flash is ideal because that will let you run with a minimal exposure time while also generating nice short pulses of light that freeze out whatever vibration there may be in your system. Not running the camera in live view also helps, because in live view mode the sensor heats up.
The dark smudgy trail near upper right has a similar cause and is called a "dust trail". Dust trails are almost always caused by debris on the sensor, not the optics. In almost all setups, all of the lens surfaces are so far out of focus that dirt on them does not affect the final image except perhaps to cut its contrast a bit.
The pattern of the trails says a lot about how well aligned your focus stepping process is. In the ideal situation, with most lenses including this one, the trails would be perfectly straight and radial, pointing to the center of the frame. In this case they're pretty straight, but the pattern is off-center, low and to the right. Most likely this indicates that your camera was pointed in some direction slightly different from the axis of physical movement. This does not necessarily degrade the final image, but in general it's best to keep everything lined up as well as possible. In more extreme cases this sort of misalignment causes edge streaks that can be pretty confusing unless you realize what you're looking at.
In general, your image looks noisy. From this, plus the hot pixel trails, I'm guessing that you were using relatively long exposures with an ISO setting well above base. Again, flash is your friend, especially when just getting started in this sort of work. Add more light, and turn the ISO setting down.
One other aspect comes to mind: step size. The DOF of your optics is about 0.05 mm, assuming that 4X objective is the typical NA 0.1 . So then with 216 images you could cover around 10 mm total depth. Of course I don't know your subject, but I'm guessing that the parts I can see sharply are not that far apart. Check your source frames to see if they have some but not too much depth overlap from one to another. Obviously you need every feature to be sharp in at least one source frame, which means that some features will be sharp in two frames. But if any feature is sharp in 3 or more source frames, then you stepped smaller than you needed to. There's no great harm in stepping smaller than necessary -- typically a slight increase in noise, but mostly just the extra time to shoot and process.
I hope this helps!
--Rik
Rik
Thank you for responding to my request for feedback. I apologize for posting in the wrong forum, I will be more cognizant in the future. I just wanted to respond to you with some changes that I made, hopefully improving the outcome. The hot pixel trails are still present, but not quite as bad.
1- reduce the number of photos
2 - changed the lighting (seems a little dark right now, but I don't think it is as harsh)
3 - reduced the ISO and increased the light (maybe not enough), and shortened the exposure
4 - turned off LIVE VIEW
5 - I am not sure how to make my setup, such as it is, more true without more of a monetary investment than I can muster at present, that may be something I have to live with for now. In the past I have seen edge streaks, before adding the 3 way head with the leveling bubbles.
-
rjlittlefield
- Site Admin
- Posts: 23625
- Joined: Tue Aug 01, 2006 8:34 am
- Location: Richland, Washington State, USA
- Contact:
This looks much better except that it's awfully dark.
I see a flash in the picture of your setup. Is that being used to shoot these stacks? If so, what power level are you running it on?
I also see some kind of snoot on the flash, possibly with another layer of something that may add some diffusion but also absorb some light. Can you tell me more about that?
A lot of the tonal range can be recovered in post-processing with a levels adjustment. If you'd like, I can post here to show you how.
--Rik
-
rjlittlefield
- Site Admin
- Posts: 23625
- Joined: Tue Aug 01, 2006 8:34 am
- Location: Richland, Washington State, USA
- Contact:
In this use, the vellum paper may be hurting you more than it's helping. The only light that can get to the subject is whatever goes through the big wraparound diffuser. To do that, it first has to hit the big diffuser. By diffusing the light at the flash, the vellum will cause a significant amount of it to miss the big wraparound diffuser altogether. You would have to test to be sure, but it's quite possible that you could get almost as high quality diffused illumination, and brighter, by removing the vellum.
One inexpensive way to improve the utility of flash for this sort of application is to buy an off-camera cable. Together with some sort of mechanical support for the flash, this allows to place the flash unit very close to a small diffuser that wraps around the specimen. Yogurt containers and white plastic foam coffee cups are popular materials. By confining the light to a smaller space, these approaches can pick up several stops of useful brightness.
Here is an example of improving the image's tonal range through the use of a "curves" adjustment layer. The large panel at top right shows the adjustment layer with the original histogram, before adjustment. The smaller panel below that shows the final histogram, after adjustment.
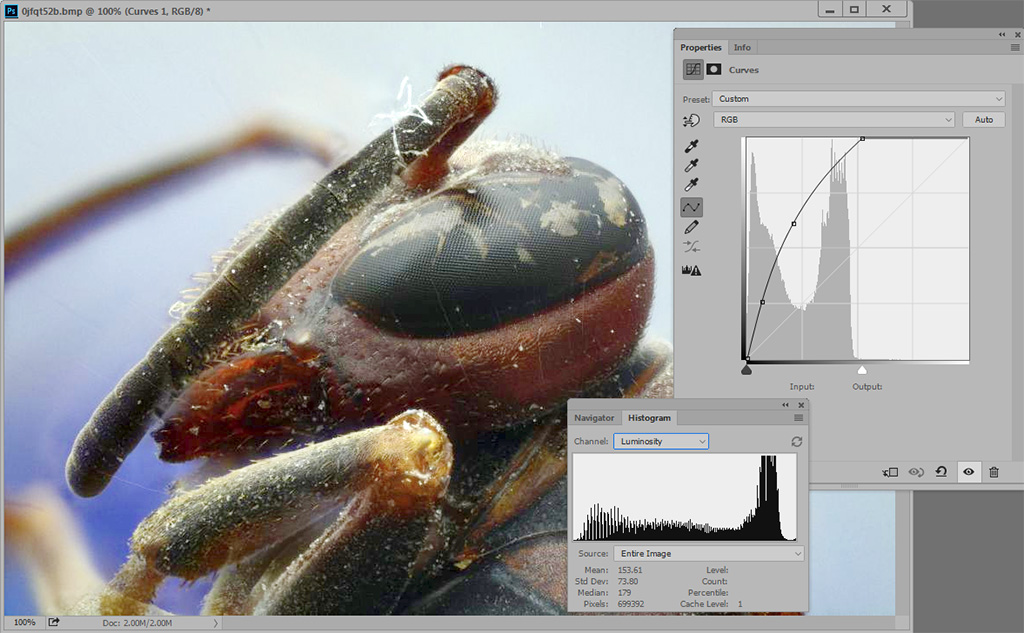
This was done in Photoshop. Any decent image processing program will have similar capabilities.
--Rik
One inexpensive way to improve the utility of flash for this sort of application is to buy an off-camera cable. Together with some sort of mechanical support for the flash, this allows to place the flash unit very close to a small diffuser that wraps around the specimen. Yogurt containers and white plastic foam coffee cups are popular materials. By confining the light to a smaller space, these approaches can pick up several stops of useful brightness.
Here is an example of improving the image's tonal range through the use of a "curves" adjustment layer. The large panel at top right shows the adjustment layer with the original histogram, before adjustment. The smaller panel below that shows the final histogram, after adjustment.
This was done in Photoshop. Any decent image processing program will have similar capabilities.
--Rik