Hi all,
Haven't posted much recently. I've been having a bit of rest from image stacking.
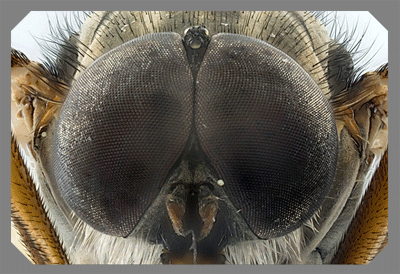
Here's one I did today of a fly's eyes. Not sure what kind of fly it is, but it was quite large. About 12mm long with a wingspan a little over 20mm. The distance between the outer edges of the eyes is about 2mm. It has a distinct black and white striped pattern running along its thorax.
It's a stack of 40 frames with a 0.1mm focus adjustment.
I'm going to spend a bit more time on the full sized stack to see if I can improve it in a few areas, where Helicon has not did as good a rendering of some of the detail that is on the original frames as I hoped. The areas below the central ocelli and the around the mouthparts look as though they could benefit from a bit of source cloning.
Nikon D200 with Schneider Componon HM F2.8 lens.
5 second exposure @ F8
40 frames stacked in Helicon Focus
Finished in Photoshop CS2
The Eyes Of A Fly
Moderators: rjlittlefield, ChrisR, Chris S., Pau
-
georgedingwall

- Posts: 207
- Joined: Tue Aug 01, 2006 11:15 am
- Location: Invergordon, Scotland
- Contact:
The Eyes Of A Fly
Last edited by georgedingwall on Sun Mar 02, 2008 1:49 pm, edited 1 time in total.
-
rjlittlefield

- Site Admin
- Posts: 23598
- Joined: Tue Aug 01, 2006 8:34 am
- Location: Richland, Washington State, USA
- Contact:
George,
It's good to see you getting back into this. Too much stacking can definitely cause burnout!
I'll be interested to see how much improvement comes from the manual source cloning. Now that you mention it, those mouthparts do look a bit mushy, but of course I don't have either the original pics or the real fly to compare against.
By the way, you might be interested in my reaction to the fake mounting corners. I suppose it's just me, but I've noticed that my brain consistently jerks around for several seconds trying to figure out what those triangular white/gray things are. Even more bizarre, once I've figured it out, my eyes still keep getting drawn back to them. Maybe if the whole page looked more like a scrapbook, I'd figure 'em out quicker and easier, but here on a forum page, they're a constant distraction for me. (I know, I'm easily distracted.
  )
)
--Rik
It's good to see you getting back into this. Too much stacking can definitely cause burnout!
I'll be interested to see how much improvement comes from the manual source cloning. Now that you mention it, those mouthparts do look a bit mushy, but of course I don't have either the original pics or the real fly to compare against.
By the way, you might be interested in my reaction to the fake mounting corners. I suppose it's just me, but I've noticed that my brain consistently jerks around for several seconds trying to figure out what those triangular white/gray things are. Even more bizarre, once I've figured it out, my eyes still keep getting drawn back to them. Maybe if the whole page looked more like a scrapbook, I'd figure 'em out quicker and easier, but here on a forum page, they're a constant distraction for me.
--Rik
-
georgedingwall
- Posts: 207
- Joined: Tue Aug 01, 2006 11:15 am
- Location: Invergordon, Scotland
- Contact:
Hi Rik,
Thanks for the comments.
The photo corners are something that get applied automatically when I resize and save for the web. I use some scripts I wrote for Photoshop to automate various aspects of finishing, and the corners are part of that process. I can easilly remove them by a single click of the mouse.
The reason I started using them was to make the images a little more difficult to be used if downloaded from the web. I found some of my images being used, or linked to, from other websites, and figured that if I added the corners, the images would be less useable by the time the corners were cut off.
I'll give it a try without them when I upload the reworked image later.
Bye for now.
-
georgedingwall
- Posts: 207
- Joined: Tue Aug 01, 2006 11:15 am
- Location: Invergordon, Scotland
- Contact:
Hi,
Here's a reworked version of the image after using the "Clone Source" option in Helicon focus to try to bring back some detail in low contrast areas that can get lost during the stacking process.
I've managed to recover some details in the areas I previously mentioned, and one or two other places in the image.
I also used a small amount of the clone tool in Photoshop
Bye for now.
Last edited by georgedingwall on Sun Mar 02, 2008 1:50 pm, edited 1 time in total.
-
rjlittlefield
- Site Admin
- Posts: 23598
- Joined: Tue Aug 01, 2006 8:34 am
- Location: Richland, Washington State, USA
- Contact:
Interesting. This image looks significantly better over most of the frame -- sharper and less pixelated. Did it by any chance go through one less stage of resizing, or were there other differences? Also, what's going on with the dark gray areas upper left and right? In the first image, I see see hairs in those areas; in the second, I don't.
--Rik
--Rik
-
georgedingwall
- Posts: 207
- Joined: Tue Aug 01, 2006 11:15 am
- Location: Invergordon, Scotland
- Contact:
Hi Rik,
The only other difference, was that the first stack was saved at 1500 pixels wide, the second was saved at full size of 3872 pixels wide.
The dark areas you mention are still a bit of work in progress I'm afraid. I tried to bring back a bit of the surface detail that was in the originals images, but I didn't do a very good job of it. Helicon Focus doesn't seem to allow you to cancel individual actions when you use the source clone option. It's either accept it or cancel all the work you have done up to that point. I will have another shot at it when I get time, but I was quite pleased with the general result of the process on the other areas that had problems, so I decided to keep this version and post a copy for comparison.
The second image did have one less resizing step in the process. In the one with the corners, the image is first resized to 800 x nnn. The matte and corners are then added which makes the image larger than 800, so there is a final resizing step to reduce the image back to 800 again.rjlittlefield wrote:Interesting. This image looks significantly better over most of the frame -- sharper and less pixelated. Did it by any chance go through one less stage of resizing, or were there other differences? Also, what's going on with the dark gray areas upper left and right? In the first image, I see see hairs in those areas; in the second, I don't.
--Rik
The only other difference, was that the first stack was saved at 1500 pixels wide, the second was saved at full size of 3872 pixels wide.
The dark areas you mention are still a bit of work in progress I'm afraid. I tried to bring back a bit of the surface detail that was in the originals images, but I didn't do a very good job of it. Helicon Focus doesn't seem to allow you to cancel individual actions when you use the source clone option. It's either accept it or cancel all the work you have done up to that point. I will have another shot at it when I get time, but I was quite pleased with the general result of the process on the other areas that had problems, so I decided to keep this version and post a copy for comparison.
-
georgedingwall
- Posts: 207
- Joined: Tue Aug 01, 2006 11:15 am
- Location: Invergordon, Scotland
- Contact:
I've tried in this image to restore the hairs that were lost in the reworked image.
I blended two images, one with the hairs and one with some tecture behind the hairs, in photoshop.
I think it is a little better than both earlier images.
Bye for now.
I blended two images, one with the hairs and one with some tecture behind the hairs, in photoshop.
I think it is a little better than both earlier images.
Bye for now.
Last edited by georgedingwall on Sun Mar 02, 2008 1:50 pm, edited 1 time in total.
-
rjlittlefield
- Site Admin
- Posts: 23598
- Joined: Tue Aug 01, 2006 8:34 am
- Location: Richland, Washington State, USA
- Contact:
Hhmm... Looking more closely by clicking layers in Photoshop, I see substantial differences between these images. The latter two have much less flare in the dark areas of the face, and even the geometry of the reconstruction is slightly different. When I layer and align in Photoshop, then click to toggle between, I see the legs staying in exactly the same place while the eyes bulge in and out slightly. I'm thinking that either these are from two slightly different stacks, or the HF parameters were set differently, causing the frame-to-frame auto-alignment to be slightly different in the two reconstructions. Is this making any sense? Would you like to see an animation of the toggle-between? (If so, permission requested to post in your thread...)
--Rik
--Rik

-
georgedingwall
- Posts: 207
- Joined: Tue Aug 01, 2006 11:15 am
- Location: Invergordon, Scotland
- Contact:
Hi Rik,
I don't recall the exact stacking parameters used, but I usually go with 6 and 4, although I will usually bracket these somewhat to see if there is any improvement. My experience so far normally shows 6.4 to be the best for most images.
One other thing that might have had an influence on the process is that I download and installed the latest version of Helicon Focus after the first stack was produced. One of the things in the new version is that it has better support for larger images. The D200 image is around 28MB uncompressed, and I have noticed in the past that Helicon sometimes struggles a bit with images of this size.
I don't think any of the settings in the Preferences were changed during the upgrade process, but I can't be sure.
I tried to keep the post-processing in Photoshop the same, but again, I can't be 100% sure of this. In the original images, there was a bit of light pollution which caused the flare you mentioned. To bring this back, I use layer masks and selective processing with the Curves tool and sometimes use a little of the burn tool to achieve a more balanced image.
I think I had to use a little less sharpening than I usually do on the first image due to its smaller size. I don't use a lot of sharpening on my images. I use Smart Sharpen with fairly conservative parameters. And then apply them in three stages using a luminosity fade at each stage 50% for the first and 25% for the other twice.
I would be happy for you to post you animation Rik. I'm a little unsure if you are saying that the differences between the stacks are causing the images to be less good than they might otherwise have been, or are just pointing out an interesting phenomenon. I would value your insight.
Bye for now.
The first image was separate stack. The RAW images from the first run were saved as a different size to the second two images. The first was saved at 1500 pixels wide and the other two at 3972 pixels wide. I'm pretty sure that Helicon does something different to files of different sizes. The RAW conversion parameters were identical for all stacks.rjlittlefield wrote:Hhmm... Looking more closely by clicking layers in Photoshop, I see substantial differences between these images. The latter two have much less flare in the dark areas of the face, and even the geometry of the reconstruction is slightly different. When I layer and align in Photoshop, then click to toggle between, I see the legs staying in exactly the same place while the eyes bulge in and out slightly. I'm thinking that either these are from two slightly different stacks, or the HF parameters were set differently, causing the frame-to-frame auto-alignment to be slightly different in the two reconstructions. Is this making any sense? Would you like to see an animation of the toggle-between? (If so, permission requested to post in your thread...)
--Rik
I don't recall the exact stacking parameters used, but I usually go with 6 and 4, although I will usually bracket these somewhat to see if there is any improvement. My experience so far normally shows 6.4 to be the best for most images.
One other thing that might have had an influence on the process is that I download and installed the latest version of Helicon Focus after the first stack was produced. One of the things in the new version is that it has better support for larger images. The D200 image is around 28MB uncompressed, and I have noticed in the past that Helicon sometimes struggles a bit with images of this size.
I don't think any of the settings in the Preferences were changed during the upgrade process, but I can't be sure.
I tried to keep the post-processing in Photoshop the same, but again, I can't be 100% sure of this. In the original images, there was a bit of light pollution which caused the flare you mentioned. To bring this back, I use layer masks and selective processing with the Curves tool and sometimes use a little of the burn tool to achieve a more balanced image.
I think I had to use a little less sharpening than I usually do on the first image due to its smaller size. I don't use a lot of sharpening on my images. I use Smart Sharpen with fairly conservative parameters. And then apply them in three stages using a luminosity fade at each stage 50% for the first and 25% for the other twice.
I would be happy for you to post you animation Rik. I'm a little unsure if you are saying that the differences between the stacks are causing the images to be less good than they might otherwise have been, or are just pointing out an interesting phenomenon. I would value your insight.
Bye for now.
-
rjlittlefield
- Site Admin
- Posts: 23598
- Joined: Tue Aug 01, 2006 8:34 am
- Location: Richland, Washington State, USA
- Contact:
George,
Here's the animation:
I didn't take time to get the two images perfectly aligned, but I think they're close enough to show several effects.
Let your eyes roam around for a minute, and you'll see differences in halo (near the legs, left and right side), in flare (darkness of the blacks, especially around the mouth), and in geometry (eyes bulge more or less and change in size).
Some of these affect quality and some are just interesting, at least in this case.
Halo is hard to fix in post-processing, so whatever made the difference around the legs is worth figuring out.
Flare is easier to fix in post-processing, but sometimes it can be easily addressed by lens shades while shooting. (See the black paper cone in panel #1 at http://www.photomacrography.net/forum/v ... .php?t=424 .)
Geometry changes are just interesting, at least for a single stack shot for aesthetic purposes. I'm not perfectly sure what's happening in your pictures, but in some of my own work, I have run the very same stack through different software, overlayed the resulting images like this, and seen noticeable "warping" of the geometry. What happens is that alignment errors accumulate as the software works its way incrementally through the stack, registering each frame against the previous one. The difference in the individual errors would not be enough to notice, but the sum can be.
To my eye, your second and third images in this topic are definitely better than the first one. I'm just poking around for "root causes", trying to understand better what matters when.
I would definitely try to avoid that additional interpolation step that's done by the corner-tabs script. Resizing an image by just a little bit is almost guaranteed to mush out detail in some places. Think of trying to resize a crisp black/white/black/white pattern, 400 line pairs in 800 pixels, so that it fits in 780 pixels. The moire effect would be striking. With natural images, it's a lot less obvious, but still visible. As an experiment, try taking your third image, make a copy, resize to 780 pixels, than resize back to 800, layer that with the original, and click back and forth. I just now did that in Photoshop; the differences are barely visible at first glance, but when I focus on the details, the image that got resized is a lot less crisp.
About Helicon doing different things to images of different sizes, I have the impression that those R and S parameters are measured in units of pixels. If so, then doubling the image size is like halving R and S -- probably quite a noticeable effect.
I hope this discussion is helpful to you. It certainly is to me!
--Rik
-
georgedingwall
- Posts: 207
- Joined: Tue Aug 01, 2006 11:15 am
- Location: Invergordon, Scotland
- Contact:
Hi Rik,
Thanks for you explanation. The animation certainly show some geometry changes.
Some of the changes between the images are where I cloned from the source images. The area around the mouth had much more detail in the original frames than it did after the stack.
Thanks for all you comments, you've given me a lot to consider.
Bye for now.