Sorry for the confusion. I was confused because I didn't notice my images were resorted when the software renamed the stacks.
Top image was 60mm at f11. I trusted autofocus to get the top in focus. In the earlier series I had used manual to start and since they were determined to be unsharp I thought this might be more dependable. The autofocus shot was not included in the stack, just used as comparison single shot.
2nd image was 200mm at f11. Likewise all the other procedure.
3rd image is stack of 60mm f11. The stack was started with the starting point backing off slightly from the autofocus point and camera was switched to manual. Liveview was used with the rail to set the end point near the labrum. When I zoom in, what I see isn't a shaking but the pixels seem to be a seething mass. Because of the fluorescent illumination? Never noticed before. The room light was turned off before each shot, and without the flash I would get a black picture.
The 4th shot is stack 200mm f11. Ditto everything for the 60mm stack. I used the slower shutter speed, as Rik said my 1/3" exposures in my first test, would ironically be sharper than my 1/100' in the 2nd blurry series.
It did not seem to make sense, what the Nikon help tech told me. There is an extreme variance in knowledge, when calling, I've found. Once with a previous problem I was told it was due to using an SD card with the D4, and that couldn't be used. When I checked to see what I could use, that was the only one that could be, confirmed by a 2nd tech.
Also some confusion about the distance. It should be .16mm. this is 160 microns indicated on the Stackshot readout, correct?
comparison
Moderators: rjlittlefield, ChrisR, Chris S., Pau
aperture comparison
I set up a leaning ruler and photographed it with the 200mm macro at all the aperture., to see if you think there is something wrong with the lens. Rather than clutter up here, I have link. http://theearlybirder.com/aperture%20200mm/index.htm
None of the links on that page go anywhere as it is in a different directory.
I am also trying controlmynikon software. when I take a picture with liveview though, I can't see how it turned out. Can't it be saved to the camer card as well or instead? In this program I don't see the browser shown in the tutoriaol, so the only way I can check a picture is by opening each in photoshop, extremely inefficient and wasteful of time. Any tips?
-
rjlittlefield

- Site Admin
- Posts: 23621
- Joined: Tue Aug 01, 2006 8:34 am
- Location: Richland, Washington State, USA
- Contact:
Re: aperture comparison
I'm not sure what I'm looking at. When I click on each thumbnail it expands to be 900x493 pixels. Is that an actual-pixels crop from your 4928 x 3280 full frame?robirdman wrote:I set up a leaning ruler and photographed it with the 200mm macro at all the aperture., to see if you think there is something wrong with the lens. Rather than clutter up here, I have link. http://theearlybirder.com/aperture%20200mm/index.htm
--Rik
-
rjlittlefield
- Site Admin
- Posts: 23621
- Joined: Tue Aug 01, 2006 8:34 am
- Location: Richland, Washington State, USA
- Contact:
I just drew a rectangle around the series in Camera RAw and cropped that way.
After spending most of the day, trying out ControlmyNikon, I decided I wanted to try out the 4x objective I had bought in December. I did the head of this galerita, with 115 steps of .015 at F11 with a dust mask over the flash. What a dirty head!
I have been trying for a month to get recommendation on an Ultrasonic Cleaner, that would not disintegrate delicate subjects, and perhaps have different power controls but still nothing.
I think if I can get some kind of stage instead of just sticking on a piece of lightweight styrofoam, it should improve. It seems sharper than the last few series.
-
rjlittlefield
- Site Admin
- Posts: 23621
- Joined: Tue Aug 01, 2006 8:34 am
- Location: Richland, Washington State, USA
- Contact:
These last couple of rounds are sharper, so I assume you're getting a better handle on vibration problems and how to kill them with flash.
The images at http://theearlybirder.com/aperture%20200mm/index.htm look fine. They still don't look to me like "actual pixel" crops, by which I mean that one pixel on the sensor becomes one pixel on the display. The reasons I say that are: 1) they look too sharp to be actual pixels, 2) they don't show typical diffraction softening at smaller than f/16, and 3) the scale is all wrong, unless you were shooting that ruler at way less than 1:1, which then would not be testing the lens in the same way you've been using it. But I'm tired of trying to get a clear answer to my question, so I'm going to give up on that one for now.
Let me address a few of your other questions.
About deleting duplicate posts... You can delete your own posts as long as no one has replied yet. After there's been a reply, only administrators can delete posts. You can always edit your own posts, even if there have been replies. The difference there is that edits prior to replies are silent (no comment by the forum software about edits), while edits after replies produce a "Last edited by...at..." comment, plus the number of edits.
In [ControlMyNikon] I don't see the browser shown in the tutoriaol
To be clear, which tutorial? And where in the tutorial (what timestamp?) do you see this "browser"? In general, there are a bunch of sticky settings in ControlMyNikon. I'm guessing that display of the browser window is one of those. Perhaps it's addressed by the tutorial "ControlMyNikon v4.0 - Image Browsers".
The stacking one makes it seem like I didn't need to get Stackshot rail though.
If you have an internal focusing 200 mm lens, then indeed there's quite a bit you can do without a StackShot rail, even with high mag images. See for example AF motor focusing with a microscope objective. For some discussion of the tradeoffs (which are mostly in favor of "focus by ring"), see HERE.
Also some confusion about the distance. It should be .16mm. this is 160 microns indicated on the Stackshot readout, correct?
Correct.
I have been trying for a month to get recommendation on an Ultrasonic Cleaner, that would not disintegrate delicate subjects, and perhaps have different power controls but still nothing.
Once in a while a question comes up that nobody knows the answer to. My own unit is probably 30 years old, so it's really not much help.
--Rik
I redid the test because I thought that I may not have done it at x1. for some reason CS6 does not show distance. Attached is an uncropped one. CS6 does not produce the type of web gallery that I want so I went to CS5, where I make my galleries, and behold there is the subject distance as .5m. And it says the same for the previous series.
http://theearlybirder.com/aperture%2020 ... /index.htm is definitely x1
Controlmynikon emailed me about how to access the browser.
Regarding the Ultrasonic, is your suitable for delicate specimens? What controls or specs does it have. I have contacted field Museum, Svalley and others with no reply. I was just trying to get some Balsawood 10mm thick to suspend a specimen, and went to 3 places in chicago that only had Basswood m then called others and finally had to settle for thinner, but it works.
The I found this thing in my house that looks like it is for some very precise measurements, and I wondered if I could adapt it for use somehow? Any idea what it is. Presently it is hard to move anything on it, but it looks interesting, and if I knew what it was or how it works, maybe I could revive or operate it.
-
rjlittlefield
- Site Admin
- Posts: 23621
- Joined: Tue Aug 01, 2006 8:34 am
- Location: Richland, Washington State, USA
- Contact:
Lens manufacturers customarily quote "subject distance" as being the distance between the sensor plane and the subject. Using a 200 mm lens at 1:1, a value of 0.5m = 500 mm is not so unreasonable as it might seem at first glance. By the way, if it seems like that definition doesn't have much to do with "working distance", you're right.and behold there is the subject distance as .5m
Thank you for clarifying what was shown in the aperture series.I didn't see any point in leaving in a lot that was never close to in-focus, so I cropped them all in CS6 camera raw to have a larger final image of the more relevant area.
...
I just drew a rectangle around the series in Camera RAw and cropped that way.
...
Attached is an uncropped one.
Now, please bear with me while I explain my view of what you did, and why the aperture series that you displayed was not very useful for evaluating sharpness.
Here is an overlay showing a single frame from your aperture series overlaid on the uncropped frame.
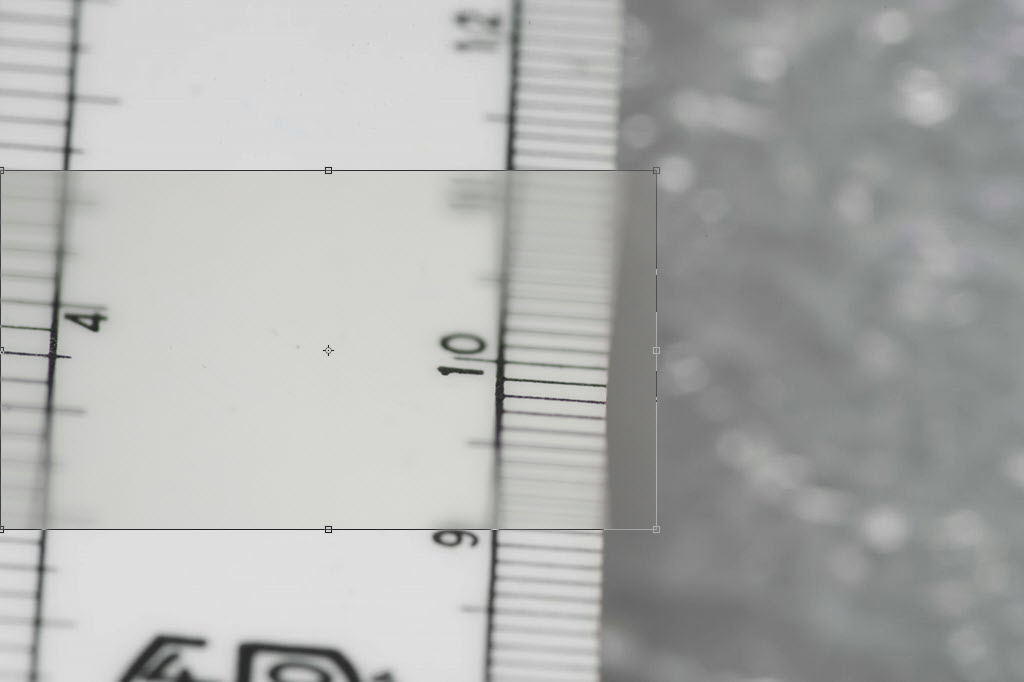
It turns out that the crop occupies 73% of the frame width. Knowing that your camera's resolution is 4928 pixels wide, that means the crop was 3600 pixels wide on sensor.
But because of the way you processed it, you showed it to us in the aperture series as 900 pixels wide on screen. That's a 4:1 reduction.
This completely explains why I said that the images looked "too sharp to be actual pixels". In fact every pixel that you showed to us represented 4 pixels on the camera's sensor. That turns f/45 diffraction blur into f/11 diffraction blur, and so on. Essentially what you did was to apply "the great equalizer": low resolution snapshots look sharp no matter what f-stop you shoot them at.
I have no idea. It works fine for the specimens I'm willing to put into it, but I have no intention of sticking anything really important into it. I don't know what Steve Valley is up to these days, but I vividly recall a story he told me some years ago, in which a long chain of successful uses came to a grinding halt when one important specimen simply exploded. Why that specimen and not others? Nobody knows.Regarding the Ultrasonic, is your suitable for delicate specimens?
I don't know what your device is. If you want to make precise measurements, I suggest learning about stage micrometers and other optical reticles that can easily give you measurements down to 0.01 mm. For angular measurements, working off images using the Photoshop "ruler" is a quick and accurate solution.The I found this thing in my house that looks like it is for some very precise measurements
--Rik
Rik,
I always appreciate your input. The main reason I put the ruler tests up was because I was not getting good results and Chris thought my lens was broken. I thought the results of these tests could indicate if it wasn't functioning properly at the different apertures.
The second series with the metal ruler I put up uncropped, as shot. Is diffraction shown there? How would I see or demonstrate it?
One of the best articles I could find on the web for cleaning specimens was this one which was preparation for SEM. http://www.zin.ru/animalia/coleoptera/p ... oscopy.pdf
The US cleaner was actually used on type specimens. I was never able to find anything out about the discontinued Branson 12 though. But he does mention putting the specimens in another container and putting that in the cleaner. I don't know if that is how you or others used it.
I came across a Branson 200 offered locally, but when the seller on the phone turned it on, I could hear that it was making a very loud noise making me wonder if it was broken though it was supposed to be new.
The strange device I depicted was something I though maybe could be integrated into some kind of stage that I could move precisely, rather than just to measure things. I definitely need to come up with some system, as I just have a light piece of Styrofoam with the insect pin in it. Nothing is gripping or stabilizing it. I noticed with Liveview zoom that if I don't move carefully the vibration takes a couple of seconds to subside. This is on a big desk on a basement cement floor, which surprised me.
-
rjlittlefield
- Site Admin
- Posts: 23621
- Joined: Tue Aug 01, 2006 8:34 am
- Location: Richland, Washington State, USA
- Contact:
Is diffraction shown there? How would I see or demonstrate it?
To see diffraction, first learn to make images that are not motion blurred.
Then simply focus on a detailed subject and run an aperture series from wide open to as small as your lens will go. Look at the resulting images at 100% in Photoshop. This is the view that we call "actual pixels".
For a non-stacked example see http://www.janrik.net/insects/ExtendedD ... deoff.html, second panel.
The exact degree of blurring that you see associated with any particular f-number will vary depending on type of camera, not just sensor size and pixel count but even the brand name. That's because for macro applications, different cameras report f-numbers differently. At 1:1, what your Nikon setup calls "f/16" is probably closer to what a Canon setup would call "f/8".
But in any case you should be able to see the usual progression from wide open = pretty sharp but with shallow DOF, through medium = sharpest and with moderate DOF, to smallest aperture = blurred but with most DOF.
If you cannot see that progression, then you should go looking for other sources of blur such as motion (vibration).
--Rik
So the 2nd ruler test at http://theearlybirder.com/aperture%2020 ... dex.htm#19 was not a good measure either, and I should try a butterfly wing?
And with the Nikon lens F11 would be equivalent to F22 and may be fairly optimal? Perhaps F18 or f20 reading would be pretty good then.
And then don't crop but just blow up in PS. I'll try it.
Meanwhile I'm running out of free trial times on everything.
And with the Nikon lens F11 would be equivalent to F22 and may be fairly optimal? Perhaps F18 or f20 reading would be pretty good then.
And then don't crop but just blow up in PS. I'll try it.
Meanwhile I'm running out of free trial times on everything.
It depends WHICH Nikon lens.
Set camera exposure Mode to Manual.
Set lens to minimum aperture if it has an aperture ring (orange number, likely to be 32) so control is via the dials on the camera.
Turn Focus to closest possible.
Set minimum aperture via the dial on the camera.
Is it f/32, or something like f/57 or 64?
There's always GIMP (free) for image manipulation.
I just ran the butterfly series with my Nikon 200mm macro which has F32 on the barrel but shows f45 at smallest aperture. This time I used the mirror lockup for the first time also. Never used it in the field. Focus was minimum at 1:1. Haven't transferred to the computer yet. Experimenting with ControlMyCamera now. This is in the basement setup, while my PC and image work is done upstairs.