comparison

A forum to ask questions, post setups, and generally discuss anything having to do with photomacrography and photomicroscopy.

Moderators: rjlittlefield, ChrisR, Chris S., Pau

robirdman
Posts: 70
Joined: Wed Dec 04, 2013 4:53 pm

comparison

Post by robirdman »

As I am just a beginner starting, and this is only my second attempt, I would appreciate comments on carefully comparing these 2 images, and what I should look for to judge which procedure to use, and what might improve.

Nikon D4 200mm macro w/close-up F32, 1/3" ISO 160 3R1 flashes with a little translucent packing material over them.

Thanks for any advice.

Image
Image
Image
Last edited by robirdman on Mon Jan 06, 2014 7:28 am, edited 1 time in total.

NikonUser
Posts: 2693
Joined: Thu Sep 04, 2008 2:03 am
Location: southern New Brunswick, Canada

Post by NikonUser »

Try f/8 rather than f/32.
Make sure that at least the head of the pin is in focus
ISO 100 or less
NU.
student of entomology
Quote – Holmes on ‘Entomology’
” I suppose you are an entomologist ? “
” Not quite so ambitious as that, sir. I should like to put my eyes on the individual entitled to that name.
No man can be truly called an entomologist,
sir; the subject is too vast for any single human intelligence to grasp.”
Oliver Wendell Holmes, Sr
The Poet at the Breakfast Table.

Nikon camera, lenses and objectives
Olympus microscope and objectives

robirdman
Posts: 70
Joined: Wed Dec 04, 2013 4:53 pm

Post by robirdman »

I added a 3rd method. I had intended to clone one side to the other to get rid of the pin in a final image. I would have to add many times the number of images to get the pin in focus wouldn't I? If I did so would it then get the areas around the pin in focus, and only having a small blur?

Besides improving technique, I am interested in noting differences among the 3 results.

F8 with way more than 26 stops? I could use a faster shutter then, even at 100 ISO. thanks. I've seen your amazing images and hope to approach eventually.

Olympusman
Posts: 5090
Joined: Sun Jan 15, 2012 12:31 pm

f8

Post by Olympusman »

NikonUser recommended f8 rather than f32 because at f32 lens diffraction can seriuosly reduce detail. The sweet spot on most lenses is usually the middle stop -- f8 or f11. It will require more shots in the stack, but the detail will be much finer.
Michael Reese Much FRMS EMS Bethlehem, Pennsylvania, USA

NikonUser
Posts: 2693
Joined: Thu Sep 04, 2008 2:03 am
Location: southern New Brunswick, Canada

Post by NikonUser »

I am assuming you have a 200mm AF Micro Nikkor with ED glass (a lens I have). It gives a decent image at f/32.
If you want to get sharper images you will have to open up to f/8 (f/11 may be OK).
It's your choice for outcome. Lots of frames at f/8 = sharp image; fewer frames @ f/32 = decent images.

Similarly for the pin head; if you don't get it in focus (again many more frames needed) you end up with, to me, an unacceptable blur.
Get it in focus and the blur will disappear and the head can easily be cloned out.

An alternative with pinned beetles is to relax them (warm water for a few hours) and remove the pin. After photographing (after they dry) the pin can be re-inserted.
NU.
student of entomology
Quote – Holmes on ‘Entomology’
” I suppose you are an entomologist ? “
” Not quite so ambitious as that, sir. I should like to put my eyes on the individual entitled to that name.
No man can be truly called an entomologist,
sir; the subject is too vast for any single human intelligence to grasp.”
Oliver Wendell Holmes, Sr
The Poet at the Breakfast Table.

Nikon camera, lenses and objectives
Olympus microscope and objectives

Olympusman
Posts: 5090
Joined: Sun Jan 15, 2012 12:31 pm

f8

Post by Olympusman »

NikonUser is recommending f8 over f32 because at f32 lens diffraction can seriously wipe out detail. The sweet spot on most lenses is usually a middle stop -- f8 or f11. You will have to have more shots in your stack, but the detail will be much finer.
Michael Reese Much FRMS EMS Bethlehem, Pennsylvania, USA

rjlittlefield
Site Admin
Posts: 23608
Joined: Tue Aug 01, 2006 8:34 am
Location: Richland, Washington State, USA
Contact:

Post by rjlittlefield »

Since you've included 3 images, I suppose you're interested in comments on differences between them.

Here are some things I notice:

Image Image Image

I see that all three of your images have slightly different scale and rotation, so I'm guessing that these represent the same stack run through three different processing methods.

For a beginner with this type of subject, I'd recommend using a "pyramid" method such as CombineZP "Do Pyramoid Maximum", Helicon Focus "Method C", or Zerene Stacker "PMax". That will eliminate most of the halo, bands in OOF regions, and missing detail.

To avoid problems with washed out backgrounds, it's best to underexpose a little bit when the pictures are shot, then restore the desired brightness and contrast in post-processing after all the stacking is done.

--Rik

robirdman
Posts: 70
Joined: Wed Dec 04, 2013 4:53 pm

Post by robirdman »

I tried to make things as equal as possible. In 2 cases, the program worked from the RAW file. In the other, I created a macro to make cropped tiffs with size not changing, (unconstrained) with 300dpi. So all 3 are 300dpi.

I noticed immediately the nearly missing middle claw in one that otherwise looked pretty good. What is the oof area?

They were actually underexposed somewhat more than I would have liked, and I brought them up after stacking with shadows/highlight and level in Photoshop CS6.

I'm thinking, I don't really need to use the R1s as I'm not shooting in the field and could use SB800 with cheaper batteries.

For the pin head, just add a extra focus point without all the ones in between?

I want to have enough detail for species ID or confirmation whenever possible.

Thanks.

rjlittlefield
Site Admin
Posts: 23608
Joined: Tue Aug 01, 2006 8:34 am
Location: Richland, Washington State, USA
Contact:

Post by rjlittlefield »

robirdman wrote:I tried to make things as equal as possible.
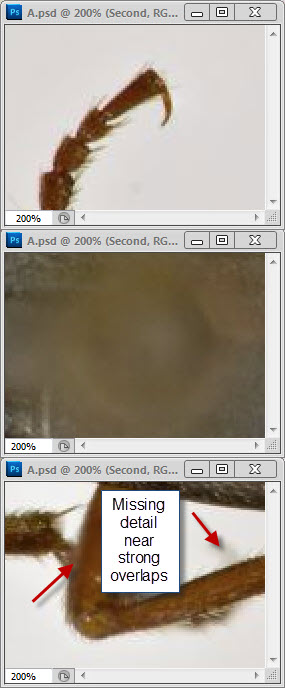
Well, your three posted images are three different sizes, all 1024 pixels wide but with heights of 761, 726, and 812 pixels. When I pull those images into Photoshop, make a layered stack of them, and use transparency to compare alignment, I see that the beetles are slightly different sizes and orientations. No two of them can be made to line up exactly, although the first and third are pretty close.

If I then use Photoshop's Edit > Auto-Align Layers with the Collage option (allow image rotation, scale, and translation), I see that the beetles are not quite the same shape either. The second and third appear to have the same shape, but in the first one the closer portions of the subject are shifted slightly with respect to the farther portions. For example click-to-flash between the first and second images shows the upper antenna bouncing between two slightly different positions where it overlaps the beetle's front leg.

Slight changes in geometry like this are completely typical of what happens when you run the same stack through different pieces of software. What happens is that each piece of software makes slightly different decisions about how the images line up with each other. Those slight differences add up across the whole stack to make easily visible differences in the final product.
What is the oof area?
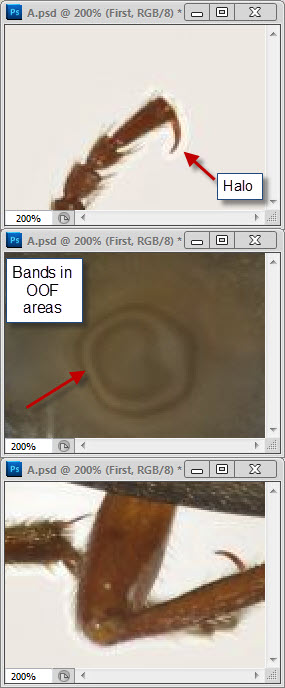
The bands I pointed out are in what I assume is the head of the insect pin. Without knowing which software and what method you're using, I can't tell you what caused them. Bands that look like this often arise in depth map methods when there is significant difference in illumination from one frame to another. They can also be produced by out-of-order frames. Neither of those seems to be a good explanation for why they appear in your image, so I'm treating the origin as a mystery and I'm just saying "here's another thing to look out for when stacking".
For the pin head, just add a extra focus point without all the ones in between?
Beats me -- try it and see. In my own experience, the best results seem to come from letting the stacking software see things as they go continuously in and out of focus. Stacks with large gaps often have more obvious artifacts such as contamination halos around foreground features. But for your purposes the savings in time to shoot the stack may be a good tradeoff against whatever more artifacts you get.
I want to have enough detail for species ID or confirmation whenever possible.
Again, you'll have to decide what that means in terms of resolution and specimen prep and posing. I don't know anything about these beetles. I do know a bit about butterflies, and across the ones I know, "enough detail" can range anywhere from a fuzzy snapshot of the wing pattern down to obscure details of the genitalia that can be seen only by dissection and high magnification.

--Rik

robirdman
Posts: 70
Joined: Wed Dec 04, 2013 4:53 pm

Post by robirdman »

the one with banding in oof area is Helicon but method B.
The area above the pin is almost twice the depth of the beetle I think, so that seems too much extra to do. I'll try just the head area added next time. the softening and removing the pin means I'd have to respread all the appendages again, which also seems too much trouble for most. A few do have legs curled under and that would be more worthwhile and need less cloning.
Thanks.

rjlittlefield
Site Admin
Posts: 23608
Joined: Tue Aug 01, 2006 8:34 am
Location: Richland, Washington State, USA
Contact:

Post by rjlittlefield »

robirdman wrote:the one with banding in oof area is Helicon but method B.
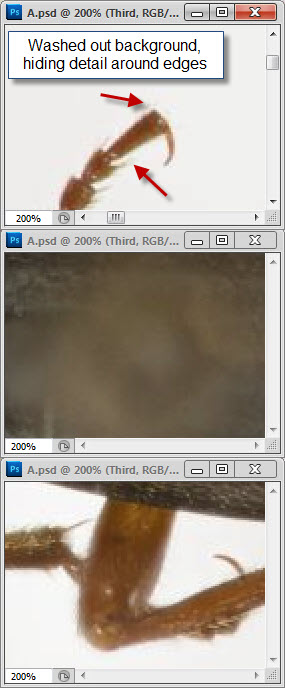
That makes perfect sense. Helicon's Method B is a depth map method, similar to CombineZ's Do Stack and Zerene Stacker's DMap, but with no provision like Zerene's contrast threshold slider to designate where you care about smooth transitions versus sharp detail.

--Rik

robirdman
Posts: 70
Joined: Wed Dec 04, 2013 4:53 pm

Post by robirdman »

I have found with my field macro photography of live arthropods, that there are relatively few that required the genitalia, while there were more that needed more detail of a part that wasn't sharp enough, or a different view, or precise measurements, so I expect a very high ratio of success with this collection.

Besides that though, to be able to produce something like the extreme quality of the many wonderful shots I see here is also a goal, though not with the vast majority of these specimens.

I still need to come up with a better lighting system. And I don't even have a stage. Just a piece of Styrofoam that I manually place in the right approximate position.

NikonUser
Posts: 2693
Joined: Thu Sep 04, 2008 2:03 am
Location: southern New Brunswick, Canada

Post by NikonUser »

What are you seeing in this dorsal view of a pinned beetle that you are not seeing in a field shot?
If you need more detail of a part I think you may have to go to higher magnification than the 1x+ you are getting with the 200mm lens.
NU.
student of entomology
Quote – Holmes on ‘Entomology’
” I suppose you are an entomologist ? “
” Not quite so ambitious as that, sir. I should like to put my eyes on the individual entitled to that name.
No man can be truly called an entomologist,
sir; the subject is too vast for any single human intelligence to grasp.”
Oliver Wendell Holmes, Sr
The Poet at the Breakfast Table.

Nikon camera, lenses and objectives
Olympus microscope and objectives

robirdman
Posts: 70
Joined: Wed Dec 04, 2013 4:53 pm

Post by robirdman »

As you can see in many field shots here, the legs are not in focus, and the underside is not visible and there are no dimensions. Numbers less than 1000000 are slide scans. Often an ID was needing to know if there were setae, or something that weren't visible or clear. If I find another view is needed, I can take more shots with the specimens.
http://theearlybirder.com/insects/beetl ... ndex.htm#8

Today was disappointing. I used F10 and .120mm stops with other parameters the same as before, but with different flashes. All the results are worse. Photoshop was terrible. Here are 2 others with 31 steps.
Image
Image

rjlittlefield
Site Admin
Posts: 23608
Joined: Tue Aug 01, 2006 8:34 am
Location: Richland, Washington State, USA
Contact:

Post by rjlittlefield »

Those are absurdly blurred.

My first thought is that there's something fundamentally wrong with your optics, but then I don't understand how you got a sharp image earlier.

Take a look at your source images. If they're blurred also then at least you'll know that your problem is not associated with the stacking process.

--Rik

Post Reply Previous topicNext topic