Effect of polarizing filters on the cricket mandibles photo

A forum to ask questions, post setups, and generally discuss anything having to do with photomacrography and photomicroscopy.

Moderators: rjlittlefield, ChrisR, Chris S., Pau

rjlittlefield
Site Admin
Posts: 23599
Joined: Tue Aug 01, 2006 8:34 am
Location: Richland, Washington State, USA
Contact:

Effect of polarizing filters on the cricket mandibles photo

Post by rjlittlefield »

Background for this topic is "The face behind the mask (cricket mandibles)", posted here. If you have not read that topic yet, go read it now --- we'll wait for you.

.... :smt015 ....

What, you're back already?! Excellent. Then you've already read a bit of discussion about the effect of polarizers on this picture, and you can guess that I'm going to fill in some details.

To start, here are pictures of a couple of lighting setups. On the left is the pingpong ball diffuser like what produced the original photo. (It's been torn down and set up again a couple of times, so please don't expect exact repetition here.) The right two are bare-bulb setups that yield lousy pictures but good insight. (BTW, the cricket is lying on its back, with its neck sticking through a notch in the blue card.)

Image

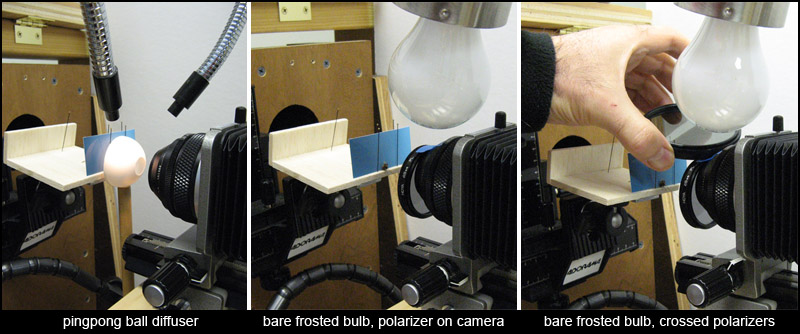
Using these lighting setups, I shot a series of pictures to document what happens with different arrangements of polarizers.

The following four cases show all the important effects:
  • pingpong ball diffuser, no polarizer
  • pingpong ball diffuser, polarizer on camera
  • bare bulb lighting, polarizer on camera only (between subject and lens), and
  • bare bulb lighting with crossed polarizers -- one between the light bulb and the subject, the other between the subject and the lens as usual.
Here are the images:

Image

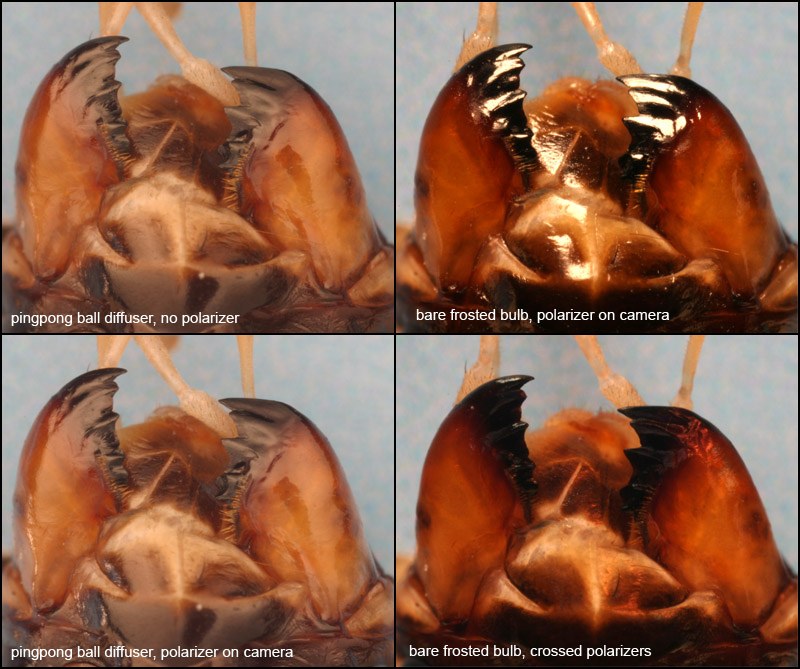
Nope, there is no mistake here -- I shot the series twice and checked very carefully to be sure that I had not mixed up any images.

It should be obvious that when using the pingpong ball diffuser, putting a polarizer on the camera has very little effect. The glare in some areas is reduced slightly (top of left mandible), while the glare in other areas is increased slightly (left side of left mandible). But the differences are small -- you have to study to see them.

I'm not showing the picture here, but that same thing is true with the bare bulb setup -- putting a polarizer on the camera alone has very little effect.

On the other hand, the effect of crossed polarizers is dramatic. The intense specular reflections essentially disappear, leaving a richly colored dark shape that shows a distinct outline but no surface contouring or details.

This demonstration simply begs for explanation, and I hope it's not too difficult to write one. Here goes...

Think of a ray of light as a vibrating string. Just like vibration in an ordinary string, vibration in light has a direction -- it can be up-and-down, side-to-side, or any angle in between. (It can even spin, but we're going to ignore that case here.)

In ordinary non-polarized light, the vibrations occur at all different angles. In completely polarized light, the vibrations occur at only a single angle. You can also have partially polarized light, in which the vibrations are larger at one angle than others.

Starting with ordinary non-polarized light, there are three ways to make it polarized.

One way to polarize light is to run it through a polarizing filter, which you can think of as a sort of screen that blocks light vibrating across the axis of the screen, while passing light that vibrates along the axis. A good polarizing filter produces almost completely polarized light, blocking 99% or more of any light that vibrates across the axis.

The second way to polarize light is to reflect it off a shiny surface made of most materials (metals excluded). This method generally gives only partially polarized light, and the amount of polarization depends on the angle of reflection. There is a critical angle, called Brewster's angle, at which the reflected light is 100% polarized. That angle varies with the material; for water it's about 37 degrees away from the water surface. At angles greater or less than Brewster's angle, the polarization is less than 100%. At 90 degrees, the polarization is zero.

The third way to polarize light is to scatter it in certain ways. Blue sky is partially polarized. The amount of polarization varies with angle away from the sun; it reaches a maximum (still much less than 100%) at 90 degrees.

Now, it is also possible to turn polarized light back into non-polarized. The easiest way to do that is to shine polarized light on most anything non-metallic. Light that is reflected in a non-specular manner will also be non-polarized, regardless of the polarization (if any) of the illumination.

On the other hand -- and this is important -- specular reflections from any material retain the angle of polarization of the illumination. In addition, specular reflections also retain the color of the illumination, not the substrate. That's why glare is always "white" and thus reduces color saturation.

OK, with all that background, we're now prepared to explain what we see in the pictures.

With the pingpong ball diffuser, the illumination is completely non-polarized. The specular reflections that comprise glare become slightly polarized, but only very slightly because most of the light in this setup comes from in front of the subject and the angles of reflection are far away from Brewster's angle. Putting a polarizing filter on the camera diminishes some of the glare spots while enhancing others (depending on the orientation of the surface that generates them). But because none of the reflections are strongly polarized, the filter really doesn't make much difference.

The same thing is true with the bare bulb -- putting a polarizing filter on just the camera does not have much effect. (In fact it has so little effect that I'm not even bothering to show it.)

However, size and placement of the bare bulb also permits a second polarizing filter to be used, this one placed between the bulb and the subject. Properly oriented, that second filter makes all the difference in the world!

What happens then is that the illumination becomes essentially 100% polarized. Every specular reflection -- every bit of glare, no matter how small -- preserves that polarization and thus can be blocked by the polarizer on the camera when turned to the proper angle. On the other hand, non-specular reflections from this non-metallic subject are also non-polarized, so they do not get blocked by the polarizer on the camera, no matter what angle that polarizer is turned to.

The upshot is that by polarizing the illumination, you can dial in exactly the amount of glare reduction you want, by adjusting the angle between the two polarizers. In the fourth panel above, I have set the polarizers to be at 90 degrees, eliminating essentially all of the glare.

OK, great, so now we have an explanation for what's happening with the cricket mandibles.

But why does this differ so much from Irwin's experiences with his subjects? Why do I need glare to reveal shape with the cricket mandibles, but he doesn't with his plants?

Most likely there are several contributing factors. I suspect the two most important are these:
  • The materials are different. Most plant structures, and for that matter most insect structures, are essentially opaque and produce their non-specular reflections at or very near the surface. In that case, the non-specular reflections carry much (not all) of the same shape information that the specular ones do. These mandibles are different, though. They are essentially clear but absorbant -- a lot like the coffee I mentioned in the other post -- so there is very little shape information contained in the non-specular reflections.
  • The lighting angles are different. In many setups used with larger subjects, a lot of light comes from behind the subject. That light reaches the camera through an angle of reflection that is closer to Brewster's angle, causing the specular "glare" component to be much more strongly polarized and thus able to be blocked. With these tiny macro setups, it's physically challenging to hold everything in place while providing light from both front and back. Usually I go with just one or the other.
One final question that may come to mind is this: Why not use polarized illumination with the pingpong ball, and thus become able to dial in exactly the right amount of glare to balance rich colors and visible surfaces?

The answer is, I'd love to but I haven't figured out how to pull that off yet. The trick is to either 1) polarize the fiber output and then scatter the light without changing its polarization, or 2) diffuse the light first and then polarize it before it gets to the subject. Both of these seem harder than trivial, but on the other hand, I haven't spent any time on them either. Could be there's some clever but simple approach, in which case I'd be delighted to hear about it.

A long writeup, but worth it, I think. At least I've got the content straight in my head now. :roll:

Questions, comments?

--Rik

Graham Stabler
Posts: 209
Joined: Thu Dec 20, 2007 11:22 am
Location: Swindon, UK

Post by Graham Stabler »

Nice presentation!

I'm not familiar with Irwin's pictures but it would seem to me that the average plant surface has a higher surface roughness than an insect's cuticle, this will produce diffuse reflections so you won't get the shaped lines that are seen in reflections on smooth surfaces and help to show the surface topology. There are also lots of fine details (veins, cells etc) which give visual cues.

Insect cuticle is more like a polished plastic with varying opacity depending on how much it is strengthened. This will produce a lot of specular reflection and not a great deal else (light that scatters into the cuticle will tend to be absorbed) so you really need those reflections to get an idea of the shapes. They are also smooth and featureless surfaces except when you get sutures or hairs etc.

A friend of mine did a lot of work with polarization of diffuse materials, there are some tricks you can play where you take a plain image and then the cross image and subtract one from the other to provide sub surface information, something like that anyway, I forget.

Cheers,

Graham

rjlittlefield
Site Admin
Posts: 23599
Joined: Tue Aug 01, 2006 8:34 am
Location: Richland, Washington State, USA
Contact:

Post by rjlittlefield »

Thanks for the comments, Graham.

A couple of more things maybe worth noting...

One is that in scenes lit by skylight, the illumination is naturally polarized -- not nearly 100% but perhaps enough to give some extra value to an on-camera polarizer.

Another is that I just now checked a moth wing and found that it behaves pretty much like you might expect a hairy leaf would. Single polarizer on camera greatly reduces glare from backlighting at roughly Brewster's angle. Crossed polarizers on illumination and camera completely remove glare, resulting in much higher color saturation but reduced ability to see ripples in the membrane shape.

While I was at it, I accidentally noticed that a single polarizer also cuts glare from dry skin when backlit at Brewster's angle. For one tantalizing moment, my 55-year old finger looked pink and smooth as a baby's bottom...which should tell you something about how well that setup hid the actual surface texture. :lol:

--Rik

cactuspic
Posts: 437
Joined: Tue Dec 26, 2006 8:34 am
Location: Dallas, TX
Contact:

Post by cactuspic »

Thanks Rik. When I got home a few minutes ago, I anxiously hopped on line to see your reply. It was exceptionally interesting and informative. I have one question. If my morning coffee goes cold tomorrow when I spend my time looking at it through a polarizer rather than drinking it, do I get to give you grief. :roll: More seriously, thank you for the extended explanation. In the next several days I hope to test the effect of a single polarizer on the surface detail rendition with several different surfaces and lighting angles

Several of the factors that you mentioned are probably at play in my plant photos. First, a very high percentage of my images are taken with natural light, often lit by the open sky, so the lighting is probably polarized in part at least. Second, frequently I use of side lighting with a back lighting component. Third, my surfaces have different characteristics than the mandibles and I suspect that the changes in texture in my subjects are often reflected in changes of color. In any case, they do not typically have a a transparent or translucent top surface. `Lastly, my surfaces have a great deal of fine detail. I will have to check the impact of magnification.

Again, thanks for helping to make sense of polarizer use.

Irwin


:roll: :roll: :roll: :roll: :roll:

rjlittlefield
Site Admin
Posts: 23599
Joined: Tue Aug 01, 2006 8:34 am
Location: Richland, Washington State, USA
Contact:

Post by rjlittlefield »

cactuspic wrote:If my morning coffee goes cold tomorrow when I spend my time looking at it through a polarizer rather than drinking it, do I get to give you grief. :roll:
But of course! Most of my friends need much less excuse than that, to give me grief! :wink:

I'm glad you found the explanation helpful. It's always interesting to talk through these things.

--Rik

rjlittlefield
Site Admin
Posts: 23599
Joined: Tue Aug 01, 2006 8:34 am
Location: Richland, Washington State, USA
Contact:

Post by rjlittlefield »

Adding links to previous articles describing/using cross-polarized flash:

http://www.naturescapes.net/articles/te ... otography/ (technical article by Will Hershberger, at NatureScapes)

http://www.photomacrography1.net/forum/ ... php?t=3629 (technical topic by Tom Webster, in the old forum)

http://www.photomacrography.net/forum/v ... php?t=1346 (mucky application by me, pic #2)

--Rik

Edit: to fix URL
Last edited by rjlittlefield on Mon May 13, 2013 2:17 pm, edited 1 time in total.

lauriek
Posts: 2402
Joined: Sun Nov 25, 2007 6:57 am
Location: South East UK
Contact:

Post by lauriek »

rjlittlefield wrote: For one tantalizing moment, my 55-year old finger looked pink and smooth as a baby's bottom...which should tell you something about how well that setup hid the actual surface texture. :lol:
--Rik
Been lurking here for a while now, too scared to post any images!!

It's good to know I've got a few years to catch up with you! I figure with 17 or so years of practice available I might be able to get close to some of your images!! ;)

Laurie
--

rjlittlefield
Site Admin
Posts: 23599
Joined: Tue Aug 01, 2006 8:34 am
Location: Richland, Washington State, USA
Contact:

Post by rjlittlefield »

Laurie, it's good to hear from you -- welcome aboard! :D
lauriek wrote:Been lurking here for a while now, too scared to post any images!!
Gee, you've only been registered for 6 weeks or so, and here you've already made your first post. That's pretty good -- well over half our registered members never get around to posting anything! Some of them have been with us for years.

If you're nervous about posting images, just let us know that and we promise to be nice. :D
I figure with 17 or so years of practice available I might be able to get close to some of your images!! ;)
Thanks for the nice words. :) I only post the ones I'm willing to have seen. You should see some of the stuff I throw away. :( :shock: :wink:

--Rik

crayfish74
Posts: 148
Joined: Tue Sep 04, 2012 6:11 pm

Post by crayfish74 »

Hi Rik....

In conclusion, do you recomend the use of filter for best results of light? mean using a polarizer on camera or cross-polarization ?

if the answer is yes, how I can attach the filter to tne Nikon 4x or 10x infinite?


Best,

Harold Gough
Posts: 5786
Joined: Sun Mar 09, 2008 2:17 am
Location: Reading, Berkshire, England

Post by Harold Gough »

Rik,

This link doesn't work (anymore):

http://www.naturescapes.net/042004/wh0404.htm (technical article by Will Hershberger, at NatureScapes)

The cross-polarizer for use with the T10 ring flash was part of the Olympus OM system:

http://www.alanwood.net/photography/oly ... flash.html

http://www.alanwood.net/photography/oly ... r-pol.html

I have both the ring flash and the cross polarizer (obtained last year) but have yet to try the latter.

Harold
My images are a medium for sharing some of my experiences: they are not me.

rjlittlefield
Site Admin
Posts: 23599
Joined: Tue Aug 01, 2006 8:34 am
Location: Richland, Washington State, USA
Contact:

Post by rjlittlefield »

Harold, thanks for the heads-up about the broken URL. I have replaced it with the current one, which NatureScapes claims is now a permalink: http://www.naturescapes.net/articles/te ... otography/ .

crayfish74, I personally don't use polarizers very often. Once in a while, for a very tricky problem like the waterlice.

Using polarizers with microscope objectives is more difficult than with ordinary lenses because objectives don't like to look through extra glass. It is much better to put the polarizer behind the objective, preferably between the objective and the tube lens.

If you're currently using an M42 system to mount the objective, then you can do something like M42-to-52mm adapter, 52mm polarizing filter, and 52mm-to-M42 adapter. This basically gives you a polarizer filter with M42 threads, which you can stick between the objective and the tube lens. You can get the M42<->52mm adapters as a mated pair on ebay, item 360637327932.

Or, if you're currently using a 52mm-to-RMS adapter to mount the objective, then you can just stick the polarizer in back of the adapter.

The closer the polarizer is mounted to the objective, the more likely it is to give flare problems, cutting your overall system contrast. Best to use a high quality coated polarizer and keep it as far as possible back of the objective.

--Rik

Harold Gough
Posts: 5786
Joined: Sun Mar 09, 2008 2:17 am
Location: Reading, Berkshire, England

Post by Harold Gough »

Rik,

You have reminded me that I have two copies of the cross-polarizer. The first one has the central (49mm) disc with the polarizer layer partly separating. Cutting out that glass and placing a standard polarizer further back on the light path, gives posibilites for variable interference, the benefits of which are not fully apparent to me at the moment. I am accustomed to single polarizer use outside of macro.

Harold
My images are a medium for sharing some of my experiences: they are not me.

Post Reply Previous topicNext topic