Help optimising cheap setup

Just bought that first macro lens? Post here to get helpful feedback and answers to any questions you might have.

Moderators: rjlittlefield, ChrisR, Chris S., Pau

bugbear
Posts: 67
Joined: Thu Mar 18, 2010 7:39 am
Location: UK

Help optimising cheap setup

Post by bugbear »

In a bid to document my knife sharpening problems, I am trying to photograph a knife edge.

I've done "OK", but I feel there's more quality to come.
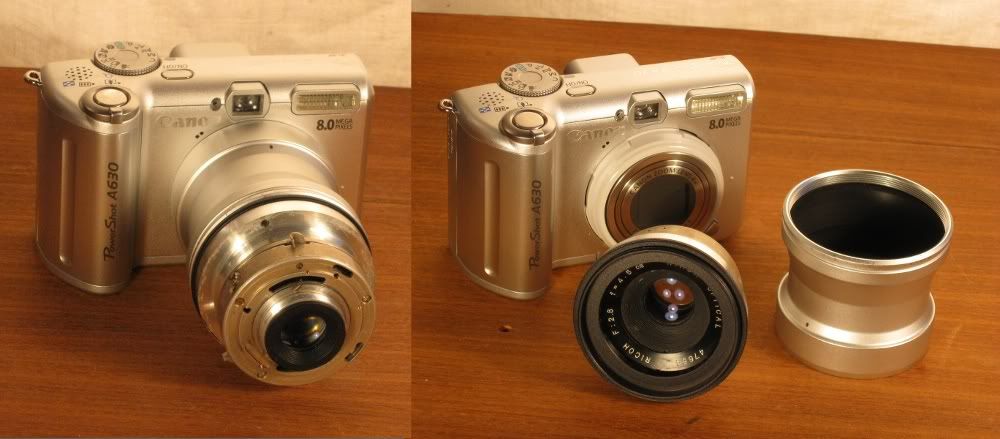
My rig is:

Canon A630 (4x zoom)
Lensmate Adapter
(adapter rings)
f2.8 45mm lens from defunct Ricoh rangefinder

Image

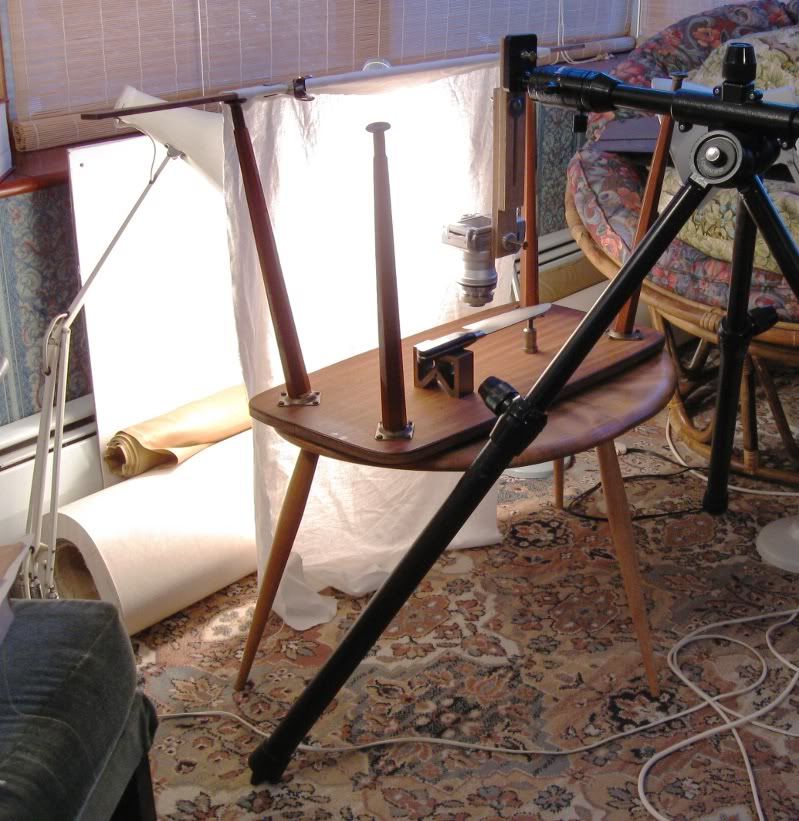
Camera positioning is via a Benbo tripod with its centre columns horizontal, and a DIY vertical "adjuster"

Lighting is from two angle poise lamps through a white cloth diffuser.

Image

Image

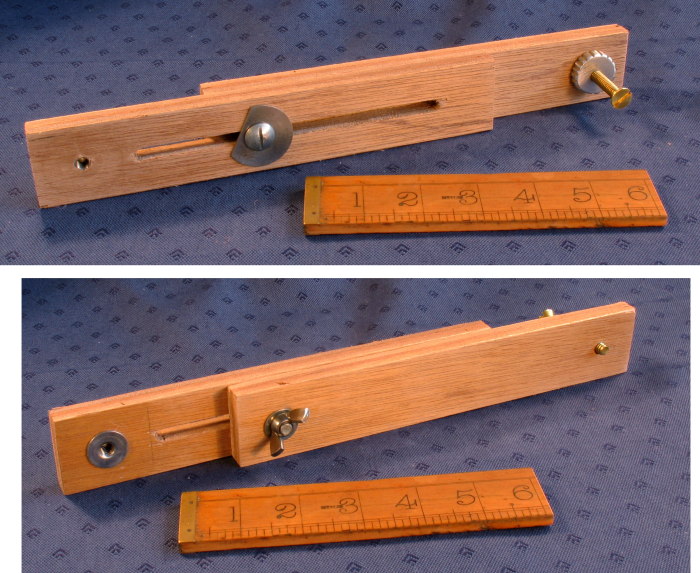
I've done some test shots, mainly of a 6" ruler on a 10 degree angled block, checking out focus and depth of field information. Shots are taken using camera delay to avoid any vibration (the DIY extender is particularly flimsy), focus is auto.

As far as I can judge, my DOF at f8 is around 0.4mm, and my range of focus (as I traverse the camera's focus from 50cm to infinity) is around 7mm.

I can get good, detailed photos, albeit with nasty vignetting (f2.8 is not enough, but the old camera was free!); here's my test ruler on a 10 degree bed, f8, 1 second, ISO80.

Image

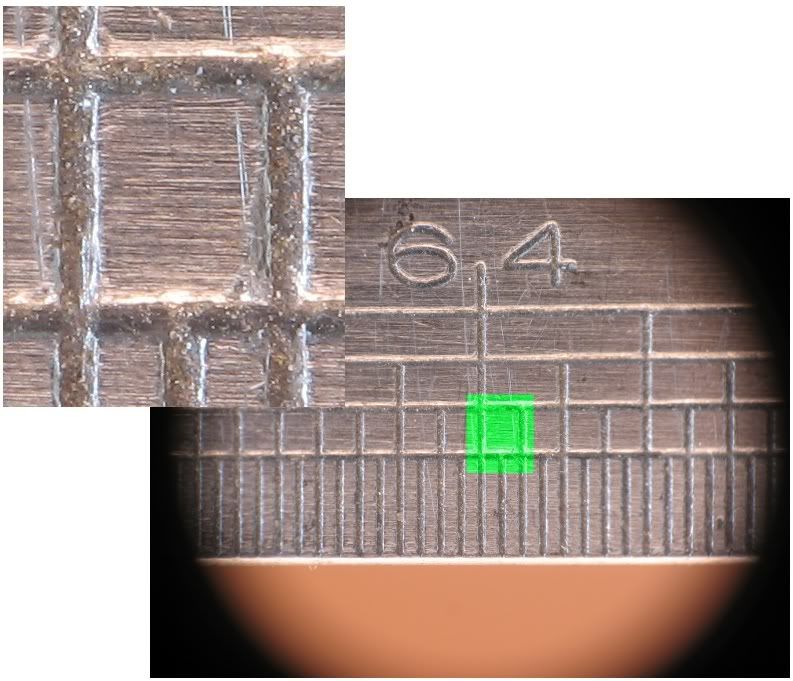
The inset is a 100% (yeah, I need all the zoom I can get).

Counting pixels, I'm presently getting around 7100 pixels per inch (280 per mm).

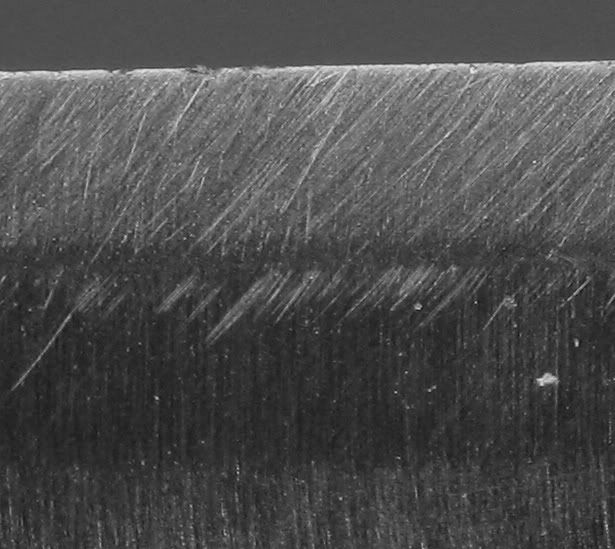
My shots of the knife edge aren't this good - I'm struggling with lighting, and focus.

(green channel only, levels adjusted)
Image

Questions:

Without just going and buying better equipment (my current expenditure has been 8 quid on the adapter rings - everything else I already had, or was free) how can I improve either the clarity or magnification?

Secondly, can anyone recommend a good test target - I want something so that I can see if my "capture" is getting the right information, and the rule doesn't have predictable information below 1/64"

BugBear
Last edited by bugbear on Wed Feb 16, 2011 6:53 am, edited 1 time in total.

Charles Krebs
Posts: 5865
Joined: Tue Aug 01, 2006 8:02 pm
Location: Issaquah, WA USA
Contact:

Post by Charles Krebs »

If the camera llens is zoomed to it's "max" and at it's closest focus, that's all the magnification you will get with the 45/2.8 lens you are using on front. A shorter focal length lens (attached to the front) will provide higher magnifications.

You might want to try camera lens apertures larger than f8. This will likely provide slightly better resolution (but with less DOF). That's why many of us here are so into "stacking"... settings that provide higher resolution will give less DOF.

You might also try adding an undiffused light that "skims" the blade edge. It should help reveal the sharpening marks and "imperfections".

The most effective way to focus something like this is to set the camera/lens to it's highest magnification and move either the subject or camera back-and-forth to get accurate focus (with the view on the LCD screen magnified if that possible with your camera). You'll need to make up something to allow the fine movement needed. (Is there a focusing helical around from the old Ricoh lens that could be made into a up/down "stage" for the knife?)

Harold Gough
Posts: 5786
Joined: Sun Mar 09, 2008 2:17 am
Location: Reading, Berkshire, England

Post by Harold Gough »

Is it worth rubbing the knife edge with some kind of ink, to fill the grooves and thus increase contrast?

Harold
My images are a medium for sharing some of my experiences: they are not me.

rjlittlefield
Site Admin
Posts: 23626
Joined: Tue Aug 01, 2006 8:34 am
Location: Richland, Washington State, USA
Contact:

Post by rjlittlefield »

Ditto everything Charlie said.

I notice also that it looks like your adapter is leaving a lot of separation between the camera's lens and the added lens. That will make vignetting worse and may also degrade image quality, for example by adding chromatic aberration. Try removing the adapter and holding the added lens by hand as close as possible, to see if there is any significant improvement. If there is, then perhaps you can bodge together some sort of custom holder.

--Rik

rjlittlefield
Site Admin
Posts: 23626
Joined: Tue Aug 01, 2006 8:34 am
Location: Richland, Washington State, USA
Contact:

Re: Help optimising cheap setup

Post by rjlittlefield »

bugbear wrote:Secondly, can anyone recommend a good test target
I've had good results with laser-printed paper, see HERE for example.

Some ink jet printers are OK also, but a lot of them insist on using colored inks even if you give them a gray-scale image to print. That makes assessing CA a lot tougher.

--Rik

DaveW
Posts: 1702
Joined: Fri Aug 04, 2006 4:29 am
Location: Nottingham, UK

Post by DaveW »

To bring out texture as Charles says you need skimmed or oblique lighting. From what I see of your lighting set-up the light is more or less aimed down the length of the sharpening groves, not across them to put the "valleys" into shadow and show them in greater relief.

This one is microscopy since I am afraid I cannot find a photomacrography example, but note how oblique or skimmed lighting at 90 degrees to the lines provides better modeling by providing highlights and shadows.

http://www.microscopy-uk.org.uk/mag/ind ... lique.html

I think if you skim your light along the length of your blade it will do the same thing. You can reduce the intensity of any shadows produced by skimming a weaker light in the other direction, simply increasing or decreasing its intensity or distance from the subject until you get the effect you want.

DaveW

rjlittlefield
Site Admin
Posts: 23626
Joined: Tue Aug 01, 2006 8:34 am
Location: Richland, Washington State, USA
Contact:

Post by rjlittlefield »

bugbear, can you say more about "my knife sharpening problems"?

What sort of problems are you trying to understand and/or document with your photography?

I see what look like a couple of notches along the knife edge. The generally brightened edge also suggests some rounding. These aspects are different from the long fine scratches typical of grinding or honing.

You may need different lighting to emphasize each of these aspects.

--Rik

Harold Gough
Posts: 5786
Joined: Sun Mar 09, 2008 2:17 am
Location: Reading, Berkshire, England

Post by Harold Gough »

rjlittlefield wrote:Ditto everything Charlie said.

I notice also that it looks like your adapter is leaving a lot of separation between the camera's lens and the added lens. That will make vignetting worse and may also degrade image quality, for example by adding chromatic aberration.
Rik,

I don't understand why it might introduce chromatic aberration.

Harold
My images are a medium for sharing some of my experiences: they are not me.

rjlittlefield
Site Admin
Posts: 23626
Joined: Tue Aug 01, 2006 8:34 am
Location: Richland, Washington State, USA
Contact:

Post by rjlittlefield »

Harold Gough wrote:I don't understand why it might introduce chromatic aberration.
See http://www.photomacrography.net/forum/v ... php?t=8336.

The farther apart the lenses are, the more likely that off-axis rays will go through parts of the front lens that its designer did not intend.

I don't know whether bugbear is getting enough CA to be a problem, but I get suspicious anytime somebody writes "green channel only".

--Rik

bugbear
Posts: 67
Joined: Thu Mar 18, 2010 7:39 am
Location: UK

Post by bugbear »

rjlittlefield wrote:Ditto everything Charlie said.

I notice also that it looks like your adapter is leaving a lot of separation between the camera's lens and the added lens.
That's because the camera lens is retracted. When the lens is being used at it's maximum focal length, the end is pretty much flush with the end of the adapter.

However, the actual "glass" of the reversed (Ricoh) lens is well recessed inside a pseudo-hood, so I may be able to improve that a little.

BugBear

bugbear
Posts: 67
Joined: Thu Mar 18, 2010 7:39 am
Location: UK

Post by bugbear »

A quick walk in garden located a shed feather, which I mounted on a metal block using blu-tak. The feather was at quite an angle, so DOF issues mean this photo has a VERY small area in focus. This is a 100% crop

f4.5, 0.4 second, ISO 80, rig as before

Image

I am quite happy with this - while I'd like more magnification, there's nothing (cheap!) I can do about that.

I can use focus stacking (via in camera focusing) to get greater DOF. My tests with the ruler show I have 7mm of focusable-depth (is that a proper term) this way.

I've tried using CHDK focus bracketing, but am limited to 10 shots (the max in continuous mode) that way. If I write (or find) a proper "focus bracketing script) I can do deeper (or finer) stacks.

One limitation is that if I want to focus bracket around a auto-focus point I have to use +- bracketing, and it appears that the Canon actually moves the lens elements laterally (a tiny amount) when reversing the focusing direction. I would like to offset from the auto-focus point, and then track focus in one direction continously to get better results by reducing "lash".

BugBear

ChrisR
Site Admin
Posts: 8671
Joined: Sat Mar 14, 2009 3:58 am
Location: Near London, UK

Post by ChrisR »

Rather than all that Benbo leggery, you might consider a smaller support.
I'm not sure if the originals are still made but "Leitz" copy stands work like the top arrangement I've doodled. Roofing bolts, screws or studding can be used for the legs.
A cookie jar can do the lower one. Cut a hole in the lid, which has a screw thread you might be able to use to move the camera/subject apart with some control.
If you find a white jar/pot, it'll serve as a diffuser too.

Image

ChrisR
Site Admin
Posts: 8671
Joined: Sat Mar 14, 2009 3:58 am
Location: Near London, UK

Post by ChrisR »


DaveW
Posts: 1702
Joined: Fri Aug 04, 2006 4:29 am
Location: Nottingham, UK

Post by DaveW »

An old converted enlarger made into a copy stand by removing the head and adapting it to take a camera works just as well, and these are going dirt cheap with the switch to digital.

DaveW

rjlittlefield
Site Admin
Posts: 23626
Joined: Tue Aug 01, 2006 8:34 am
Location: Richland, Washington State, USA
Contact:

Post by rjlittlefield »

bugbear wrote:My tests with the ruler show I have 7mm of focusable-depth (is that a proper term) this way.
I've not heard that term. But I'm pretty sure I know what you mean, and I don't know another term. So sure, it's proper!
I've tried using CHDK focus bracketing, but am limited to 10 shots (the max in continuous mode) that way. If I write (or find) a proper "focus bracketing script) I can do deeper (or finer) stacks.
I checked my references for focusing scripts, and CHDK was what I came up with also.

About the 10-frame limit, does it not work to just run the script several times with different limits?

About focus stacking software, I see that the CHDK page recommends CombineZM. That has now been upgraded to CombineZP, which will handle some kinds of subjects a lot better. It is by far the best of the freeware products that I know about.

--Rik

Post Reply Previous topicNext topic