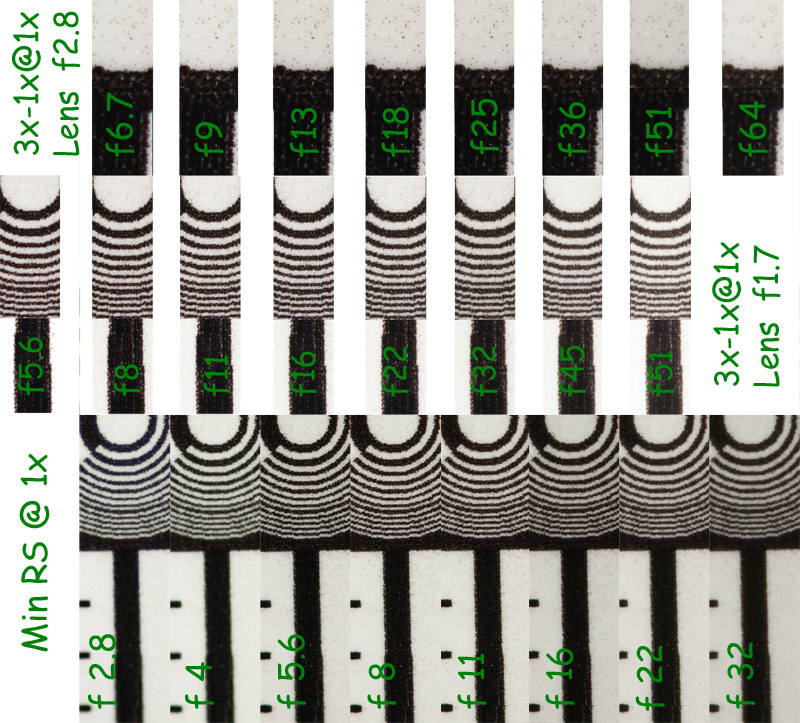
Chris, I was a little puzzled at first too, but I think I got it figured out. What we're looking at is three rows of not quite comparable test patterns. In the bottom row, labeled "Min RS @ 1X", the test pattern is a big T with some concentric circles above it. In the center row, labeled "3x-1x@1X", the test pattern is almost the same except the top of the T is clipped out. In the top row, labeled "3x-1x@1x" on the photo but actually being 3x as described in the text, the test pattern is only the top of the T or some similar arrangement of ink. The top row cannot be compared directly to the other two rows, but the images within each row can be compared.
Tim, I did not really intend to suggest such an in-depth investigation, but on the other hand I'm delighted to see it!
Let's see if we can make sense of these images.
First off, it's interesting that the lens is described as "f1.7-2.8".
We normally see ratings like that for zoom lenses, in which case the larger f-number applies at higher magnifications with larger focal lengths.
But in this case, I think it's the reverse. I believe the lens has a pupillary magnification factor such that at 1:1, the lens acts like f/2.8 corrected for extension, while at 3:1 it acts like f/1.7 corrected for extension. (Ah yes, see confirmation
HERE.) The resulting effective f-numbers would then be 2.8*2=5.6 at 1:1 and 1.7*4=6.8 at 3:1. This matches the starting numbers shown in your chart, except for what's presumably a rounding difference between 6.7 and 6.8. (The labels, however, are reversed. It's the top row that should be "f1.7", with "f/2.8" in the middle.)
For the other lens, I think that what's being reported is
not effective f-number, but rather the nominal f-number, which needs to be corrected for extension. So in the bottom row, the effective f-numbers would be f/5.6 to f/64.
Now, to evaluate and compare the blurs...
My standard test for blurring is to shrink, restore, and compare, using Photoshop layers. As a quick look, I adjusted the canvas size of your linked image to a multiple of 2 pixels on each axis, then made a comparison image by resizing to 50% followed by resizing 200%. The result of these two resizings is an image that is just the same size as the original, but contains only half as much potential detail because it's gone through a stage with only half as many pixels on each axis. Layer this second image on top of the first image and flash between them using the "eye" icon in the Photoshop layers palette. What I'm looking for is the point where there's little or no visible difference between the original version and the shrunk/restored copy. That's the place where blurring from whatever cause has made the image so fuzzy that you only have 3 megapixels of image data, not 12.
Applying this test to the current images, here's what I see. In the top row, the critical point is someplace between f/25 and f/36, probably closer to f/25. In other words, I can see just a little difference between the original and shrunk/restored images at f/25, and none at f/36. In the middle row, the critical point is between f/22 and f/32, and there's a little more effect on the middle row's f/22 than there is on the upper row's f/25. In the bottom row, the critical point is between what's called "f/11" and "f/16", but those are actually effective f/22 and f/32.
So, I'm not seeing any significant difference in the point where diffraction blur creeps in. In all three cases, the threshold found by the test lies someplace around effective f/25-30.
Now, an interesting question is how these observations match up against the predictions of the cambridgeincolour calculator, and what they mean for "usability".
Remember that what the shrink/restore test gives us is the point where the camera has effectively lost 3/4 of its pixels due to blurring. Observationally, that's between f/22 and f/32.
In the cambridgeincolour calculator, the Airy disks at f/22 and f/32 look to be around 3 and 5 pixels wide, respectively. Intuitively, I would have expected to see more visual blurring from 5 pixels of Airy disk than I actually do see in the f/32 images. I think that's partly a tribute to my lousy intuition, and partly because the test pattern doesn't really contain any small closely spaced features, only edges and isolated features that are rendered more sharply or less sharply, but always visible.
When I actually run the numbers for cutoff frequency and MTF-50 at f/32 (and assuming perfect optics), what I compute is that cutoff happens at a feature size (dark/light) that spans about 3 pixels, with MTF-50 at about 8 pixels. Considering that the smallest ink dots in the top row of the full-size image are about 5 pixels wide, it's reasonable that f/32 would do a fair job of capturing them. If we were looking at a moth wing, I suspect we'd perceive more difference between the f/22 and f/32 cases. (On the other hand, I've been wrong before. It would be an interesting test.)
As for usability, well, most cameras have more pixels than you really need. After all, the standard circle of confusion is about 1/1500 of a frame width, or about 1 pixel on a 1.5 megapixel camera. If stopping down to f/25 or f/32 effectively drops you from 12 megapixels down to "only" 3 megapixels, maybe that's not such a bad deal!
--Rik