I've been using a cardboard box lined with matte finish white posterboard to bounce my flash. Recently, I was told that using a white styrofoam cooler would be a better option because it didn't have seams or hard lines. I do continue to get glare off the shiny elytra of the insects but before trying one more thing, I need to understand if the hard lines & seams of the cardboard box is the issue.
I have ordered the turtledove diffusers and hope they offer some solution.
My questions are so simple compared to others on this forum. My needs are simple yet getting the insect photos accurate and clear for scientific purposes and ID is important. So I thank you for your help!
Bounce box
Moderators: rjlittlefield, ChrisR, Chris S., Pau
-
Marci Hess
- Posts: 55
- Joined: Fri Mar 07, 2014 4:01 pm
- Contact:
They would have to be sufficiently in focus for the viewer to note the shape. If they're far enough away, they become well oof.I need to understand if the hard lines & seams of the cardboard box is the issue.
You could test it with glass headed pins, or buttons.
As here:
http://www.photomacrography.net/forum/v ... 256#197256
Chris R
-
Marci Hess
- Posts: 55
- Joined: Fri Mar 07, 2014 4:01 pm
- Contact:
The lines and seams are not in focus. I thought he was trying to tell me it created bouncing issues.
I apparently am not creating a proper bounce box. I just made this one to test it out. To cover the front I use a piece of cloth -- again just to test this out.
http://www.photomacrography.net/forum/u ... 1861_3.jpg
The insect photos don't appear much different with regard to the glare. The one I took without the box is a bit darker.
This one is without the cover:
http://www.photomacrography.net/forum/u ... 4161_2.jpg
With the cloth cover:
http://www.photomacrography.net/forum/u ... 4181_1.jpg
Often the insect I'm photo'g isn't mounted because I need to get the underside and I hate the pin.
What am I doing wrong?
-
rjlittlefield

- Site Admin
- Posts: 23608
- Joined: Tue Aug 01, 2006 8:34 am
- Location: Richland, Washington State, USA
- Contact:
To understand glare problems, it helps to imagine yourself in the position of the subject, looking outward to see where the light is coming from.
In the cases that you've shown, what the subject will see are:
1) a direct view of the two flash heads, which are very bright, and
2) the rest of the environment, which is much less bright because the light has to spread out so far to reach it, before bouncing back to illuminate the subject.
The bright glare spots in your images are simply reflections of the flash heads.

To eliminate those, you need to surround your subject with a diffusing/reflecting enclosure that prevents the subject from seeing the flashes directly.
The usual solution is a "light tent" that surrounds the subject with translucent material such as thin paper or purpose-made white fabric.
An alternate solution is a reflecting enclosure where the flashes are mounted inside the enclosure but blocked from direct view by the subject. Something like a white cabinet or a foam cooler works well for this, but again, the flashes have to be inside the enclosure, mounted behind some baffle that allows them to bounce light around the inside of the enclosure but prevents them from being seen directly by the subject. Sam Droege's bee lab uses this approach.
In both cases, there needs to be a hole in the light tent or reflecting enclosure for the lens to look through. The hole should be as small as possible, and in the case of the light tent, certainly small enough to block any direct light from the flashes.
This hole will be reflected as a dark blob, and that problem is quite difficult to solve. At low magnifications, you can shoot through a sheet of partially reflecting glass that acts as a "one-way mirror", so that from the inside the glass appears light gray versus a nearly black hole. That trick does not work at high magnification due to aberrations added by the glass. The dark blob could also be made less obvious by grading its edge so that the reflection has a soft edge too. But most people just accept the idea that the reflections will include a "black hole" surrounding the camera lens, and move on to other issues.
As a quick and dirty way to explore the concept, you might mount a small piece of white paper with a hole in it, above the specimen, with the hole sized and placed so that the camera has a clear shot at the beetle but the flashes don't. What you should see is that those bright reflections on the beetle go away, being replaced by a much less obvious reflection of the white paper.
--Rik
In the cases that you've shown, what the subject will see are:
1) a direct view of the two flash heads, which are very bright, and
2) the rest of the environment, which is much less bright because the light has to spread out so far to reach it, before bouncing back to illuminate the subject.
The bright glare spots in your images are simply reflections of the flash heads.
To eliminate those, you need to surround your subject with a diffusing/reflecting enclosure that prevents the subject from seeing the flashes directly.
The usual solution is a "light tent" that surrounds the subject with translucent material such as thin paper or purpose-made white fabric.
An alternate solution is a reflecting enclosure where the flashes are mounted inside the enclosure but blocked from direct view by the subject. Something like a white cabinet or a foam cooler works well for this, but again, the flashes have to be inside the enclosure, mounted behind some baffle that allows them to bounce light around the inside of the enclosure but prevents them from being seen directly by the subject. Sam Droege's bee lab uses this approach.
In both cases, there needs to be a hole in the light tent or reflecting enclosure for the lens to look through. The hole should be as small as possible, and in the case of the light tent, certainly small enough to block any direct light from the flashes.
This hole will be reflected as a dark blob, and that problem is quite difficult to solve. At low magnifications, you can shoot through a sheet of partially reflecting glass that acts as a "one-way mirror", so that from the inside the glass appears light gray versus a nearly black hole. That trick does not work at high magnification due to aberrations added by the glass. The dark blob could also be made less obvious by grading its edge so that the reflection has a soft edge too. But most people just accept the idea that the reflections will include a "black hole" surrounding the camera lens, and move on to other issues.
As a quick and dirty way to explore the concept, you might mount a small piece of white paper with a hole in it, above the specimen, with the hole sized and placed so that the camera has a clear shot at the beetle but the flashes don't. What you should see is that those bright reflections on the beetle go away, being replaced by a much less obvious reflection of the white paper.
--Rik
-
Marci Hess
- Posts: 55
- Joined: Fri Mar 07, 2014 4:01 pm
- Contact:
This explanation makes so much sense. Yet, these twin lights have plastic diffuser caps on them. I *thought* that was supposed to keep the light from directly hitting the subject. I also point them away from the subject so I wouldn't have thought there was a direct hit. Why are these diffusers not enough?
Prior to this box, I would tape milk carton sides (laying to the left) or paper towels to keep even more light from the specimen. I did not have anything surrounding the specimen on other sides (meaning all other areas were open as showing in the photo). What's laying on top of the black table is diffuser paper. Why did this not work sufficiently?
http://www.photomacrography.net/forum/u ... 7711_1.jpg
-
Charles Krebs

- Posts: 5865
- Joined: Tue Aug 01, 2006 8:02 pm
- Location: Issaquah, WA USA
- Contact:
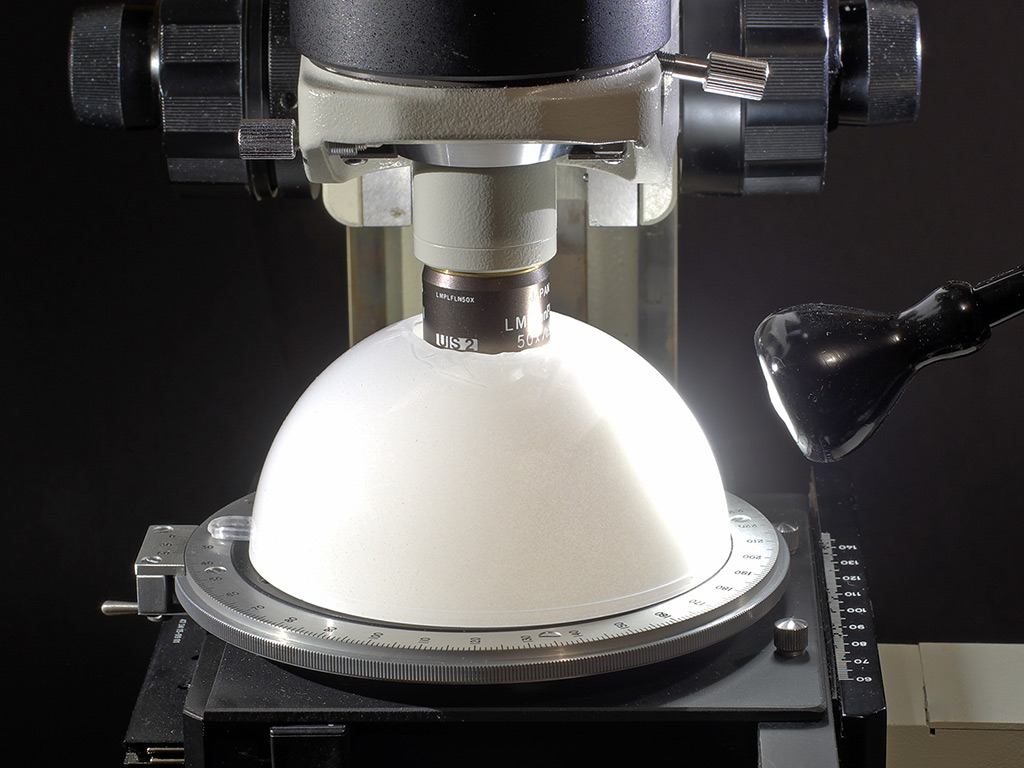
Even though you have plastic diffuser caps on the flash-heads they do not really broaden the illuminating surface relative to the subject unless they are very close to the subject... much closer than you want for a beetle your size here. You want a much broader source of light, which is generally accomplished as Rik described.
See Beatsy's thread here:
https://www.photomacrography.net/forum/ ... hp?t=33432
Also here is an example of a dome enclosure I use for subjects considerably smaller than your beetle... but the technique is the same:
See Beatsy's thread here:
https://www.photomacrography.net/forum/ ... hp?t=33432
Also here is an example of a dome enclosure I use for subjects considerably smaller than your beetle... but the technique is the same:
-
rjlittlefield
- Site Admin
- Posts: 23608
- Joined: Tue Aug 01, 2006 8:34 am
- Location: Richland, Washington State, USA
- Contact:
It seems that imagination is not enough to understand what's going on.Marci Hess wrote:I *thought* [those diffusers were] supposed to keep the light from directly hitting the subject.
So then, I suggest to remove your camera and flash assembly from the copy stand, mount it on a tripod instead, then physically place your eye where the subject would go, and fire the flashes.
What you'll see -- in the instant before you get intense dark after-images from the flash heads -- is that those diffusers mounted on the flash heads act as small and very bright light sources, much brighter than anything else in the vicinity. Yes, the diffusers will prevent you from seeing the flash tubes directly, but the diffusers are so close to the flash tubes that it really doesn't make much difference. Essentially the entire diffuser will light up, but since the diffuser is no larger than the flash head, it still remains a small bright source.
Those on-head diffusers are very good for spreading out the light so that it illuminates a large area. They would be just the ticket if you wanted to use a wide angle lens to photograph a room. But then everybody in that room would still see the flashes (with their diffusers) as being small bright light sources.
What you need to minimize glare is light reaching the subject from a wide range of angles. Continuing the room analogy, you could take off the diffusers and point the flashes at the ceiling, so far off-angle from all the people that they would not see light coming directly from the flash heads, only the light bouncing off the ceiling.
I'm serious about running the physical test with your eye located where the subject would be. When you can fire the flashes and not be left with small intense afterimages, then you'll have a setup that will not have bright reflections either.
--Rik
-
rjlittlefield
- Site Admin
- Posts: 23608
- Joined: Tue Aug 01, 2006 8:34 am
- Location: Richland, Washington State, USA
- Contact:
Just remembered...
I have some slides with diagrams that try to explain the concept.
See pages 37-40 of http://zerenesystems.com/presentations/ ... 280800.pdf, the ones titled from "Good Lighting Is "Diffused" (Hits subject from wide range of angles)" through "Put Diffuser Close To Subject".
--Rik
I have some slides with diagrams that try to explain the concept.
See pages 37-40 of http://zerenesystems.com/presentations/ ... 280800.pdf, the ones titled from "Good Lighting Is "Diffused" (Hits subject from wide range of angles)" through "Put Diffuser Close To Subject".
--Rik
-
Marci Hess
- Posts: 55
- Joined: Fri Mar 07, 2014 4:01 pm
- Contact:
-
Marci Hess
- Posts: 55
- Joined: Fri Mar 07, 2014 4:01 pm
- Contact:
I think I'm getting closer. It seems "fixing" one problem creates another.
I created a diffuser from a vinegar container, hoping it would mimic Charles Krebs' dome. Took some pics and still had glare.
http://www.photomacrography.net/forum/u ... 1921_1.jpg
As I was looking at this, I realized the diffuser was still too close to the light source. (an AHA! moment) Crafted a smaller tube of diffuser paper. Much better, but still shouldn't I be expecting less glare than even this?
http://www.photomacrography.net/forum/u ... 1941_2.jpg
http://www.photomacrography.net/forum/u ... 4371_1.jpg
Switched out the twin lights for my speed light. No glare but I don't see this as a workable solution because I have to hold the speedlight. Many times when I'm photo'g insects, I need 3 hands as it is. And I couldn't find the sweet spot in the speedlight setting so this photo had the exposure tweaked in Lightroom.
http://www.photomacrography.net/forum/u ... 4731_1.jpg
Questions related to all this:
1) Is seems I won't be able to use the twin lites for this as I could not get them far enough away to conform to the principle of the diffuser. Is this accurate? If not, what other solutions have been found that work well?
2) What lights and where are they placed that have worked?
3) Is there a better option than the cumbersome tripod?
Super grateful for your help. [/url]
I'd say your vinegar bottle isn't diffusing well enough.
The fussier your subject is, the more even the light has to be, you can need 3 or so spaced layers of diffusiuon.
The London Natural Hstory Museum use a polystyrene cup, with a twin flash heads something like 4" from the cup.
Those cups "lose" a lot of light, but they certainly diffuse well, and anything which gets through, bounces around inside.
Paper is very good, try an extra cylinder of that. Tissue papaer which doesn't appear to have holes though when you hold it up to a light, such as "Kleenex", is also very good.
Space between diffusers helps too.
Chris R
-
Marci Hess
- Posts: 55
- Joined: Fri Mar 07, 2014 4:01 pm
- Contact:
-
Marci Hess
- Posts: 55
- Joined: Fri Mar 07, 2014 4:01 pm
- Contact:
DUH! I was thinking when you said "layers" there would be space between them. When it finally hit me I had misinterpretted your statement, I added another layer of the frosted diffusion paper. Here's the results.
While I'm happy with the lack of glare, it has also created a lack of detail but not a lack of detail in the coloration. Notice the odd very clear spot. What in the world would have created that?

While I'm happy with the lack of glare, it has also created a lack of detail but not a lack of detail in the coloration. Notice the odd very clear spot. What in the world would have created that?
-
rjlittlefield
- Site Admin
- Posts: 23608
- Joined: Tue Aug 01, 2006 8:34 am
- Location: Richland, Washington State, USA
- Contact:
I'm pretty sure that's exactly what he did mean. The space has to be pretty large. The principle is that the flash illuminates the first diffuser, which illuminates the second diffuser, and so on. Space between the diffusers allows the light to spread out farther and farther, so with each layer the illumination gets more uniform.I was thinking when you said "layers" there would be space between them.
I'm happy with the lack of glare, it has also created a lack of detail but not a lack of detail in the coloration. Notice the odd very clear spot. What in the world would have created that?
I assume that you're talking about the area that I've outlined in orange.

I'll explain that in a moment. But first, a primer about reflection...
Reflections from non-metallic objects are best thought of as coming in two parts:
1. Reflections directly from the surface are called "specular reflections". Specular reflections retain the color and polarization state of the illumination, and the angle of reflection equals the angle of incidence at each point on the surface. If the surface is perfectly planar, you get an ordinary mirror; if the surface is curved, you get a magnifying, reducing, or distorting mirror.
2. Reflections from slightly below the surface are called "diffuse reflections". With diffuse reflections, the reflected light comes off each point of the subject at a wide range of angles. The color of diffuse reflections depends on the spectral absorbance of the material, and diffuse reflections are not polarized even if the illumination is.
For more discussion of these points, see https://en.wikipedia.org/wiki/Specular_reflection .
Now the explanation...
From each point of your beetle's surface, the lens is capturing both the specular reflections and the diffuse reflections that come from that point, headed toward the lens. The specular component is white. That mixes with the diffuse component to produce a total light that is brighter and has less saturated color than the diffuse component alone would have.
Because the beetle's surface is shiny and curved, it acts like a fun-house mirror. The specular reflections are simply a distorted view of the beetle's surroundings. In the middle of that view, where the beetle's surface is parallel to the camera, you see a reflection of the lens and the hole in your diffuser that the lens looks through. Those parts are dark. All other parts are more or less bright, depending on how well you have managed to uniformly light up your illumination diffusers.
So, that "odd very clear spot" in the middle of the beetle is simply the area where the specular reflection is dark because it's reflecting what we call the "black hole" around the lens. In this area you get a clear view of the subsurface reflections because there's no specular component to dilute it.
All other parts of the beetle look washed out because they are a mix of the colored subsurface reflection that you want to see, and bright surface reflections that you don't.
Now here's the Catch 22: you cannot simultaneously illuminate your whole subject and get rid of all the glare by any manipulation of the diffusers. At best, you can confine the glare to specific areas by adjusting the size and placement of the lights and their associated diffusers.
Instead, there are two approaches to getting the perfectly glare-free rendition that I now think you want:
1. Remove most of the diffusion, shoot two stacks with the lights in different place, process each stack separately, then use retouching to replace the glared-out highlights in one stack with clean pixels from the other stack.
2. Use a technique called "cross-polarization", in which you put polarizing filters on both the flashes and the lens, with the one on the lens turned 90 degrees with respect to the ones on the flashes. If you Google on "cross polarization macro photography" you'll find lots of articles about it. The seminal publication, as far as I know, is at https://www.naturescapes.net/articles/t ... otography/ . Very briefly, it works because those nasty surface reflections retain the polarization of the flashes, which is blocked by the polarizer on the lens. Meanwhile, the subsurface reflections that are now un-polarized get through to form a glare-free image. You can dial in the angles to kill the surface reflections almost completely, or back off slightly to leave some amount to retain an appearance of "shiny".
--Rik
Marci,
(Another fellow named “Chris,” here.)
I suspect we’re making this seem more difficult than it needs to be. Key to this suspicion is that you likely don’t need the “perfectly glare-free” rendition Rik mentioned, which would indeed require the sort of effort he described. Rather, you said your goal is “insect photos accurate and clear for scientific purposes and ID.” Plenty of photographers do this routinely and quickly. What I think you want is more likely “illumination that is pleasing to the eye and illustrative for scientific analysis. This usually doesn’t require a complete absence of shiny areas on the subject—just that such areas are well-controlled, not overly contrasty, perhaps soft-edged, etc. If you look at the work of highly-regarded entomological photographers, this is what you usually see.
For clarity, let me point out that there are two ways of getting soft, even light on a subject. One is to bounce your light sources off of something. The other is to shine your lights through something. Though either approach can produced diffuse light, we usually refer to an object we bounce light off of as a “bounce panel” or somesuch. The thing we shine light through is usually called a “diffusor.” This can lead to confusion. You definitely want diffuse light; you may not want to use a diffusor. This thread has interchanged these distinct approaches to the point that I fear there may be confusion.
Since you started by talking about a “bounce box,” I suspect you are thinking of work such as Sam Droege does. He and his collaborators make large numbers of excellent insect images. From his published descriptions, it seems that he makes extensive use of bounce boxes. There is no reason you shouldn’t go this route.
The error in the shot of your bounce approach is that some of the light from your flashes hits the subject directly. In the proper use of a bounce box, none of the light from the flashes is allowed to hit the subject without first bouncing off some portion of the box. You can easily block this light with a piece of black paper, cardboard, etc. between the flash head and subject.
Have you seen Sam Droege’s pdf on insect photography? Take a look at the example images on the first page and last page. Are they the sort you’re looking for? If so, look at his bounce box on page five. Very importantly, also look at page four, where he shows what’s under the bounce box. In particular, note where and how he places his flash units. None of their light is directly hitting the subject, which would sit directly in front of the camera lens.
Also note that none of their light is directly hitting the camera lens, which could cause veiling glare if it did. His aiming the flashes at the sides of the box is probably a very good idea. It probably provides brighter illumination to the sides and top of the insect, while not leaving any portion of the insect completely unlit. This difference in lighting would help avoid some of the problems that Rik elucidated.
There is also a 47-minute video in which Same Droege give tips for insect photography. The portion on lighting starts at about 34:40. He shows one bounce box, and you may notice another one on a shelf to the lower left. In this video, he does not specifically call out the importance of blocking the flash from hitting the subject—an unfortunate omission. The same omission is made when he shows a bounce device made from two polystyrene coffee cups. In real-world implementation, this is also used with an item blocking direct light from the subject.
--Chris S.
(Another fellow named “Chris,” here.)
I suspect we’re making this seem more difficult than it needs to be. Key to this suspicion is that you likely don’t need the “perfectly glare-free” rendition Rik mentioned, which would indeed require the sort of effort he described. Rather, you said your goal is “insect photos accurate and clear for scientific purposes and ID.” Plenty of photographers do this routinely and quickly. What I think you want is more likely “illumination that is pleasing to the eye and illustrative for scientific analysis. This usually doesn’t require a complete absence of shiny areas on the subject—just that such areas are well-controlled, not overly contrasty, perhaps soft-edged, etc. If you look at the work of highly-regarded entomological photographers, this is what you usually see.
For clarity, let me point out that there are two ways of getting soft, even light on a subject. One is to bounce your light sources off of something. The other is to shine your lights through something. Though either approach can produced diffuse light, we usually refer to an object we bounce light off of as a “bounce panel” or somesuch. The thing we shine light through is usually called a “diffusor.” This can lead to confusion. You definitely want diffuse light; you may not want to use a diffusor. This thread has interchanged these distinct approaches to the point that I fear there may be confusion.
Since you started by talking about a “bounce box,” I suspect you are thinking of work such as Sam Droege does. He and his collaborators make large numbers of excellent insect images. From his published descriptions, it seems that he makes extensive use of bounce boxes. There is no reason you shouldn’t go this route.
The error in the shot of your bounce approach is that some of the light from your flashes hits the subject directly. In the proper use of a bounce box, none of the light from the flashes is allowed to hit the subject without first bouncing off some portion of the box. You can easily block this light with a piece of black paper, cardboard, etc. between the flash head and subject.
Have you seen Sam Droege’s pdf on insect photography? Take a look at the example images on the first page and last page. Are they the sort you’re looking for? If so, look at his bounce box on page five. Very importantly, also look at page four, where he shows what’s under the bounce box. In particular, note where and how he places his flash units. None of their light is directly hitting the subject, which would sit directly in front of the camera lens.
Also note that none of their light is directly hitting the camera lens, which could cause veiling glare if it did. His aiming the flashes at the sides of the box is probably a very good idea. It probably provides brighter illumination to the sides and top of the insect, while not leaving any portion of the insect completely unlit. This difference in lighting would help avoid some of the problems that Rik elucidated.
There is also a 47-minute video in which Same Droege give tips for insect photography. The portion on lighting starts at about 34:40. He shows one bounce box, and you may notice another one on a shelf to the lower left. In this video, he does not specifically call out the importance of blocking the flash from hitting the subject—an unfortunate omission. The same omission is made when he shows a bounce device made from two polystyrene coffee cups. In real-world implementation, this is also used with an item blocking direct light from the subject.
Maybe not for diffusor-lighting. But for a bounce box, I suspect you could take the lights off the lens and use them in an arrangement as shows in Droege’s pdf.It seems I won't be able to use the twin lites for this as I could not get them far enough away to conform to the principle of the diffuser. Is this accurate? If not, what other solutions have been found that work well?
Heavens, yes! But that’s a longer discussion. I’d suggest you get your lighting sorted out first. Then look at the example macro rigs shown in links from this thread. Then post another query detailing your preferences, budget, and the level of DIY you’re willing to engage in.Is there a better option than the cumbersome tripod?
--Chris S.