
coscinodiscus(?)
Moderators: rjlittlefield, ChrisR, Chris S., Pau
-
Smokedaddy
- Posts: 1976
- Joined: Sat Oct 07, 2006 10:16 am
- Location: Bigfork, Montana
- Contact:
-
rjlittlefield

- Site Admin
- Posts: 23626
- Joined: Tue Aug 01, 2006 8:34 am
- Location: Richland, Washington State, USA
- Contact:
-
Charles Krebs

- Posts: 5865
- Joined: Tue Aug 01, 2006 8:02 pm
- Location: Issaquah, WA USA
- Contact:
Just looking at this last one I would say it is excellent.
If there is any real improvement to be had (not saying there is, don't know, this is excellent for your 60/0.85) is is likely to be made with the microscope not the stacking software. From our conversations it sounds like you have your light source and condenser set up properly. The correction collar is really your "friend" when trying to squeeze the most out of a high/dry objective. It really is important to use it carefully. I know you are using a Canon 50D from live mode, so there should be no vibration issues.
There might be a couple "bands" where the step size might have been a little too large... hard to tell if that is what I am seeing or if it is just the diatom.
At best. your effective aperture (in camera "terms") is about f35 (could be considerably smaller, don't know how you have your camera set up). That's just the way is is in high magnification microscopy. So you should not expect the "crispness" you would see in something like a conventional photographic landscape image.
Looking really nice!
-
Smokedaddy
- Posts: 1976
- Joined: Sat Oct 07, 2006 10:16 am
- Location: Bigfork, Montana
- Contact:
Thanks Charles. Here's another tried playing with the correction collar and cleaning a few things up with PS. Getting better from what I can see but the center is a little grainy.

Last edited by Smokedaddy on Sun Feb 19, 2017 1:30 am, edited 2 times in total.

-
Smokedaddy
- Posts: 1976
- Joined: Sat Oct 07, 2006 10:16 am
- Location: Bigfork, Montana
- Contact:

-
Smokedaddy
- Posts: 1976
- Joined: Sat Oct 07, 2006 10:16 am
- Location: Bigfork, Montana
- Contact:
Thanks Charles, coming from you that indeed is encouraging. Out of curiosity how could I (like me) make any finer steps. I'm currently going in between the fine focus marks on the dial. Guess I could figure out a way to mount my micron dial indicator on the Optiphot.Charles Krebs wrote:Just looking at this last one I would say it is excellent.
There might be a couple "bands" where the step size might have been a little too large... hard to tell if that is what I am seeing or if it is just the diatom.
Last edited by Smokedaddy on Sun Feb 19, 2017 1:32 am, edited 1 time in total.
-
Smokedaddy
- Posts: 1976
- Joined: Sat Oct 07, 2006 10:16 am
- Location: Bigfork, Montana
- Contact:
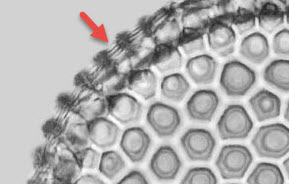
I calibrated the diatom photograph above with ImageJ for microns with my calibration slide and came up with the following measurements. The little circle thing (wart) is approximately 3 microns in diameter, the diatom itself is 120 microns in diameter and the area is 11497.

Then I measured the separation (center to center) on a couple of the dots as shown in the image below via the YELLOW line in the image (if you can see it).

Lastly I measured the diameter of one of the dots, see below.
-JW:

Then I measured the separation (center to center) on a couple of the dots as shown in the image below via the YELLOW line in the image (if you can see it).
Lastly I measured the diameter of one of the dots, see below.
-JW:
-
Smokedaddy
- Posts: 1976
- Joined: Sat Oct 07, 2006 10:16 am
- Location: Bigfork, Montana
- Contact:

-
Smokedaddy
- Posts: 1976
- Joined: Sat Oct 07, 2006 10:16 am
- Location: Bigfork, Montana
- Contact:

-
Smokedaddy
- Posts: 1976
- Joined: Sat Oct 07, 2006 10:16 am
- Location: Bigfork, Montana
- Contact:

-
rjlittlefield
- Site Admin
- Posts: 23626
- Joined: Tue Aug 01, 2006 8:34 am
- Location: Richland, Washington State, USA
- Contact:
-
Smokedaddy
- Posts: 1976
- Joined: Sat Oct 07, 2006 10:16 am
- Location: Bigfork, Montana
- Contact:


-
rjlittlefield
- Site Admin
- Posts: 23626
- Joined: Tue Aug 01, 2006 8:34 am
- Location: Richland, Washington State, USA
- Contact:
Thanks for showing the single frames. I had been concerned that the stacked results might be showing artifacts like parallel bands that had been created by accumulating simpler features across multiple frames. But comparing the composite with the single frame shows that single frame has the same sort of banding.Smokedaddy wrote:I've been trying to resolve the torus area on the circumference and can't seem to get it defined. Any suggestions on setting in Zerene or post processing?

Likewise the center of the beast looks the same in the stacked composite as it does in the single frames.
So, I don't see that there's any way to improve this result by doing the stacking any different.
I'll leave it up to the micro guys to provide assistance about how the individual frames might improved. Perhaps there's some magic to be done with the illumination. But I haven't worked at all with diatoms, so I'm pretty much clueless in that area.
--Rik
-
Smokedaddy
- Posts: 1976
- Joined: Sat Oct 07, 2006 10:16 am
- Location: Bigfork, Montana
- Contact: