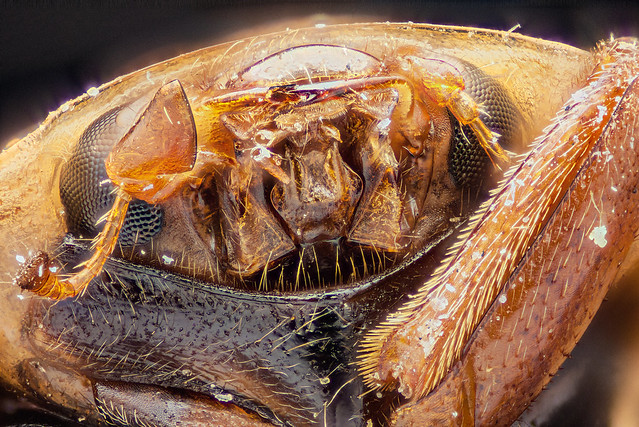
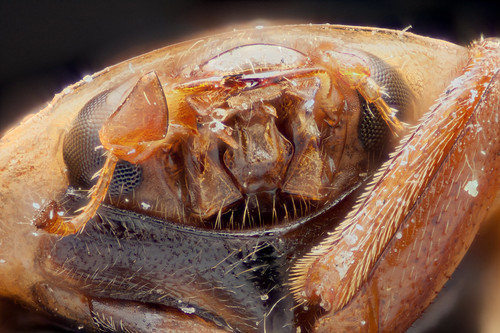
I just did the first test of my rail at magnification 10:1 (the highest I've used so far was 4:1), using my new Nikon 10x/0.25 M Plan. I shot ~30GB using some random target I happened to have (lady bug). I still have to analyze more, but here is one of the stacked shots I produced (step 5um, depth 1.2mm, using electronic shutter +flash on my Canon 50D):
 MLV_5um_sharp
 by
First Last, on Flickr
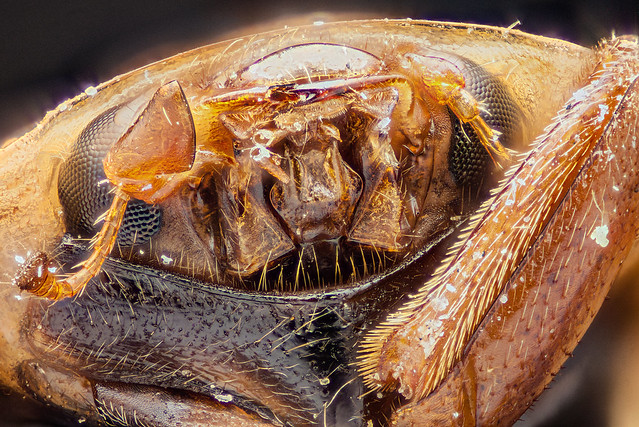
I am still getting to used to this magnification - the workflow I used at 4:1 didn't work well at 10:1 (the image was rather soft when zoomed out). For the image above I ended up doing multi-scale unsharp mask in Gimp. More specifically, three scales - 0.85/2 + 4/0.5 + 15/0.5; the first number is the sharpening scale length, the second number is the strength of the effect. The first scale (0.85/2) is only obvious when viewing 100% scale, the last (15/0.5) - mostly for viewing zoomed out, and the middle scale contributes to both. I also re-scaled the image to 50% of the original size, and increased saturation by 25%. At the end, the image looked much sharper than the original, but noise didn't get too bad. I suspect I might have overdone with sharpening. I still like the idea of doing it at 3 scales, but perhaps I just need to reduce the strength at all scales.
Here is the original stacked photo for comparison:
 MLV_5um_raw
 by
First Last, on Flickr
The light also seems to be okay, for such a short working distance (8mm) - what do you think? I made a diffuser from a white plastic cone, probably ~2" at the widest side, with the narrow side's hole large enough to snap onto my Nikon objective and be held there securely by itself, with a narrow slit at the bottom for the pin holding the insect. The cone was sanded on both sides using finest sand paper I had (#240), and illuminated by an external flash (YN560III) from behind. I also put a piece of white paper, also with a slit for the pin, under the cone and insect, to reflect light back. So at the end I had a well diffused light, with reasonable light losses (I used 1/16 flash power at ISO 200 for proper exposure).
Another thing which was tested was the electronic shutter (FRSP) feature of Magic Lantern (alternative firmware for Canon DSLRs). As discussed in
another thread, I made it work well with an external flash in my artificial tests, but not as well in real focus stacking: with 1/4s camera exposure I got ~1 dark frame every 50 shots. It doesn't really show in stacked images, but I plan to fix this issue by using larger exposure (~0.4-0.5s) and correspondingly longer flash delay.
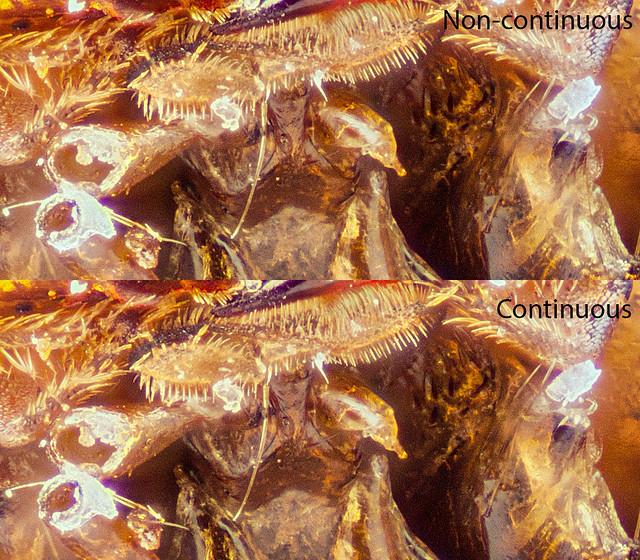
Finally, my Arduino rail itself was tested, for the first time at 10:1 magnification. My preliminary analysis shows that it performed well even with the smallest tested step (I did stacks using 5, 7.5 and 10 um). Both 5um and 7.5um stacked photos look equally good, with 10um showing very slight degradation of quality. This was done with a non-continuous stacking (5s wait after each rail move before a shot is taken). But I also tested the "quick and dirty" mode of stacking - continuous, with the frame rate 0.5 fps, and using regular camera shutter (no mirror locking). Surprisingly, the continuous stacking (with 7.5um steps) looks pretty much as sharp as non-continuous (also 7.5um), so it almost looks like there is no point in doing stacking the slow way even at magnification 10:1, except for saving your shutter.