shooting through water? (was: image stacking and stitching?)

A forum to ask questions, post setups, and generally discuss anything having to do with photomacrography and photomicroscopy.

Moderators: rjlittlefield, ChrisR, Chris S., Pau

rjlittlefield
Site Admin
Posts: 23608
Joined: Tue Aug 01, 2006 8:34 am
Location: Richland, Washington State, USA
Contact:

Post by rjlittlefield »

Chris S. wrote:I suspect the big bugaboo was that this aquarium's glass is about 3.6mm thick, which, at around 1x magnification, seemed to impose a penalty (spherical aberration?) that I could not get around no matter how carefully I placed my camera and lights.
I'm not disputing the observation, I'm just struggling to understand what might have been going on.

Here's a pair of images that I shot a few minutes ago.

Image

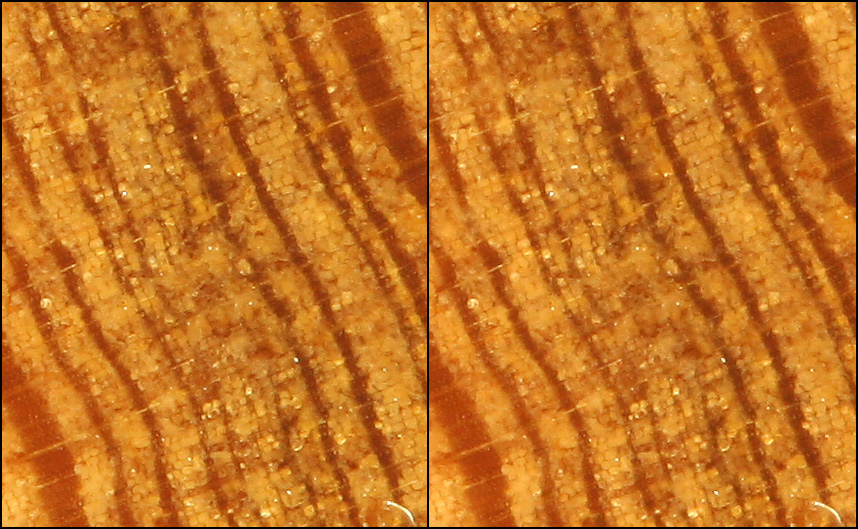
These are center pixels, 1:1 at f/8 nominal (f/16 effective) through my setup with 50 mm of water. The difference is that for one of them I added 3.75 mm of glass by layering 4 microscope slides and putting them in front of the lens too. The extra glass is notably green and provides 8 more uncoated surfaces to add veiling glare. As shot, the image through the added glass is lower contrast and has a significant color shift. To compensate for that effect, I level adjusted to match the histograms as well as I could.

Probably other people's eyes can more easily spot differences in sharpness. I can see a little, but it's not something I'd notice unless I was paying very close attention.

The lack of degradation in this test is consistent with calculation, which says that the difference in spherical aberration between these two cases should be only about 0.0003 lambda across the aperture. That effect would be dwarfed by ripple in the slide thickness. The total aberration induced by the whole 50+mm of water and glass is only around 0.0039 lambda. For comparison, the corresponding difference with and without 0.17 mm coverslip for an NA 0.25 objective is 0.0517 lambda, and visible degradation doesn't kick in until maybe 0.1000 lambda. (For an NA 0.40 objective with and without cover slip, the effect is 0.3023 lambda.[*])

In case you're wondering why the current test gives such a small number, it's because spherical aberration is proportional to the fourth power of the subject-side numerical aperture (NA). The very first test that I showed, with the MP-E 65 wide open, was around NA 0.15, but this test is around NA 0.031. As a result, the spherical aberration is reduced by a factor of (0.15/0.031) raised to the fourth power. The total reduction ends up being a factor of over 500. Stopping down is a very powerful way of reducing spherical aberration!

I know, it's a lot of numbers. I'm sorry.

The point is, whatever was going on with Chris's glass, I don't think we can blame it on spherical aberration. SA is a big problem for shooting my bugs in glycerin with a microscope objective, but it's not the culprit here. I simply don't know what was causing the result that Chris S. got.

--Rik

[*] Providing these numbers to 4 digits is completely unjustified from the standpoint of accuracy. I'm doing it so they're easy to compare -- same number of digits in each.

Chris S.
Site Admin
Posts: 4049
Joined: Sun Apr 05, 2009 9:55 pm
Location: Ohio, USA

Post by Chris S. »

Rik, this latest test of yours is interesting indeed. I would not have predicted that the addition of four microscope slides would cause so little degradation. Since it's late here, I'm going to scratch my head a couple of times over this and go to bed. In the meantime, a portion of your post seems especially notable to me:
rjlittlefield wrote:That effect would be dwarfed by ripple in the slide thickness.
So perhaps we're back to my aquarium's glass being not intended for photography--perhaps with junky glass that has an uneven surface or refractively inconsistent interior? If true, is my aquarium typical?

While I would find it confining to shoot real-life subjects with the setup you are using for your tests, companies such as Edmund Optics sell a wide variety of "optical windows," which could conceivably be used as the camera-side of a homemade photographic aquarium. If the issue is not the inclusion of glass per se, as has been my working hypothesis, but surface flatness and refractive evenness of the glass, as my sleepy brain thinks your tests are suggesting, such a setup might be worth building.

Cheers,

--Chris

rjlittlefield
Site Admin
Posts: 23608
Joined: Tue Aug 01, 2006 8:34 am
Location: Richland, Washington State, USA
Contact:

Post by rjlittlefield »

Chris S. wrote:While I would find it confining to shoot real-life subjects with the setup you are using for your tests, companies such as Edmund Optics sell a wide variety of "optical windows," which could conceivably be used as the camera-side of a homemade photographic aquarium. If the issue is not the inclusion of glass per se, as has been my working hypothesis, but surface flatness and refractive evenness of the glass, as my sleepy brain thinks your tests are suggesting, such a setup might be worth building.
Indeed, one snippet from Small Things Big (page 112) notes that
Your local DIY store can cut glass for you, but it is useful to have one of the faces made from special optical glass (the windows available from optics firms such as Edmund Scientific).
--Riik

Chris S.
Site Admin
Posts: 4049
Joined: Sun Apr 05, 2009 9:55 pm
Location: Ohio, USA

Post by Chris S. »

Chris S. wrote:Is it too early (you said you're "chipping away") to postulate what is causing this form of aberration? Camera angled with respect to the to the glass/air and glass/water interfaces? Difference in amount of water the light travels through?
rjlittlefield wrote:Surely it's the angle, which affects the amount of water the light travels through. These are all center of the sensor, using optics that are known sharp in air.
Rik, please pardon me if I drill further. To my thinking, there is a difference between two concepts that seem to be combined here: One is the angle of the interfaces of materials with differing refractive indices; the other is the amount of water that light travels through.

In tests such as you are conducting, if the camera is off-axis by, say, 10 degrees, but the subject in water is angled such that the through-water distance is approximately equal across the length of the subject, do you still see the same level of degradation?

--Chris

rjlittlefield
Site Admin
Posts: 23608
Joined: Tue Aug 01, 2006 8:34 am
Location: Richland, Washington State, USA
Contact:

Post by rjlittlefield »

In tests such as you are conducting, if the camera is off-axis by, say, 10 degrees, but the subject in water is angled such that the through-water distance is approximately equal across the length of the subject, do you still see the same level of degradation?

Yes. The degradation occurs at each point on the subject independently. There is also a focus shift that depends on path length, so the plane of best focus tips as you move off-axis. But that's a separate issue and of no great concern when stacking.

One way of thinking about this is that when the lens is not looking perpendicular to the surface, it is essentially looking through a prism. One result is dispersion depending on wavelength, hence the color fringes. In addition, there seems to be an added aberration that is sort of like astigmatism -- different best-focus distances on different axes. I haven't worked through the theory yet for that one.

--Rik

ChrisR
Site Admin
Posts: 8671
Joined: Sat Mar 14, 2009 3:58 am
Location: Near London, UK

Post by ChrisR »

Had to smile on my way to and from work today, via a railway station, a shop, a walkway and an office building foyer. I counted 7 hemispherical ish windows in 4 sizes. Security cameras! They were all opaque to some degree, but that's just exposure.
One I got closest to had a radius of about 4cm, with something like a webcam within. As I peered inside it swivelled and looked at me. Such is life.

Charles Krebs
Posts: 5865
Joined: Tue Aug 01, 2006 8:02 pm
Location: Issaquah, WA USA
Contact:

Post by Charles Krebs »

Chris S:
My own--as yet untested--solution has been to make tiny aquaria with microscope slides for the back, cover slips for the front, and layers of silicone sealant for the sides. I made a few of these just after winter set in here in Ohio, and have them in wait for the spring--am thinking of fairy shrimp and other creatures. Will shoot through the cover slip portion, but be able to light through the other sides. Not sure it will work, of course, but I have hopes.
Works very nicely!

Here's a mosquito pupa in a slide/coverslip "mini-tank".

Also a couple of older shots done in a slide/coverslip "mini-tank" with a 12.5mm f/2 Minolta bellows lens (Which is not all that different from a 10-12X microscope objective) here, and here.

Here's a caddisfly larva in a slightly larger mini-tank made from two 2x3 inch microscope slides.

A problem was reflections off of the rear slide. ("Tanks" were kept narrow to keeps subjects near front). If you've got some old multicoated clear filters or glass (for the back of the "mini-tank") it might save some retouching time. I've looked into, but never tried the available "optical windows" for the front. But the thickness... "thinness" actually (0.17mm) of a cover slip is optically desirable. I normally use double size cover slips so that give a workable size tank for many subjects.

Chris S.
Site Admin
Posts: 4049
Joined: Sun Apr 05, 2009 9:55 pm
Location: Ohio, USA

Post by Chris S. »

Charlie, I knew I had seen some spectacular examples of this approach, but didn't recall when, where, or who. Thanks for the links! I'd seen some of these wonderful images of yours, but missed others. They are fascinating and lovely.

I think the first image I saw with a cover-slip "tank" was of a red mite. I can see the image in my head--very impressive--but don't know who created it.
A problem was reflections off of the rear slide. ("Tanks" were kept narrow to keeps subjects near front). If you've got some old multicoated clear filters or glass (for the back of the "mini-tank") it might save some retouching time. I've looked into, but never tried the available "optical windows" for the front. But the thickness... "thinness" actually (0.17mm) of a cover slip is optically desirable. I normally use double size cover slips so that give a workable size tank for many subjects.
Thanks for this, Charlie! Sounds as if I should be working out solutions for reflection while the snow flies (or doesn't, this year) with these small tanks in order to be ready when the live specimens come out.

I'm fortunate to have a vernal pool visible from my office window. Everyone should be so lucky! (It provides a succession of frog/toad chorusing in the spring, a mecca for red-shouldered hawks on the hunt, an attractant to owls, a variety of water fowl, an occasional mink, etc. I've taken my county's mosquito-control folks wading into it to show them that a healthy wetland of this type contains numerous mosquito predators, and therefore few if any mosquito larvae.)

I've intended to wait for this pool to wake up naturally in the spring, but suspect that if I brought a bit of material off the bottom of the pool into the house, spring would start early for that sample. Should perhaps do that for practice.

Cheers,

--Chris

Drbluethumb
Posts: 12
Joined: Thu Feb 16, 2012 1:58 pm

Post by Drbluethumb »

Peter De Smidt wrote:Corals can be moved without harming them, assuming they aren't attached to anything to big to move. What you have to do is move them without exposing them to air.

I like the top down idea. In a small, specially built aquarium, place the coral on a shelf such that it is close to water's surface when it's polyps are extended. Photography down through the still water and avoid glass altogether.
Exactly what I was thinking, I do a lot of propagating and can move these coral's onto small surfaces, in time,sometime week's.

I don't have room over my tank, to fit a camera etc, but could do something with a container on a table and some customized led's to light up the coral's

If done this way, the container will need to be submerged in the main display tank, then the coral will be gently placed in there, then carefully taken out, on to a table, all the while always being submerged and disturbed as little as possible.

coral's are like snail's that will retract when disturbed, even vibration's, but then expand, when undisturbed for a few minutes, as long as they were not disturbed too much relocating them.

over the last several year's, when moving to different house's, I would put my coral's in 1-5G container's, they would open up fuller and fatter in non moving water.

Blame
Posts: 342
Joined: Fri May 14, 2010 11:56 am

Post by Blame »

Has anybody considered using a lens UV or daylight filter?

Drill out a circle in the bottom of a bucket. Glue a filter to the hole from the outside so that water pressure strengthens the seal.

That should give you access to a depth of a few inches.

Lou Jost
Posts: 5990
Joined: Fri Sep 04, 2015 7:03 am
Location: Ecuador
Contact:

Post by Lou Jost »

Here is my version of the optical fish tank (but for orchid flowers in alcohol).
Image
I initially made it using epoxy. But I discovered that something dissolves out of the epoxy and leaves a film on the glass when the alcohol dries. So I had to reseal it with silicon, which was very messy. Still, it works well at 5x.

Post Reply Previous topicNext topic