Gold "Nugget"

Starting out in microscopy? Post images and ask questions relating to the microscope and get answers from our more advanced users on the subject.

Moderators: rjlittlefield, ChrisR, Chris S., Pau

scitch
Posts: 463
Joined: Sat May 29, 2010 12:35 am

Gold "Nugget"

Post by scitch »

This one was very difficult to illuminate and didn't come out to be proud of (so, I put it in the beginner section). But, it was a new technique for me, so I wanted to post it to get some pointers. This is a tiny piece of gold that we panned from the San Gabriel River. Lengthwise, it's less than 1mm. The technique was to put an eyepiece in the trinoc tube of a Laborlux scope and then point a macro lens down through it. The objective was a 4X generic Plan objective surrounded by a ping pong ball. Eyepiece was a 10X WF. Lens was a Tamron 90mm fully extended. It was illuminated on one side with an illuminator and the other by a flash. They were taken at F/5.6, ISO-1600, 1/100 second. It was a Zerene DMap stack of about 15 images and PS post-processed for lighting and to remove vignetting.

I also took some images without the eyepiece, but they didn't come out well either.

So, what do you think I did wrong? Was it because I used a standard eyepiece, not a projection eyepiece? Was I not supposed to use a macro lens? Should I not have extended the macro lens fully? Other?

Image

Mike

lauriek
Posts: 2402
Joined: Sun Nov 25, 2007 6:57 am
Location: South East UK
Contact:

Post by lauriek »

My guess would be using an eyepiece designed for eyes being the problem - photo eyepieces are available but generally have lower magnification but should give higher quality picture. Do you have something like a 40x plan objective? If so you should try that with direct projection (no tube lens, no eyepiece).

ETA: Sorry just noticed you mentioned a Tamron 90mm lens as well as the objective. Is it an infinity corrected objective?

scitch
Posts: 463
Joined: Sat May 29, 2010 12:35 am

Post by scitch »

No, Laurie, it's not infinity corrected. I remember someone (maybe Rik) suggesting just pointing the camera right down the eyepiece, so I thought I'd try it.

By the way, congrats on the picture in Scienctific American.

Mike

rjlittlefield
Site Admin
Posts: 23606
Joined: Tue Aug 01, 2006 8:34 am
Location: Richland, Washington State, USA
Contact:

Post by rjlittlefield »

Mike,

A bit of background... Pointing a camera and lens down the eyepiece is called the "afocal" technique. As described HERE, the afocal technique can introduce vignetting due to mismatch between the pupils (apertures) of the eyepiece and the camera lens.

What you've done by using a fully extended 90 mm macro lens on the camera is to zoom in on the central area of the microscope's field of view.

This has the nice effect of filling the frame with a subject that would normally be viewed at higher magnification, while simultaneously reducing the vignetting so that it only cuts off the two bottom corners.

Unfortunately this approach also introduces a couple of not so nice effects. One effect is that you're making the eyepiece focus in a way that it's not intended to, producing its "virtual image" only a few inches below the eyepiece instead of at 16 inches or even farther away. This may introduce some aberrations. The other effect is that by blowing up just the center of the field, you may be encountering "empty magnification" caused by resolution limits in the objective.

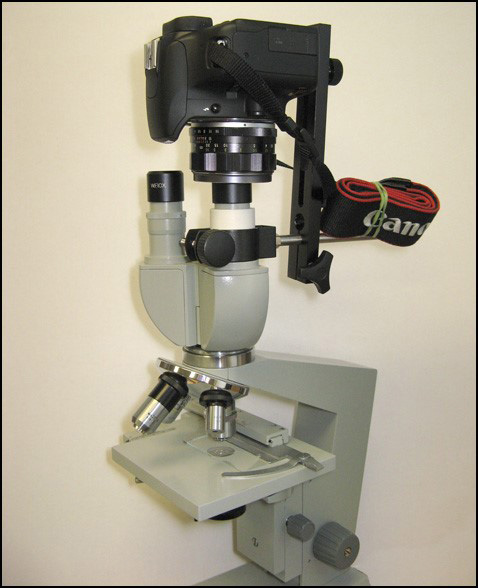
If you're going to use the afocal technique, I strongly recommend using a shorter wider lens such as the old SLR lens shown in this image from the thread linked above:

Image

Using the afocal technique, it really doesn't matter whether the objective is finite or infinite, as long as the objective matches the eyepiece and the rest of the scope's optics (if any).

One other thing... I notice on the right side of the image that there's quite a bit of color fringing. I suspect that's being caused (emphasized, anyway) by mismatch between pupils of the eyepiece and the macro lens. The situation is very much like what's discussed in the FAQ: Stopping down a lens combo, where stopping down the rear aperture causes the image to be formed from bad parts of the front lens.

To get the highest quality image from this sort of subject, my current recommendation would be to use a Nikon CFI Plan Achromat 10x NA 0.25 in front of a telephoto lens as discussed in detail HERE. These objectives can be commonly found on eBay for around $100, are also available new at less than $250 list price, and should play nicely with telephotos that you already have. Stick that combo on a StackShot rail and you'll have a setup that produces great images and is also fun to use.

Switching subjects to illumination...

Looking at the glare pattern, I don't think your continuous illuminator is making any significant contribution to the exposure. That's typical, even desirable because a) the color balances are probably far different, and b) you want the vibration-freezing effect of the short flash.

However, because the entire exposure is being produced by light from a single source, it's still pretty directional even after passing through that pingpong ball. You could do better by adding some aluminum foil reflectors on the side away from the flash, and perhaps also by surrounding the pingpong ball with a second layer of diffusion a couple of inches out. A piece of paper or matte plastic would work well for that.

I hope this helps. Metallic subjects are always challenging, but you should be able to do better than this.

--Rik

Edit: correct typo
Last edited by rjlittlefield on Sun Dec 26, 2010 7:30 am, edited 1 time in total.

scitch
Posts: 463
Joined: Sat May 29, 2010 12:35 am

Post by scitch »

Thanks, Rik, that does give me a lot to think about. Is the infinity objective that you link to the same as the ones at opticsplanet? They have a CFI E Plan and a CFI BE Plan as well as a variety of CFI Flat Fields. But that page that you linked to just refers to CFI Plan with no letter in between.
I believe that much of the color fringing is a PhotoShop effect. I did quite a bit of color, light, shadow, and sharpness adjustments. On one attempt, all of the shadows came out blue, so I discarded that one.

Mike

rjlittlefield
Site Admin
Posts: 23606
Joined: Tue Aug 01, 2006 8:34 am
Location: Richland, Washington State, USA
Contact:

Post by rjlittlefield »

scitch wrote:Is the infinity objective that you link to the same as the ones at opticsplanet?
No. The ones at opticsplanet are lower-end objectives that are designed to be used with Nikon's Eclipse microscope.

The one I linked is Nikon's MRL00102, "CFI Plan Achro 10X NA 0.25 WD 10.5mm", which listed at $226 in April 2010.

The one at opticsplanet is Nikon's MRN70100, "CFI BE Plan Achromat 10X", which listed then at only $83 (same list price as shown at opticsplanet now).

As I read the documentation, the ones at opticsplanet should be compatible with the one I linked -- in the sense of same threads, parfocal distance, and tube lens requirement -- but it is certainly not the same. There has to be a reason for that much lower price. Best guess is not as large a field, but I haven't seen any test results.

I understand that to buy things with that grant you'll probably need something besides eBay. That should be no problem. I personally don't know where to buy a new Nikon objective, but I'll bet other members do.

--Rik

lauriek
Posts: 2402
Joined: Sun Nov 25, 2007 6:57 am
Location: South East UK
Contact:

Post by lauriek »

scitch wrote: By the way, congrats on the picture in Scienctific American.
Mike
Thanks Mike! I haven't actually seen it yet!

Post Reply Previous topicNext topic