Tackling the "black hole"

A forum to ask questions, post setups, and generally discuss anything having to do with photomacrography and photomicroscopy.

Moderators: rjlittlefield, ChrisR, Chris S., Pau

Charles Krebs
Posts: 5865
Joined: Tue Aug 01, 2006 8:02 pm
Location: Issaquah, WA USA
Contact:

Tackling the "black hole"

Post by Charles Krebs »

After reading some recent posts by Eric and Craig, I thought I might try a "beam-splitter"approach to see it it offered any help with the black hole effect... the reflection of the lens on a very shiny surface.

I took a brightfield "cube" for the Olympus BH2-UMA vertical illuminator and attached it to a reversed 63/2.8 El Nikkor.

Then I did a quick test. (Nothing fancy here, I just placed a beetle on the stage). It was illuminated with a translucent white dome, as I might ordinarily do with such a subject.

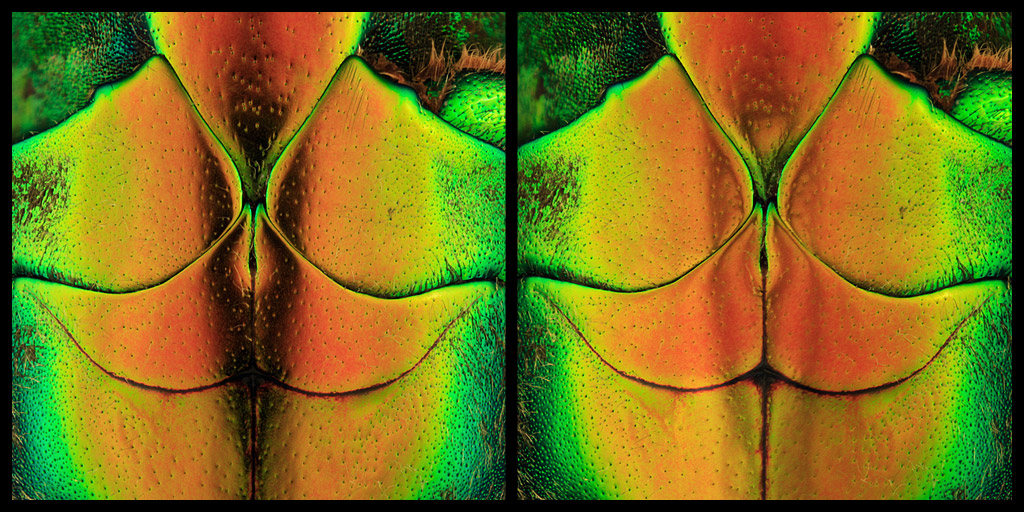
The top shot shows the "black hole" which is the reflection of the hole at the top of the dome and the lens looking through it. (It appears proportionately larger than it normally would in a "real" picture since I have cropped in on it significantly).

For the second shot I added some light through the brightfield cube to try to fill in the dark area. (I placed a couple layers of diffusion material over the light entry "port" to try and avoid harsh, focused light). The results were moderately successful. It's hard to eliminate the dark effect completely. If you crank up the light through the beam splitter too much you start to add noticeable (direct, frontal) light to the overall picture and begin to lose the nice diffused dome lighting. Shadows start to get get filled in and texture starts to become less pronounced. You begin to get undesirable reflections from the direct light. The best compromise seems to be a point where the dark area is filled in significantly, but the beam-splitter light adds very little to the overall exposure. The exposure used was was exactly the same for both images (1/6 second for each image in stack), and no adjustments were made in "post". So you can see that even though the dark areas are not entirely eliminated, there is starting to be hint of additional overall exposure to the full image. (Also notice how the small dark depressions in the surface of the beetle that face the lens are starting to be filled in with light).

Image

Image


This two-panel shot below shows, on top, the picture made with no additional light from the beam-splitter. The lower panel shows only the light that was contributed by the beam-splitter. (The end result of this added light is the second picture of this post).
(Rik... I suspect you might be tempted, but don't try to split them up and layer these, this "two panel" example was an afterthought so the cropping and sizing is not exact :wink:)

Image

elf
Posts: 1416
Joined: Sun Nov 18, 2007 12:10 pm

Post by elf »

Wouldn't a tilt/shift lens be able to eliminate the problem?

Craig Gerard
Posts: 2877
Joined: Sat May 01, 2010 1:51 am
Location: Australia

Post by Craig Gerard »

Thanks for that Charlie! :)

The brightfield cube from the BH2-UMA, used in this example, is that fulfilling a similar role to an Olympus OM Macro Mirror Housing? (I've been looking for some of those for years)

http://www.alanwood.net/photography/oly ... sings.html

What about a diffused light source through a glass slide inclined 45 degrees? Probably too fiddly with the working distance with which we have to deal...and could get messy.
I took a brightfield "cube" for the Olympus BH2-UMA vertical illuminator and attached it to a reversed 63/2.8 El Nikkor.
Do you have a 'snapshot' of that :twisted:

Craig
To use a classic quote from 'Antz' - "I almost know exactly what I'm doing!"

AndrewC
Posts: 1436
Joined: Thu Feb 14, 2008 10:05 am
Location: Belgium
Contact:

Post by AndrewC »

So where is the "green with envy" emoticon ? I've been trying to do this for months with various beam splitters I've found on sale, but so far it seems the optical quality of the cubes I've got suck.
rgds, Andrew

"Is that an accurate dictionary ? Charlie Eppes

Eric F
Posts: 246
Joined: Tue Nov 11, 2008 1:38 pm
Location: Sacramento, Calif.

Post by Eric F »

Charles -- fantastic work! Yes, this is the way to go for eliminating/ reducing the 'black hole'. I'm with Craig: please show us the setup.

Craig -- thanks for the link to the Olympus mirror housing; I never knew such a thing existed! I want one...

Eric

Charles Krebs
Posts: 5865
Joined: Tue Aug 01, 2006 8:02 pm
Location: Issaquah, WA USA
Contact:

Post by Charles Krebs »

Elf... not really. This is different from the classic view camera shot of a wall with a mirror. If the subject were perfectly flat then it might be feasible. But with insects this problem typically occurs on highly curved surfaces, and the dark area simply moves around depending on lens position.

The Olympus brightfield cube is like the nifty mirror housings Olympus made for their macro lenses only smaller. Perhaps too small for what we want to do with it.

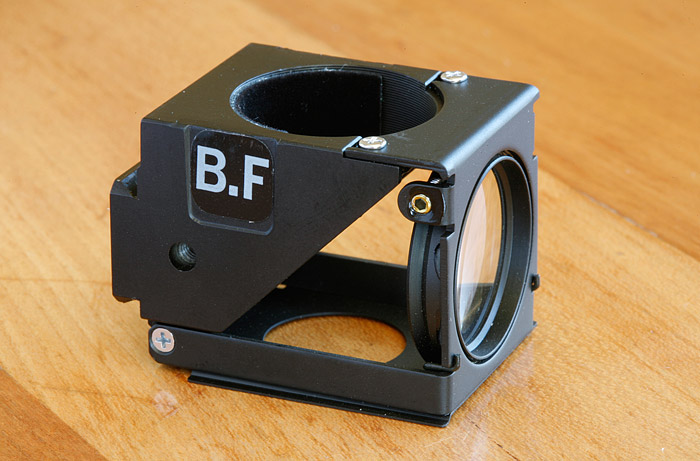
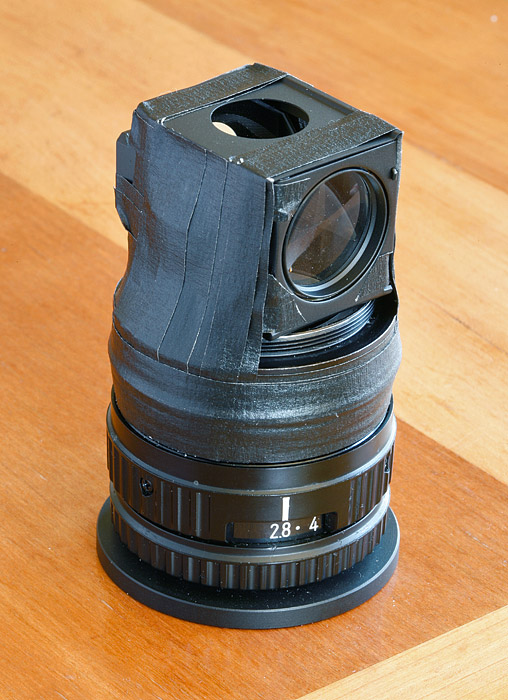
Here's the BF cube by itself, and my temporary, cobbled arrangement showing it on the 63/2.8. (Basically it's taped to a ring with the female 39mm enlarger lens thread so it can be screwed on and off the lens).

(Top shot) Light goes in the port with the lens in it on the right side... hits the angled semi-silvered mirror... and is deflected downward toward subject. The lens looks down the hole at the top. Simple and straightforward. I cover the light entry window with two layers of diffusion material, and then direct an additional fiber optic guide at this window when taking the pictures.

Image

Here it is on the 63/2.8 (pretty ugly! :roll: ). One problem is the small size of this cube. The opening that faces the subject (at the top of this second picture) is only about 16mm in diameter. To be as effective as possible, the diameter of this aperture should be larger than the opening at the top of the diffusion dome. But the size of that dome opening is dictated by the need to have it large enough so that the lens can see the subject, and the dome hole does not appear in the corners of the picture. So there are a few things that need to be juggled. You need adequate working distance to be able to insert a 45 degree beam-splitter and still have room for the rest of the lighting (diffusion dome, cone...). The size of the mirror and aperture facing subject need to be large enough so that it completely fills the viewing aperture in the dome (as seen from the subject position). I need to play around some more, but it may well be that the 16mm aperture is too small to be as effective as this technique could be. (I'll explain this with the last picture).

Image

Here's another test shot. (Again nothing serious or fancy, just working with the "black hole". As you can see it has really filled in the center of the dark area, but there remains a "ring". I'm pretty sure this darker ring occurs because the size of the circle of light produced by the cube (that 16mm opening) is not large enough to completely fill the aperture in the dome (as seen from every subject position). Once again, you can also see the effect of the direct frontal light and how it does not "shadow" at all so some surface texture is lost where it has had the most fill effect.

Image

RogelioMoreno
Posts: 2979
Joined: Fri Nov 20, 2009 11:24 am
Location: Panama

Post by RogelioMoreno »

Charles,

Thank you, excellent work.

Rogelio

lauriek
Posts: 2402
Joined: Sun Nov 25, 2007 6:57 am
Location: South East UK
Contact:

Post by lauriek »

Craig Gerard wrote:Thanks for that Charlie! :)

The brightfield cube from the BH2-UMA, used in this example, is that fulfilling a similar role to an Olympus OM Macro Mirror Housing? (I've been looking for some of those for years)

http://www.alanwood.net/photography/oly ... sings.html
I only ever saw _one_ of these on Ebay in all the years I've been looking, it went for a silly price....

Eric F
Posts: 246
Joined: Tue Nov 11, 2008 1:38 pm
Location: Sacramento, Calif.

Post by Eric F »

Wonderful information Charles (very 'illuminating'); thanks so much!

Boy, it would be sweet to have one of those OM Macro Mirror Housing units to attach to a Zuiko 38mm bellows lens...

Eric

marc
Posts: 22
Joined: Tue Mar 16, 2010 12:36 pm
Location: Germany

Post by marc »

Charles, thank you very much for sharing your idea.
I recently tried to eliminate those black holes in pictures like this:
http://www.photomacrography.net/forum/v ... php?t=9273
I used a semipermeable mirror which I placed vertically in front of the hole of the ping pong ball diffusor. I thought the reflected light from inside the lighted ball would be enough to solve the problem. But the black area did't vanish completly. Instead a slighlty lightened gray area remained.
This is the beamsplitter I used:
http://www.thorlabs.de/thorProduct.cfm?partNumber=EBS1
It's a great idea to rotate the beamsplitter by 45° and to spot it with an additional light source. Of course this is only possible if there is enough working distance left. Maybe it will work with smaller angles. Some future experiments will show.

Charles Krebs
Posts: 5865
Joined: Tue Aug 01, 2006 8:02 pm
Location: Issaquah, WA USA
Contact:

Post by Charles Krebs »

I think it might not be too hard to get the "black hole" filled in, but working distance will be an issue. And even more questionable and important (as Andrew brought up) is the image quality obtained when photographing through a 45 degree beam-splitter.

g4lab
Posts: 1437
Joined: Fri May 23, 2008 11:07 am

Post by g4lab »

Similar beam splitters are sold for machine vision. I have one somewhere that I bought for very little on fleabay. They are expensive new.
http://www.edmundoptics.com/onlinecatal ... uctID=1307
Last edited by g4lab on Mon Jul 26, 2010 12:45 pm, edited 1 time in total.

AndrewC
Posts: 1436
Joined: Thu Feb 14, 2008 10:05 am
Location: Belgium
Contact:

Post by AndrewC »

What I was playing with was trying to put the beam splitter cube between the objective and lens. To be successful you need a good quality cube with AR on top and bottom faces, and a nice holder jig ..... and a lot of patience.
rgds, Andrew

"Is that an accurate dictionary ? Charlie Eppes

PaulFurman
Posts: 595
Joined: Sat Oct 24, 2009 3:14 pm
Location: SF, CA, USA
Contact:

Post by PaulFurman »

Can this be done above the lens, behind the lens mount?

Charles Krebs
Posts: 5865
Joined: Tue Aug 01, 2006 8:02 pm
Location: Issaquah, WA USA
Contact:

Post by Charles Krebs »

Paul,

Yes, it could. Actually in microscopes that's the way it is done.
(In this post http://www.photomacrography.net/forum/v ... hp?t=10176 you can see in the a diagram exactly where this brightfield cube usually resides... inside the vertical illuminator above the objective).

Post Reply Previous topicNext topic