Testing the M plan 40x (reflections discussion going on)

Images taken in a controlled environment or with a posed subject. All subject types.

Moderators: rjlittlefield, ChrisR, Chris S., Pau

seta666
Posts: 1071
Joined: Fri Mar 19, 2010 8:50 am
Location: Castellon, Spain

Testing the M plan 40x (reflections discussion going on)

Post by seta666 »

Hi,
I recieved the nikon M plan 40/0.5 210/- ELWD this last week but I have been quite busy so I could not test it until last weekend. Both shots are with the EOS 5D
First I did a stack at 40x of an ant´s eye , around 75 shots with something like 0,0016mm steps; I did not stop to count them ;-)
Image

Large view

Then I pushed it to 60x with a fly eye, has a little crop so must be 65x. 150 shots with something like 0,00133mm steps, difraction affects the image as it is an efective f61 but there is still enugh deatail to some some fine detail of the eye structure

Image

Large view

Both these stacks have been very hard to deal with, both for me an ZS. The eye cell produce internal reflections as you do the shots for the stack, making the final stack very messy.
I had to retouch the whole eye area on both shots from partial stacks
Regards
Last edited by seta666 on Tue Aug 31, 2021 7:31 am, edited 3 times in total.

rjlittlefield
Site Admin
Posts: 23625
Joined: Tue Aug 01, 2006 8:34 am
Location: Richland, Washington State, USA
Contact:

Post by rjlittlefield »

Nice work. Stacking at this magnification is never easy, but you held good detail in everything.

--Rik

rjlittlefield
Site Admin
Posts: 23625
Joined: Tue Aug 01, 2006 8:34 am
Location: Richland, Washington State, USA
Contact:

Re: Testing the M plan 40/0.50 210/- ELWD

Post by rjlittlefield »

seta666 wrote:Both these stacks have been very hard to deal with, both for me an ZS. The eye cell produce internal reflections as you do the shots for the stack, making the final stack very messy.
I had to retouch the whole eye area on both shots from partial stacks
Thank you for sending me the images by email. I think I understand now what you are talking about.

This is an interesting technique. Let me try to explain for other readers. Please correct me if I get it wrong.

Take a close look at the second image, the fly eye.

Question: what common feature do you NOT see?
Answer: the front of the objective!

Shiny surfaces such as this fly's eye always reflect an image of their surroundings. For example, in "Eye of fruit fly", every ommatidium reflects several surrounding bristles. When a surface happens to face the camera, the camera sees its own lens. In "Eye of fruit fly", this occurs for each ommatidium at lower left.

We are used to seeing such reflections in focus-stacked images.

But when you are looking through a microscope, usually you will not notice the reflections.

Why is this?

It is because the reflected images do not lie at the same depth as the reflecting surface. If the reflecting surface is convex, as with ommatidia, the reflected image appears to lie a short distance below the surface, even though it is formed by reflection at the surface. In any case, when the lens is focused on the surface, the reflection is out of focus.

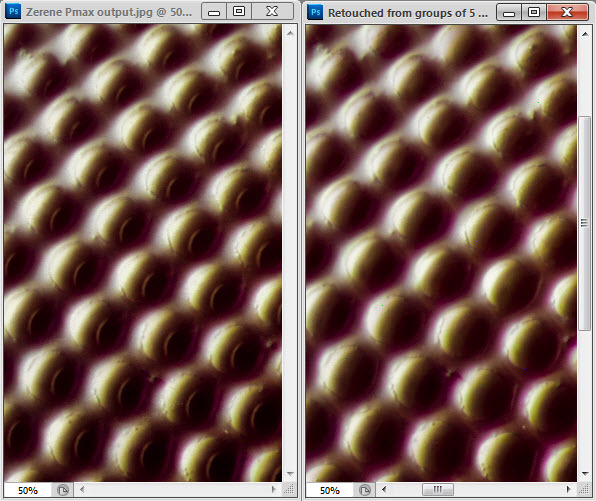
What seta666 has done here is to use the difference in focus depth to remove in-focus reflections, leaving only out-of-focus reflections that look like a soft edged diffuser on the lighting.

The technique involves a lot of retouching. Basically seta666 processes the stack in shallow slabs, something like 5 frames per slab. Each slab is thick enough to capture surface detail from some ommatidia, while not capturing in-focus reflections for those same ommatidia. Then he uses retouching to build a final image that shows the surface but not the reflections. The process is a lot of work but produces a nice result.

With kind permission from seta666, here is an illustration of the results before and after retouching.

--Rik

Image

seta666
Posts: 1071
Joined: Fri Mar 19, 2010 8:50 am
Location: Castellon, Spain

Post by seta666 »

You did explain it very well Rik.
I would add to your explanation some more benefits of this technique; I also have to say that these small partial stacks (4-6 shots) are for extreme conditions like this, normally I divide the stack by 10 (200 shot stack to 10 groups of 20 images)
Some more benefits are:
-Less noise and lots of detail recovery, specially in dark areas
-Good for removing those hair transparencies we are used to (I used it here with success http://www.photomacrography.net/forum/v ... hp?t=10167)
-If dust trails appear you can make them much smaller
-You can also recover some highlight information, ZS Pmax tends to blow away highlights
For images with background I also do a 2 shot stack, to leave a clean background
Regards
Last edited by seta666 on Wed Jul 28, 2010 6:41 am, edited 3 times in total.

Charles Krebs
Posts: 5865
Joined: Tue Aug 01, 2006 8:02 pm
Location: Issaquah, WA USA
Contact:

Post by Charles Krebs »

Yup... stacking with the 40X (and up) is not for the fainthearted. :wink:

In some cases (not all), as with certain eye reflections there is perhaps an easier way to handle the reflection problem.

(I've taken the liberty of showing this using the example Rik posted... any objections and I'll remove it)


I'll take the output image into PS and create a duplicate layer. Then on the lower layer I'll do a Gaussian blur. Then I go back to the top layer and erase through the offending reflections. The results (at least for me) are indistinguishable from the partial stack/retouch method.

And if there is a real egregious reflection that will not go away with either method, I'll use the "duplicate layer/blur" technique but before I do the blur I'll do some slight retouching to the lower layer to subdue the problematic section.

Here's Rik's example where I've done the duplicate/blur to the left hand side. As you can see, not much difference can be seen. (Yes, you do still have to retouch (erase) each individual facet, but it goes surprisingly quickly).

Image

With lower magnifications it's not uncommon that the compound eye can be left alone (because the reflection is so tiny), but the larger ocelli need some sort of "treatment".

seta666
Posts: 1071
Joined: Fri Mar 19, 2010 8:50 am
Location: Castellon, Spain

Post by seta666 »

Nice technique Charles, but that area that Rik has shown was not the most problematic one. At some areas reflections produce light rays that kill any textures the ommatidium may have, you may eliminate the reflection but there is no way to recover the gone textures.
Here is one of those problematic areas 100% crop, as you see on the original one, cornea textures had disappeared as well as the subtle hexagonal textures, also the original one is more noisy.

Image
Regards
Last edited by seta666 on Tue Aug 31, 2021 7:34 am, edited 2 times in total.

rjlittlefield
Site Admin
Posts: 23625
Joined: Tue Aug 01, 2006 8:34 am
Location: Richland, Washington State, USA
Contact:

Post by rjlittlefield »

Charlie, thanks for the suggestion. This is very helpful.

Thinking about what's going on...

When focused on the surface the reflection will be OOF, so indeed there should be little difference between selecting the frame(s) in which the reflection really is OOF, and using a gaussian blur to make it appear OOF.

The exception would be if there were fine surface detail that got excluded from the all-frames result because it was "hidden" by higher contrast detail from an in-focus reflection.

And I see that seta666 has already pointed this out in a later reply. But I'll go ahead and post anyway as the explanation may be helpful.

--Rik

seta666
Posts: 1071
Joined: Fri Mar 19, 2010 8:50 am
Location: Castellon, Spain

Post by seta666 »

Thanks Rik, I think you explain your self much better than I do. First time I came across this kind of problem was with some moth stacks at 10x, the eye did not look very good but you still had the scales to look at. However, when covering the whole frame with an eye those reflections ruin the image in my opinion; I would not mind if they were only reflections, is the texture loss what really botheres me
Regards
Last edited by seta666 on Wed Jul 28, 2010 7:41 am, edited 1 time in total.

Charles Krebs
Posts: 5865
Joined: Tue Aug 01, 2006 8:02 pm
Location: Issaquah, WA USA
Contact:

Post by Charles Krebs »

In some cases (not all), as with certain eye reflections
(emphasis added)


:wink: :wink: :wink:

seta666
Posts: 1071
Joined: Fri Mar 19, 2010 8:50 am
Location: Castellon, Spain

Post by seta666 »

je, je, you are right Charles. This method is also for those rare ocasions as it is a time consuming method, you can happily spend 4-6 hours in the computer
This is a method I have been using for a few weeks but now I took it to the extreme, next thing would be retouch a whole image from individual frames ;-)
Regards

seta666
Posts: 1071
Joined: Fri Mar 19, 2010 8:50 am
Location: Castellon, Spain

Post by seta666 »

I finished a 40x right now, has a small crop so it would be a 45x; lots of retouching involved (4+ hours) so is a time consuming method.
200 shots with 0,0015 steps. Then I run the stack again in something like 40 groups of 3 for the central section
and 15 groups of 5 shotsh for the border/corner (you can see corner have some reflection but I wanted to clean
the central part)
Quality on borders and corners drops as I use the full frame 5D for my stacks
Image

Large view

I did not mencioned it, but I used same technique for the ant´s eye where the problem was even worse

Image

Regards
Last edited by seta666 on Tue Aug 31, 2021 7:38 am, edited 1 time in total.

dmillard
Posts: 639
Joined: Tue Oct 24, 2006 7:37 pm
Location: Austin, Texas

Post by dmillard »

Thanks seta666 and Charlie for sharing your different approaches to this challenge. I'm going to return to some eye images that I had previously given up on in frustration because of the reflections.

David

Post Reply Previous topicNext topic