4X5" PhotoMicrograph
Moderators: rjlittlefield, ChrisR, Chris S., Pau
4X5" PhotoMicrograph
An area hospital recently switched their lab from using traditional photographic equipment to digital equipment. I acquired some of their stuff including a 4X5 photomicrograph. It was missing a post & base so I mounted it using 1 1/2" metal pipe. The top part holding the GG & filmholder says Brinkman USA but the rest of it says made in Germany. It comes with a shutter but no lens. I acquired a cheap student lab 40x microscope but do not know how to marry the two. Sorry for the stupid questions; but do I remove the ocular from the microscope in order to focus on the GG, or focus the microscope at some distance, then adjust the front to rear standards bellows distance? Any help would be greatly appreciated.
-
rjlittlefield

- Site Admin
- Posts: 23606
- Joined: Tue Aug 01, 2006 8:34 am
- Location: Richland, Washington State, USA
- Contact:
Doug,
Wow -- you're either a glutton for punishment, or a true history buff! There's a reason the hospital is switching to digital.
But, since you've got such a nice piece of vintage equipment...
You need an eyepiece. Its job is to take the roughly 20mm diameter image that's focused by the objective near the top of the tube, and enlarge it into a suitably sized image that's focused on the ground glass. The eyepiece that came with the microscope should work to get you started.
Turn on the microscope lamp and stick a slide in. Adjust the front-to-rear bellows distance so the eyepiece casts an bright circle of useful diameter on the ground glass. Then focus the microscope until the ground glass image is sharp.
Chances are you won't be able to focus it all the way across the glass, due to curvature of field in the objective and/or eyepiece. If you can't, then go for the center since that's where the best quality will be.
Perhaps some of our gurus will chime in with more detailed suggestions & comments. But this should be enough to get you started.
--Rik
PS. Where are my manners?! Welcome aboard -- you'll find this a friendly and helpful place -- lots of nice people here!
Wow -- you're either a glutton for punishment, or a true history buff! There's a reason the hospital is switching to digital.
But, since you've got such a nice piece of vintage equipment...
You need an eyepiece. Its job is to take the roughly 20mm diameter image that's focused by the objective near the top of the tube, and enlarge it into a suitably sized image that's focused on the ground glass. The eyepiece that came with the microscope should work to get you started.
Turn on the microscope lamp and stick a slide in. Adjust the front-to-rear bellows distance so the eyepiece casts an bright circle of useful diameter on the ground glass. Then focus the microscope until the ground glass image is sharp.
Chances are you won't be able to focus it all the way across the glass, due to curvature of field in the objective and/or eyepiece. If you can't, then go for the center since that's where the best quality will be.
Perhaps some of our gurus will chime in with more detailed suggestions & comments. But this should be enough to get you started.
--Rik
PS. Where are my manners?!
-
Charles Krebs

- Posts: 5865
- Joined: Tue Aug 01, 2006 8:02 pm
- Location: Issaquah, WA USA
- Contact:
Doug,
Welcome! I'll try to add some additional detail to Rik's response.
The first thing to do is set up the microscope and be sure it is working properly. The focus should be determined by what is correct as seen through the eyepiece(s) when the scope is properly set up. That is, when working to set up a camera with a microscope, the camera should be placed so that it is in the correct location to have an "in-focus" image after the proper focus has been determined through the eyepieces. You want to maintain the "designed" objective-to-subject distance. If the camera is set up improperly you might be able to get an in-focus shot by adjusting the microscope focus to be either closer or farther from the subject than it should be, but the image quality can suffer as it deviates from the "designed" distance.
As Rik mentioned, the objective will form an image (known as the "intermediate image") in the eyepiece tube... often located about 10mm "into" the tube from the edge. This is a "real" image... if you placed a piece of film, a sensor, or a small screen at this location the image would be in focus on the surface. When positioned properly for visual observation, the diaphram of the microscope eyepiece is located at this position. The eyepiece then forms a "virtual" image that will be focused by the lens of the eye onto the retina. (The main point I want to make here is that with a microscope there are "locations" where you will have a real image that can be placed directly onto film/sensor, and places where there will be a "virtual" image which need an additional lens (such as the lens of your eye) in order to form an image ("real") that can be placed onto retina/film/sensor.
So... set up and focus properly through the eyepiece with your eyes. At this point the image above the eyepiece is a "virtual image" that can not be placed on film/sensor. Without changing focus (remember... we want to maintain the "designed" objective-to-subject distance) you will now "raise" the eyepiece slightly. This places the intermedite image in front of the eyepiece diaphram, and as a result the eyepiece will now "project" a real image! You need to find the location in "space" above the eyepiece where that real image is in focus by moving the film/sensor/groundglass up and down above the eyepiece until the image comes into focus. (Again.... do not try to bring it into focus by altering the focus setting of the microscope). In a darkened room a thin sheet of white paper can be moved up and down to roughly but quickly determine the size and location of this new "real" image.
The more the eyepiece is "raised" the lower the overall magnification provided at the location where this projected image is in focus.
This is basically it in a nutshell.
I wrote a piece to describing the use of eyepieces with SLR cameras. While your equipment is quite different, it all applies to you as well. You simply have a need to get a great magnification of the intermediate image so that it will "fill" your larger film/sensor format. That page is here:
http://www.krebsmicro.com/parfocal/index.html
-
rjlittlefield
- Site Admin
- Posts: 23606
- Joined: Tue Aug 01, 2006 8:34 am
- Location: Richland, Washington State, USA
- Contact:
Doug,
I see from your posting in the Close-up Gallery that you have some great experience with large-format cameras. Often that experience goes along with a good background in lens theory. I'll "pitch" this post on that assumption. Please let me know if it works or not.
First off, I'd like to thank Charlie for posting his recommended procedure.
Charlie's procedure is absolutely positively the correct way to do things.
What I posted was only a "quick and sleazy" procedure (hereafter, "Q&S"), designed to get you started without too much fiddling around.
However, despite Charlie's typical graciousness, I feel compelled to "defend my honor", so to speak , and explain why quick and sleazy is not so bad as one might imagine.
The key thing to note is that in order for the eyepiece to project an enlarged image on your ground glass, the real image formed by the objective has to focus somewhat farther below the eyepiece than it would for direct viewing. Assuming that you have a 10X eyepiece (25mm focal length), and assuming that you're looking for around 5X enlargement onto the ground glass (4" = 100 mm, 100 mm / 20 mm = 5X), then "somewhat farther below" turns out to be only about 5 mm. In the correct procedure that Charlie describes, that 5 mm is obtained by raising the eyepiece. In the Q&S procedure, it is obtained by dropping the stage slightly, thus increasing the subject-to-objective distance and decreasing the objective-to-projected-image distance. So, in the correct procedure, the objective is projecting its real image at around 150 mm from the turret, while in the Q&S procedure, it's at around 145 mm.
Even in the world of microscope objectives, 150 mm versus 145 mm projection distance is not very important. It might be noticeable with extremely good objectives. It's certainly not with mine.
I set up a simple test to check out the theory. 4X Nikon achromat objective, 10X aus Jena WF eyepiece, projecting at roughly 5X onto the 23x15mm sensor of a Canon 300D. Here are the results. (The subject is a 10 micron per division stage micrometer, with center field at the left end of the scale.)
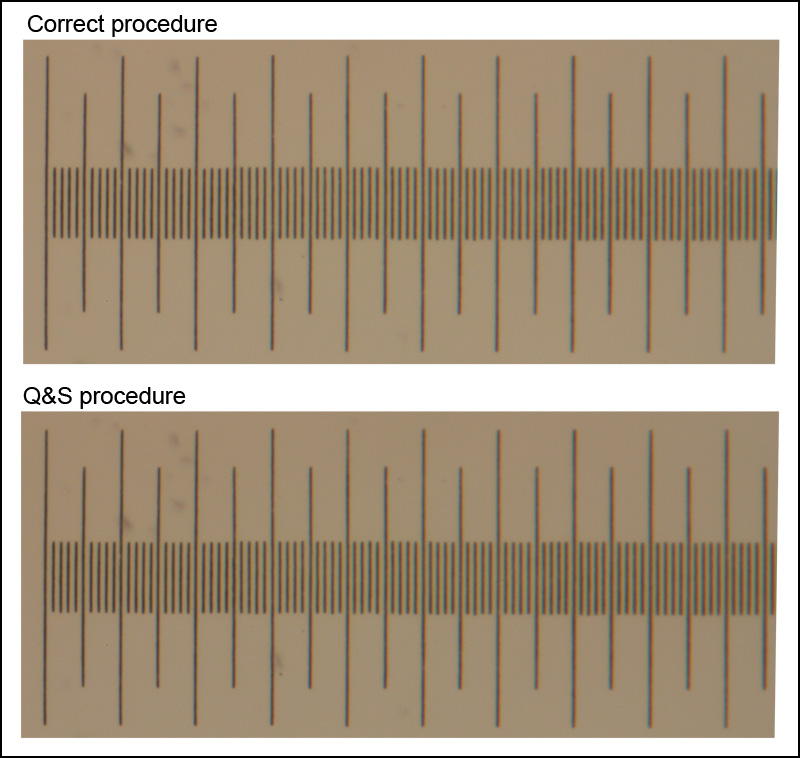
To tell the truth, I'm very hard-pressed to see any difference in image quality between these two. Certainly whatever difference exists is swamped by random variation in focus. (I'll confess, I shot a series with minor focusing tweaks, and picked the pair that appeared to be focused the same.)
So I'll argue that if all you want to do is set up the microscope to utilize the 4x5 back at a single magnification, then it really doesn't matter much which procedure you follow. "Quick and sleazy" is not that bad.
There is, however, a different concern in which the correct procedure is much better. That is parfocality. Microscopes and their objectives are normally designed so that when the highest power objective is focused, all the lower power objectives are, too. You can switch objectives without changing focus very much. Objectives that behave like this are called "parfocal". The same word describes having the camera focused at the same time that a direct view through an eyepiece is focused. The correct procedure preserves parfocality; the Q&S procedure does not. If you use the Q&S procedure, then every time you switch objectives, you'll have to refocus significantly.
Switching subjects, I'd be interested in knowing what you plan to do with this beast. Are you willing to talk about it?
--Rik
I see from your posting in the Close-up Gallery that you have some great experience with large-format cameras. Often that experience goes along with a good background in lens theory. I'll "pitch" this post on that assumption. Please let me know if it works or not.
First off, I'd like to thank Charlie for posting his recommended procedure.
Charlie's procedure is absolutely positively the correct way to do things.
What I posted was only a "quick and sleazy" procedure (hereafter, "Q&S"), designed to get you started without too much fiddling around.
However, despite Charlie's typical graciousness, I feel compelled to "defend my honor", so to speak
The key thing to note is that in order for the eyepiece to project an enlarged image on your ground glass, the real image formed by the objective has to focus somewhat farther below the eyepiece than it would for direct viewing. Assuming that you have a 10X eyepiece (25mm focal length), and assuming that you're looking for around 5X enlargement onto the ground glass (4" = 100 mm, 100 mm / 20 mm = 5X), then "somewhat farther below" turns out to be only about 5 mm. In the correct procedure that Charlie describes, that 5 mm is obtained by raising the eyepiece. In the Q&S procedure, it is obtained by dropping the stage slightly, thus increasing the subject-to-objective distance and decreasing the objective-to-projected-image distance. So, in the correct procedure, the objective is projecting its real image at around 150 mm from the turret, while in the Q&S procedure, it's at around 145 mm.
Even in the world of microscope objectives, 150 mm versus 145 mm projection distance is not very important. It might be noticeable with extremely good objectives. It's certainly not with mine.
I set up a simple test to check out the theory. 4X Nikon achromat objective, 10X aus Jena WF eyepiece, projecting at roughly 5X onto the 23x15mm sensor of a Canon 300D. Here are the results. (The subject is a 10 micron per division stage micrometer, with center field at the left end of the scale.)
To tell the truth, I'm very hard-pressed to see any difference in image quality between these two. Certainly whatever difference exists is swamped by random variation in focus. (I'll confess, I shot a series with minor focusing tweaks, and picked the pair that appeared to be focused the same.)
So I'll argue that if all you want to do is set up the microscope to utilize the 4x5 back at a single magnification, then it really doesn't matter much which procedure you follow. "Quick and sleazy" is not that bad.
There is, however, a different concern in which the correct procedure is much better. That is parfocality. Microscopes and their objectives are normally designed so that when the highest power objective is focused, all the lower power objectives are, too. You can switch objectives without changing focus very much. Objectives that behave like this are called "parfocal". The same word describes having the camera focused at the same time that a direct view through an eyepiece is focused. The correct procedure preserves parfocality; the Q&S procedure does not. If you use the Q&S procedure, then every time you switch objectives, you'll have to refocus significantly.
Switching subjects, I'd be interested in knowing what you plan to do with this beast. Are you willing to talk about it?
--Rik

Good stuff from Rick and Charles, but let me add a few other points.
4x5 cameras mount to a trinocular microscope head - it can be possible to mount it to the eyepiece tube in a binocular or monocular head, but flexing and other problems can happen not to mention it is a pain in the neck. The usual order of things is (from bottom to top):
microscope
photo eyepiece in the trinocular port
shutter
4x5 camera
If the photo eyepiece is missing, all you will get is a small circle at the film plane. The bottom of the camera body next to the shutter should also have a lens - they can unscrew and be lost.
A good shutter will have a port out the front for a focusing telescope. That is simply an eyepiece with a reticle that assists focusing. As stated above, if the viewing eyepieces and camera are parfocal, the telescope is not needed, but a focusing telescope is always more accurate regardless. (It will also show you if you are missing the photo eyepiece - all you see is a tiny circle.)
You cannot normally use the ground glass to focus. The image is too dark and the glass too course (and depth of focus too large) to focus accurately. However, it should take a 4x5 polaroid back and so you can try some instant photography.
BTW, I use medium-format roll-film holders in my 4x5 microscope camera. One is 6x6 square (see avatar) and the other a 6x12 panoramic format. Roll film is certainly cheaper than 4x5 and gives more aspect ratios is you are a full-frame nut like me.
If you do take a liking to medium or large-format photography through the microscope, I would recommend going to a camera that can take an electronic shutter with built-in exposure control - you save lots of time and film testing exposures.
Perhaps you can post a pic of the camera and the microscope.
Will