A Macro Beauty-dish Diffuser

A forum to ask questions, post setups, and generally discuss anything having to do with photomacrography and photomicroscopy.

Moderators: rjlittlefield, ChrisR, Chris S., Pau

morfa
Posts: 554
Joined: Mon Oct 12, 2009 2:14 pm
Location: Stockholm, Sweden
Contact:

A Macro Beauty-dish Diffuser

Post by morfa »

I said I'd post some shots of the diffuser I like to use for my field shots.

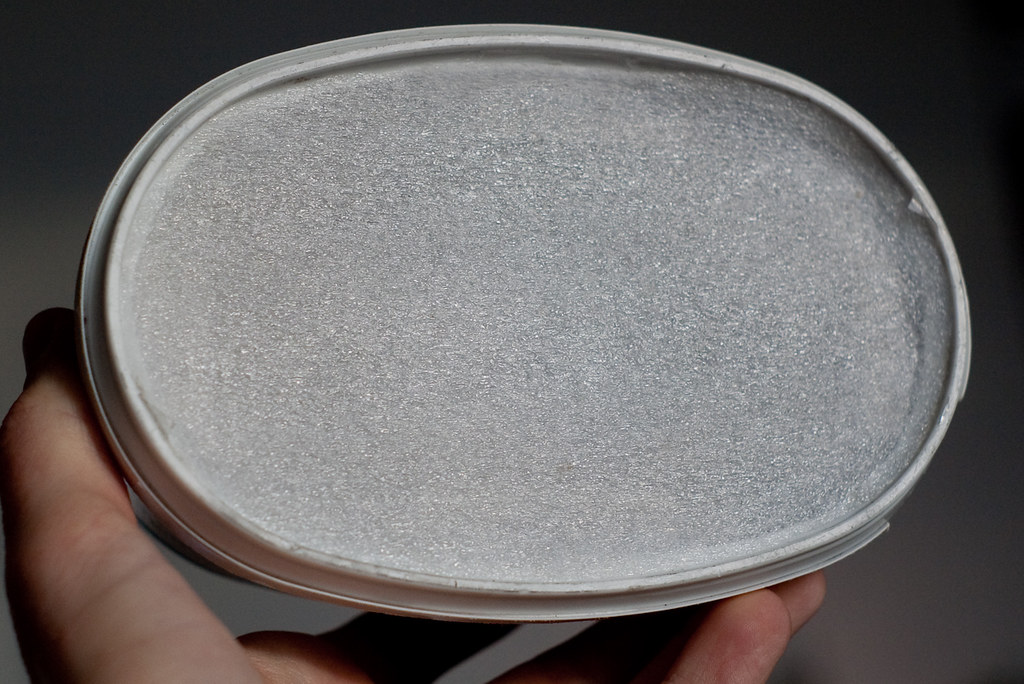
The first incarnation of this diffuser looked like this:
Image

A plastic ice-cream container, lined with reflective aluminum tape and most importantly: a modified lid with a reflector at the center, right in front of the flash head.

I've later learned that similar diffuser designs are used in portrait/fashion photography where they are called "Beauty dish diffusers" (do a search and you'll find a lot of DIY-projects)

But I got the idea for this when I was at the dentist looking up at the dentist's lamp trying to keep my mind on something other than what was going on at the moment. It struck me that the design of their lamps not only prevents the patient from being blinded by the very bright light but it also softens the reflections on the teeth since the central part is blocked by a small reflector.

At this point I must have tried at least 50 different diffuser materials and designs and I was constantly changing things to improve it. I wanted something that:

1) provided good light diffusion
2) wasn't too light hungry (draining the flash batteries)
3) was light and small enough to not be in the way in the field
4) was durable enought to withstand being lugged around in thick vegetation and being exposed to wind, rain, sun etc.
5) was easy to mount and unmount from the flash

The design above met these criteria better than anything else I'd tried so far and I was quite happy with it. I soon found room for improvement though: when shooting shiny subjects the blocked out central part left a very distinctive highlight footprint that could be annoying (see below)

Image
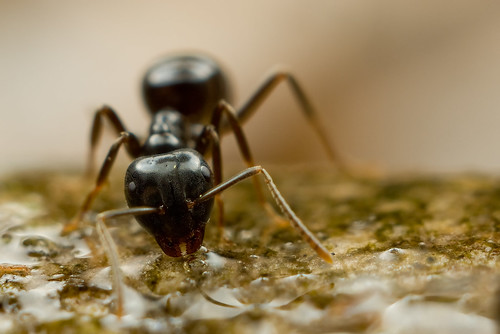
In this shot of a Lasius fuliginosus ("Jet black ant") drinking sap the diffuser pattern on the head becomes disturbing.

So I tried different ways to get around this – I perforated the triangular central reflector with small holes to let some of the light pass trough, I replaced the central reflector with a thin piece of styrofoam and so on...

The best solution turned out to be moving the triangular reflector back closer towards the flash, allowing light to bounce back in front of it before exiting the diffuser (passing through a very thin (<1mm) layer of white styrofoam (glued onto a transparent sheet of plastic for durability).

Image
Image
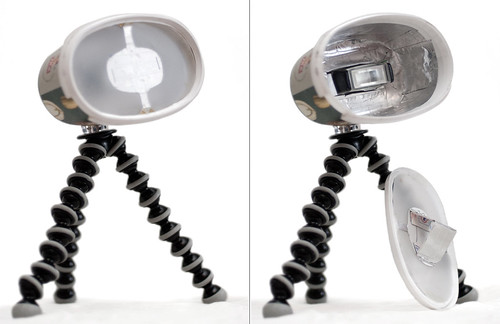
My current version of the diffuser (lid removed in the upper one to better show the design)

As you hopefully can make out from the pics, I've made the triangular reflector out of a folded piece of transparent plastic attached to the upper and lower walls of the ice-cream container. The central portion of this piece of plastic is covered with aluminum tape. I've used the same container as in my original version since I find it ideal in size and the (almost) elliptical footprint is perfect for me – the round shape gives much more natural looking highlight reflections (than a rectangular one) and for the same amount of light "spread" (i.e. maximum width/radius of the diffuser) an elliptical diffuser is much smaller and easier to position than a circular one AND it is closer to the original proportions of the flash head which makes it easier to spread the light evenly in the diffuser.

Here is what it looks like when you fire it (shot with a 28mm lens from approximately 30cm away):
Image

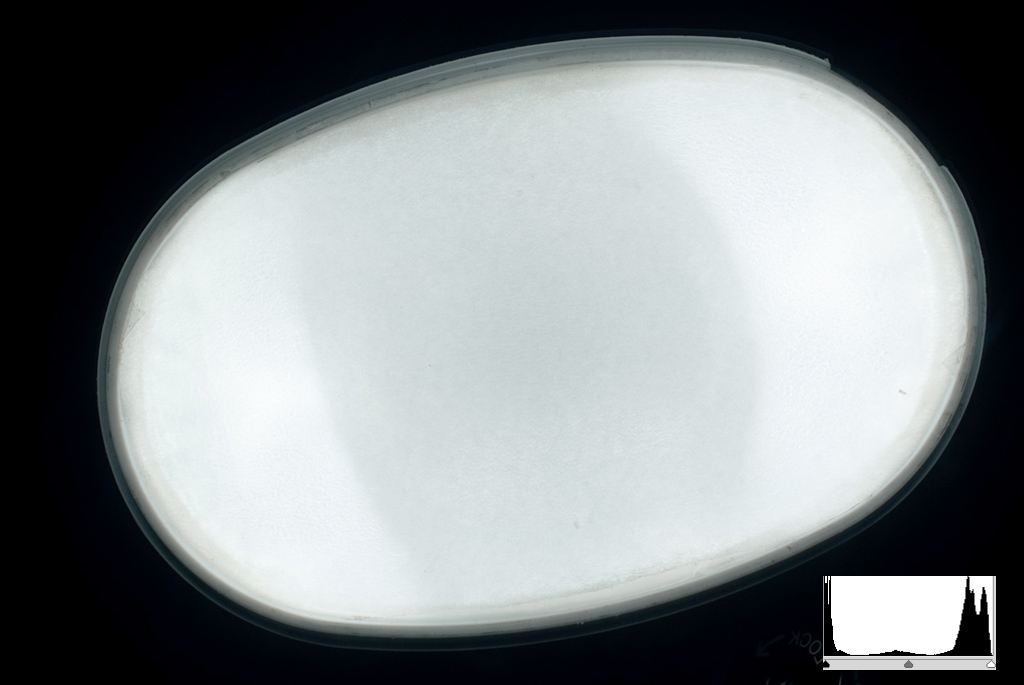
As you can see from the histogram nothing is blown out in this image which means no area is considerably brighter than it looks (which is easily the case when you take this kind of shot). Most importantly – the brightest parts are towards the edges which is where you want them to be. Not only is the central part closer to the subject and should be less bright for that reason – it is also the light from the central part that is most responsible for creating shadows beneath the subject whereas the light coming from the edges of the diffuser has the reverse effect and hence should be slightly brighter than the rest.

Ok, so this became a lengthy post on a rather simple design but I've found that sometimes when you do this people are more likely to come up with bright ideas on how to improve things further! :D

/John
Last edited by morfa on Sat Dec 19, 2009 5:41 am, edited 1 time in total.

augusthouse
Posts: 1195
Joined: Sat Sep 16, 2006 1:39 am
Location: New South Wales Australia

Post by augusthouse »

Thanks for the detailed post John....appreciated!

Craig
To use a classic quote from 'Antz' - "I almost know exactly what I'm doing!"

LordV
Posts: 1571
Joined: Thu Nov 22, 2007 10:28 am
Location: UK

Post by LordV »

Interesting stuff John :)

One alternative I've found for this is light dispersion sheet I obtained from behind the LCD screen of an old portable PC. This is very odd stuff which has high trnsmission but seems to split the light beam into 2. Been using a sheet of this applied directly to the front of my 430Ex flashes for a while now. I'm also using the diffusion sheet from the same LCD on the front of the diffusers together with a single ply sheet of kitchen towel :)
Brian v.
www.flickr.com/photos/lordv
canon20D,350D,40D,5Dmk2, sigma 105mm EX, Tamron 90mm, canon MPE-65

The BAT
Posts: 111
Joined: Wed Sep 02, 2009 5:32 pm
Location: Ballarat, Australia

Post by The BAT »

Great stuff John, and the presence of photos makes it sooo much easier to understand.
Results speak for themeslves and your pics usually show very good lighting.
Bruce

Joseph S. Wisniewski
Posts: 128
Joined: Fri Aug 15, 2008 1:53 pm
Location: Detroit, Michigan

Post by Joseph S. Wisniewski »

LordV wrote:One alternative I've found for this is light dispersion sheet I obtained from behind the LCD screen of an old portable PC. This is very odd stuff which has high trnsmission but seems to split the light beam into 2. Been using a sheet of this applied directly to the front of my 430Ex flashes for a while now. I'm also using the diffusion sheet from the same LCD on the front of the diffusers together with a single ply sheet of kitchen towel :)
I believe the stuff you describe is 3M "light control film", a simply wonderful product, essentially, a Fresnel prism.

LordV
Posts: 1571
Joined: Thu Nov 22, 2007 10:28 am
Location: UK

Post by LordV »

Joseph S. Wisniewski wrote:
LordV wrote:One alternative I've found for this is light dispersion sheet I obtained from behind the LCD screen of an old portable PC. This is very odd stuff which has high trnsmission but seems to split the light beam into 2. Been using a sheet of this applied directly to the front of my 430Ex flashes for a while now. I'm also using the diffusion sheet from the same LCD on the front of the diffusers together with a single ply sheet of kitchen towel :)
I believe the stuff you describe is 3M "light control film", a simply wonderful product, essentially, a Fresnel prism.
Thanks for the info - suspect you are correct. There were 2 sheets of this behind the LCD one much thicker than the other (I'm using the thin one). Assumed they might be fresnel somethings but unlike the lenses you cant see any lines on them- just a rather odd interference colours.
Brian v
www.flickr.com/photos/lordv
canon20D,350D,40D,5Dmk2, sigma 105mm EX, Tamron 90mm, canon MPE-65

augusthouse
Posts: 1195
Joined: Sat Sep 16, 2006 1:39 am
Location: New South Wales Australia

Post by augusthouse »

Do all laptops have this material behind the screen?

Appears cheaper to salvage the material from broken laptops rather than buying it from Edmunds, etc.

Craig
To use a classic quote from 'Antz' - "I almost know exactly what I'm doing!"

LordV
Posts: 1571
Joined: Thu Nov 22, 2007 10:28 am
Location: UK

Post by LordV »

augusthouse wrote:Do all laptops have this material behind the screen?

Appears cheaper to salvage the material from broken laptops rather than buying it from Edmunds, etc.

Craig
I think they do all have it- seems to be a standard part of the light dispersion/diffusion. The laptop I had was very old though.
Brian V.
www.flickr.com/photos/lordv
canon20D,350D,40D,5Dmk2, sigma 105mm EX, Tamron 90mm, canon MPE-65

DQE
Posts: 1653
Joined: Tue Jul 08, 2008 1:33 pm
Location: near Portland, Maine, USA

Some URLs to 3M LCD screen-related materials

Post by DQE »

Joseph S. Wisniewski wrote:
LordV wrote:One alternative I've found for this is light dispersion sheet I obtained from behind the LCD screen of an old portable PC. This is very odd stuff which has high trnsmission but seems to split the light beam into 2. Been using a sheet of this applied directly to the front of my 430Ex flashes for a while now. I'm also using the diffusion sheet from the same LCD on the front of the diffusers together with a single ply sheet of kitchen towel :)
I believe the stuff you describe is 3M "light control film", a simply wonderful product, essentially, a Fresnel prism.
I found some 3M web pages and tutorials and PDF brochures on these materials to be interesting. I'm still trying to figure out the best way to use them as add-on or auxiliary diffusion layers for commercial photographic flash guns.

Perhaps the best result would be maximum diffusion (180 degree uniform emission of light) plus maximum light output. More likely, one may strive to achieve the best balance between the two. Then, one should compare it to a couple layers of paper towels just to keep yourself humble!

Once you have perfectly diffuse light, there is no way to have "more diffuse than diffuse" light, I believe. There are of course important effects from the apparent size of the light source at the subject. Also, some of these materials' characteristics are relevant to LCD panel design and/or privacy screen design, not diffuse flash lighting.

http://solutions.3m.com/wps/portal/3M/e ... ntrolfilm/

http://solutions.3m.com/wps/portal/3M/e ... rightness/

http://solutions.3m.com/wps/portal/3M/e ... ementfilm/

http://solutions.3m.com/wps/portal/3M/e ... ementfilm/

http://solutions.3m.com/wps/portal/3M/e ... stutorial/

I hope some of this information is useful or at least interesting.
-Phil

"Diffraction never sleeps"

rjlittlefield
Site Admin
Posts: 23597
Joined: Tue Aug 01, 2006 8:34 am
Location: Richland, Washington State, USA
Contact:

Post by rjlittlefield »

DQE, thanks for tracking down and posting these additional links.

I had been very confused by the reference to "light control film", since everything that I was reading about that material indicated that it was used in front of the display, for privacy protection.

These additional references by DQE indicate that the stuff behind the display is "brightness enhancement film", which acts quite differently.

Compare for example these two descriptions:

http://solutions.3m.com/wps/portal/3M/e ... ementfilm/
Brightness Enhancement Films (BEF) use a microreplicated prism structure to increase the brightness of liquid crystal displays through improved management of the existing light created by the backlight by focusing the light toward the user. They work by utilizing the principles of refraction and total internal reflection by refracting usable light towards the viewer and reflecting most of the remaining light back into the display.
http://solutions.3m.com/wps/portal/3M/e ... ntrolfilm/
Vikuiti™ Light Control Films consist of microlouvers that act like window blinds to control the direction of light transmission through the film. They offer privacy at specific viewing angles and help reduce glare in both high and low ambient light conditions.
Ordering the Light Control Film from Edmund would be spending money on the wrong product. In quick search, I can't see that Edmund sells the brightness enhancement film.

--Rik

DQE
Posts: 1653
Joined: Tue Jul 08, 2008 1:33 pm
Location: near Portland, Maine, USA

My initial take on the 3M LCD films

Post by DQE »

My understanding of the various 3M films is that they are primarily designed for doing various things to the light coming out of an LCD display, which works in part by manipulating polarized light. Thus, I am uncertain that many of these materials will perform as described in the tutorials if they are exposed to unpolarized light as emitted from a flash head's exit surface.

Yet given Lord V's reported success with the material and his well-established reputation for careful experimentation and macro photography, I am continuing to think about various combinations of these materials that might produce a useful effect in flash-exposed macro photography. It may simply be that the materials empirically diffuse the light more effectively than most other materials without excessive light losses. Trying to explain their performance without resorting to Monte Carlo light scattering calculations may be difficult! Also, I don't have confidence that I know which of the current 3M materials is similar to Lord V's old laptop's screen.

In any event, these very unusual materials seem interesting to think about and to experiment with for this application. I wish it were easy to obtain a few large sheets of each of these materials. If one works for a company or university, it might be possible to obtain some free samples directly from 3M. Not sure they would be interested in supporting a hobbyist's tinkering, though!
-Phil

"Diffraction never sleeps"

LordV
Posts: 1571
Joined: Thu Nov 22, 2007 10:28 am
Location: UK

Post by LordV »

Not going to be much help here but the dispersion film I was referring to, if you look through it gives 2 rather blurry images of what you are looking at. I then tried shining a torch through it and got two displaced light beams. I am assuming this film helps spread the backlight behind the screen. My only reason for mentioning it was that I was trying to solve the same problem as John ie prevent a slightly brighter spot in the middle of the diffusion sheet on the front of the diffuser.
I'm assuming here that LCD manufacturers have a lot more interest in high efficiency light dispersion/light diffusion methods than most camera accessory manufacturers.

As a complete aside I did manage to get some of the 3-M vikuiti image enhancement film from a 3-M supplier. This does behave as a rather interesting diffuser. The stick on sheet i used loses just over 2 stops of light and has the interesting property of looking black which does not scare bugs as much as the normal white diffusers :)

I do test potential diffusion materials every now and then (normally when it's raining outside) and found a raisin with two plastic ended pins a useful test subject - eg below.
Brian v.

Image
www.flickr.com/photos/lordv
canon20D,350D,40D,5Dmk2, sigma 105mm EX, Tamron 90mm, canon MPE-65

The BAT
Posts: 111
Joined: Wed Sep 02, 2009 5:32 pm
Location: Ballarat, Australia

Post by The BAT »

Hi Brian,
Great test that covers just about everyone's DIY chosen 'medium'.
From the resulting Levels graphs, it would appear that all the diffuser materials seem to work equally, yet the loss of light figures seem to indicate otherwise?
After looking at the results, what did you decide?
Bruce

LordV
Posts: 1571
Joined: Thu Nov 22, 2007 10:28 am
Location: UK

Post by LordV »

The BAT wrote:Hi Brian,
Great test that covers just about everyone's DIY chosen 'medium'.
From the resulting Levels graphs, it would appear that all the diffuser materials seem to work equally, yet the loss of light figures seem to indicate otherwise?
After looking at the results, what did you decide?
Bruce
Well I still use the kitchen paper towel often. Did use the paper table cloth for quite a while (a lot tougher than paper towel) but at the moment I'm actually using the LCD dispersion film on the flash head with LCD diffuser on the coke can head with 1/2 ply kitchen towel. Have to admit still not convinced it's vastly superior to kitchen towel but I like playing :).
I think all the diffusion materials I've tried end up giving me around 2 stops light loss to get the sort of diffusion I like - this often means layering them. One thing I'm certainly not convinced about is that "photographic" diffusers are actually more efficient for the same level of diffusion.

Brian V.
www.flickr.com/photos/lordv
canon20D,350D,40D,5Dmk2, sigma 105mm EX, Tamron 90mm, canon MPE-65

augusthouse
Posts: 1195
Joined: Sat Sep 16, 2006 1:39 am
Location: New South Wales Australia

Post by augusthouse »

DQE wrote:
In any event, these very unusual materials seem interesting to think about and to experiment with for this application. I wish it were easy to obtain a few large sheets of each of these materials. If one works for a company or university, it might be possible to obtain some free samples directly from 3M. Not sure they would be interested in supporting a hobbyist's tinkering, though!
They might be :smt017 scratching their heads if they suddenly start receiving incoming emails from photographers; but no harm in asking.

http://solutions.3m.com/wps/portal/3M/e ... ersamples/

*later note: Here is the response to a request for samples I sent via the form at the link above.
Thank you for your interest in 3M Vikuiti(TM) film.
Based upon the information provided, you would be better served by www.digikey.com or www.apioptics.com.
Craig

*edited to include response to a samples request.
Last edited by augusthouse on Wed Dec 23, 2009 11:46 pm, edited 1 time in total.
To use a classic quote from 'Antz' - "I almost know exactly what I'm doing!"

Post Reply Previous topicNext topic