Trying to make a telecentric lens

A forum to ask questions, post setups, and generally discuss anything having to do with photomacrography and photomicroscopy.

Moderators: rjlittlefield, ChrisR, Chris S., Pau

PaulFurman
Posts: 595
Joined: Sat Oct 24, 2009 3:14 pm
Location: SF, CA, USA
Contact:

Trying to make a telecentric lens

Post by PaulFurman »

(Admin edit: this topic was split from the end of Perspective and 2x flowers.)

Rik, Maybe I should ask in the other threads but this is where you discuss the 38mm telecentric modification. I'd like to try that with my 35mm f/2.8 Canon Macro Photo bellows lens.

If I comprehended the discussions in those threads (big if), here's the formula:

The new aperture goes the same distance as the working distance in front.

The magnification would be determined by making sure I can fit the subject in the diameter of the front element, so 2.4x and that has about a 40mm working distance with about 60mm of extension.

So the aperture would go 40mm behind the back of the lens. The lens design drawing is perfectly symmetrical with, I think it's 6 fixed elements.

The new aperture should be the same size (seems like I may need to eyeball it & do tests to fine tune the actual effective entrance pupil location & size). The lens performs best stopped down from f/2.8 to f/4 so that's no loss for me to stop it down a tad.

Hopefully this won't be telecentric on the rear side or else I'll only get a 15mm dia circle, the diameter of the front element, on my 45mm diagonal FF sensor. Perhaps you cropped the tilted flower example to eliminate vignetting. Perhaps that crop doesn't matter because if this degrades sharpness, a crop would be prudent. Am I right to link this to your other article about how stopping down towards the front is better for image quality than stopping down in back? I might be jumping to conclusions there. It probably depends on the lens <g>.

It sounds likely I'd need to be able to adjust the aperture size and position to actually figure it out
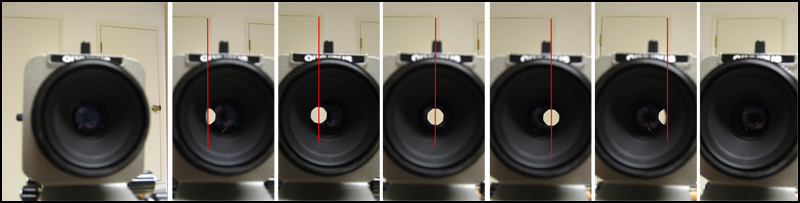

rjlittlefield wrote:
Harold Gough wrote:Rik, I like the way you casually drop that into the discussion. Have you mentioned this elsewhere?
Can't recall whether I've mentioned it specifically for the Olympus 38 mm. But it's just another implementation of the general technique illustrated HERE, third image, for the Olympus 80 mm. Stick a limiting aperture at the rear focal point of any lens, and suddenly it becomes telecentric. A ray-traced diagram is shown HERE in the thread on Stopping down a lens combo. There's a bit more discussion in this paper, around pages 14-15.

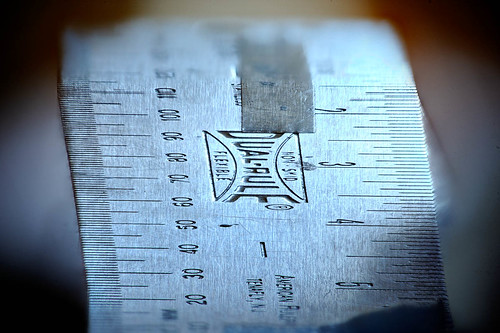
For the 38 mm, the required placement is actually inside the lens barrel, but fortunately still in back of all the lens elements. All I really had to do was cut a disk of black paper with appropriate outside diameter, and put a hole in it to serve as aperture. It's not as good as a commercial telecentric lens, of course, but the paper disk is quite a lot cheaper.

Another method for assembling telecentric optics is shown HERE. That method is considerably more practical at low magnification with longer lenses. But since the discussion about Brian's fuchsia involved an MP-E 65, I thought it would be best to illustrate at higher magnification with a shorter lens. Besides, I already had the aperture disk lying around from earlier experiments.

By the way, the Stopping down a lens combo thread also contains information that's relevant to this discussion about perspective. Firstly, the illustration HERE, second panel, left side, shows that at 4X magnification an ordinary 50 mm lens just doesn't give much perspective effect -- the grid does converge toward the rear, but only slightly. Secondly, the same panel, right side, shows that when used in the obvious way (rear stopped), the lens combo has quite bizarre perspective -- fairly strong and inverted, so background is bigger. This behavior is typical of high mag lens combos, but nobody mentions it. At least I've never seen an article or even a forum posting that says "Stay away from lens combos because the perspective is weird!" With typical subjects, it seems that nobody even notices, and if they do notice, it's not worth commenting about. If perspective were very important, there'd be lots of comments.

rjlittlefield
Site Admin
Posts: 23608
Joined: Tue Aug 01, 2006 8:34 am
Location: Richland, Washington State, USA
Contact:

Post by rjlittlefield »

Paul,

The easiest way to figure out where the added aperture goes is by looking into the front of the macro lens with some other long lens focused at infinity. (I used one side of 7X binoculars, but any long telephoto would work.) Slide a pointer around behind the macro lens and look at it through the infinity-focused one. When the pointer is at the wrong distance, either too close or too far, it will be fuzzy. When it becomes sharp, then it's effectively at infinity. That's the place where your new aperture needs to go.

The proper diameter of the aperture is determined by competing effects. In addition to the usual diffraction/resolution tradeoff, you have to consider that the lens will be fully telecentric only in a cylinder that's roughly equal in size to the built-in aperture diminished by the added aperture. (See diagram HERE. When the subject moves very far off the optical axis, the limiting aperture gets split between the built-in and the added one, and the perspective gets weird.)

If you make the added aperture too big, the telecentric region gets very small. If you make the added aperture too small, then your image gets fuzzy from diffraction.

In my first post in this thread, the main reason for doing the fuzzy white borders was to force comparison of the image contents, versus comparison of how the images lined up with their respective frames. There was some visible vignetting around the corners of the telecentric image but it would not have been objectionable by itself.

--Rik

PaulFurman
Posts: 595
Joined: Sat Oct 24, 2009 3:14 pm
Location: SF, CA, USA
Contact:

Post by PaulFurman »

Well, again I'm having fun tinkering but not able to achieve the intended result. This is the other discussion I remembered but was missing for review where you show the 80mm oly modified with added aperture (no extra lens) toward the bottom of the page: http://www.photomacrography.net/forum/v ... php?t=1032 I do get the new aperture moving like your diagram:
Image
-but wherever I place the new aperture, the actual aperture blades are in focus near the lens or usually a few inches in front of it. I used a fast 50mm lens on a camera to check this. Longer lenses don't seem to differ. Mounting the modified lens on the camera and looking at a steeply inclined mm scale, some scenarios produce backward perspective, some might be telecentric but it's hard to tell without actually stacking a set, some appear to do weird curvy things with the perspective.

The other lens I tried this with is the PC Micro 85/2.8 D. I would expect it should be very capable of performing this trick because the the very large, well corrected for odd angles image circle and I think I got close to the goalpost. Here's the results of that test:

Image

You can still see that the grain of the metal is not parallel with the edge of the ruler. Moving a little further seemed to improve things, maybe, it's confusing, then at some point the entrance pupil jumps in front of the lens and I could almost swear I saw a cheshire cat in there <g>. Looking from the front with the fast 50mm lens, I think the furthest back I could get it is about 5 feet away before it slips through the wormhole but things get a bit hard to distinguish and at certain distances, the lens' f/2.8 aperture takes over. Looking from the front with my eyes, if I stop down the built in lens aperture, they alight at about f/5, so maybe I need to stop down more. I allowed Zerene to align these but I also tested unalaligned and it wasn't very different. There were more errors in the coarsely incremented stack and the ruler's edge got a slight curve but the metal's grain still didn't align.

rjlittlefield
Site Admin
Posts: 23608
Joined: Tue Aug 01, 2006 8:34 am
Location: Richland, Washington State, USA
Contact:

Post by rjlittlefield »

Paul,

Right after I finish this reply, I'm going to split these last few posts into a separate thread. Otherwise this discussion is going to get lost in a thread titled "Perspective and 2x flowers".

That part about "actual aperture blades are in focus near the lens or usually a few inches in front of it" suggests that the added aperture is being located behind the rear focal plane instead of at it. Viewed from in front, that puts the added aperture "beyond infinity", which is the same as saying that it's now in front of the lens. When the added aperture is behind the rear focal plane, then it is projected to a new position in front of the lens using the traditional 1/f = 1/i+1/o rules. In this case if you do something to make the aperture asymmetric, you should find that its image is inverted also. It will be non-inverted when properly positioned.

Another way of finding the required point is to try using the lens as a simple magnifying glass. Put your eye close to the lens and move something closer and closer behind the lens until it just barely focuses. (Of course this is just using your eye as an "infinity detector", which it's pretty good at if your eyes are "normal" or you're wearing distance glasses or contacts.)

It may be that the required point simply cannot be reached using your first lens. I have no familiarity with the "35mm f/2.8 Canon Macro Photo bellows lens". With my Olympus 38 mm f/2.8 bellows macro lens, the required position is inside the lens barrel, but comfortably behind the rear glass. For a lens designed to work at significant magnification, I have no trouble imagining that the designer might put some glass farther back. Certainly that's the case for many microscope objectives that I've looked at.

The "wormhole" you describe occurs exactly at the rear focal plane. When the added aperture is closer than the rear focal plane, then its image is behind the physical aperture. As it gets closer to the rear focal plane, the image moves farther and farther back. Just before the rear focal plane, it's very very far back. At the rear focal plane, the image is at infinity. Move the physical aperture just a hair farther back, and the snaps to being in front of lens, though initially quite far in front of the lens. Keep moving it back, and the image stays in front of the lens, getting closer and closer to it. If you could move the physical aperture out to infinity, then its image would appear at the lens's front focal plane, about one focal length in front of the lens.

I agree that your second test is getting close. What I'm noticing is that the left edge of the rule is vertical, while the ends of the long tick marks and the corresponding numbers are almost (not quite) vertical -- in other words, almost parallel to the edge. I see what you mean about the finishing marks of the metal not appearing parallel to the edge, and I'm pretty what that means is just that they are not actually parallel to the edge either. I cannot think of any way that the lens could render the finishing marks tipped to the right while leaving the edge of the ruler, the ends of the tick marks, and the annotatation nicely vertical.

I see one thing that puzzles me a lot. At the bottom right of your frames, there is a dark blue area whose boundary is strongly angled on the 7-o'clock axis. Initially I thought that was the other edge of the rule, but that makes no sense. Is the blue area something sitting on the rule or stuck to it?

--Rik

PaulFurman
Posts: 595
Joined: Sat Oct 24, 2009 3:14 pm
Location: SF, CA, USA
Contact:

Post by PaulFurman »

The dark blue is tape. The grain is aligned with the edge in the actual object. The ruler is tilted back something like 5 or 10 degrees from level. The magnification is about 2.5x which is too much for this lens.

OK, I think I almost solved it (except for the misaligned grain in the end but mostly it makes sense so read on). The alignment of the grain in the metal is key. The angle of the edge of the ruler is showing reverse perspective. The ruler is tilting back very severely, so the top should be much smaller. The sample on the right just happens to have the ruler tweaked over so instead, the grain is at an angle.

So, I zoom in with live view & get the grain vertical by adjusting the ruler, then use the focus ring on the lens to bring the elements nearer & farther from the new aperture and the bellows to correct focus & magnification. When it's not right, swinging the ruler left/right clearly shows the ruler edge angle change perspective: it's only straight when it's in the middle. When it's set right, I can swing the edge left-right & it doesn't change angle.

So here's my explanaton: the metal grain is not subject to ray selection by the aperture because it's actually in focus. Only the out of focus parts get distorted by having their OOF circles shrunk (& shifted?) by the aperture using the selected angles. Reading Rik's treatise on entrance pupils was essential for understanding what I was looking at and what to check for: http://www.janrik.net/PanoPostings/NoPa ... xPoint.pdf

However... I just ran another stack (below) and the grain still comes out crooked, so what you see in my test above was very close to correct. My new test had it stopped down to f/8 to be sure the new aperture is contributing enough. another thing you'll notice in the one that zerene didn't align is some weird curvature. I guess this is picking up lens faults from the far outer edges of the large image circle. When shifted to the extremes there is a tad of curvature, CA & softness, with the new aperture picking out only a few weird rays to form the image, those faults are applied to the whole image.

Another possibility is the curvature is coming from the fringes of non-telecentric rays. I'm just now stacking some wider views with less magnification and they are really wonky.

Unaligned:
1200 pixel version: http://www.flickr.com/photos/edgehill/4 ... otostream/
Image

Aligned:
1200 pixel version: http://www.flickr.com/photos/edgehill/4 ... otostream/
Image

rjlittlefield
Site Admin
Posts: 23608
Joined: Tue Aug 01, 2006 8:34 am
Location: Richland, Washington State, USA
Contact:

Post by rjlittlefield »

I'm still having trouble believing that those fine scratches are really parallel to the edge of the rule. In the images that are shown here, they appear to be tipped about 8 degrees with respect to the edge. But if I understand the geometry correctly, we're looking very obliquely along the rule, at an angle that's only 5-10 degrees away from the surface of the rule. In that case the apparent angle is about 6-11 times the actual angle. So an actual angle of only 1 degree with respect to the edge would be enough to explain what we're seeing here. It would be easy to overlook a slope that small.

Any chance you could post a snapshot of what the rule looks like when viewed perpendicular to its surface, and maybe a side view of your whole setup? That would give me a lot better understanding of what I'm looking at.

--Rik

PaulFurman
Posts: 595
Joined: Sat Oct 24, 2009 3:14 pm
Location: SF, CA, USA
Contact:

Post by PaulFurman »

OK, you're right, it's a barely perceptible angle and the extreme view exaggerates it:

http://www.flickr.com/photos/edgehill/4 ... otostream/

another view, full 12 MP shows it:
http://farm3.static.flickr.com/2549/391 ... 5a34_o.jpg

rjlittlefield
Site Admin
Posts: 23608
Joined: Tue Aug 01, 2006 8:34 am
Location: Richland, Washington State, USA
Contact:

Post by rjlittlefield »

OK, that's reassuring about the fine scratches.

Now, about that funny wiggly effect in the unaligned composite... Looking at the large version you link to, it appears to me that what we have is just a stack of 7 frames that step very slightly to the left as we work up and back. It looks like a curve because the top and bottom sections of the rule are vertical, while the center section tips left because of the stepping. Up/left/up = "curve". That is a typical appearance whenever the axis of movement is not perfectly aligned with the optical axis. When you add an aperture, you add one more opportunity to get things a little bit out of line. If the added aperture happens to be slightly left or right of what had been the old optical axis, then this will happen. I don't know what all moves in your setup, so I can't suggest other possibilities.

--Rik

PaulFurman
Posts: 595
Joined: Sat Oct 24, 2009 3:14 pm
Location: SF, CA, USA
Contact:

Post by PaulFurman »

Yes Rik, the new aperture was probably a tad off center. And the ruler is a little bit bowed also. These had the bellows doing the movement so that's not a problem though it has been in others where I moved the stage improperly aligned. Also it's not uncommon for barrel distortion to show at close focus for many lenses. Those were pushed beyond the design limits.
PaulFurman wrote:Another possibility is the curvature is coming from the fringes of non-telecentric rays. I'm just now stacking some wider views with less magnification and they are really wonky.
The foreground & background OOF (out of focus) are different and veer off in different angles. The wider views below are about 1:1 opened up to about f/5 (from f/8 in the previous) and yes there is vignetting. The tighter high mag crops didn't have that problem at this aperture. Full frame sensors are tough sometimes. These are uncorrected, when I let Zerene align, sharpness improved and the curves changed a little bit. It straightened the right edge of the first and scaled the second to enlarge the top.

One other consideration is this stainless steel 6-inch ruler does have a slight bow so that it's flat when you press down to cut paper with an exacto knife. In the previous test above, the bottom aligned stack shows dust streaks from the stack in an arc shape, which is probably caused by this curve in the ruler.

But I think you can see how the OOF areas bend above & below the sharp stack so it's not hard to understand how I came up with the ray selection distortion rabbit-hole theorem which has now been mostly debunked. The bottom image which is not quite telecentric shows it best, where the OOF areas go vertical matching the metal finish grain. The telecentric one is pretty good.

Aperture in correct location:
1200 pixel: http://www.flickr.com/photos/edgehill/4 ... 8/sizes/o/
Image

Aperture 10mm too close to lens:
1200 pixel: http://www.flickr.com/photos/edgehill/4 ... otostream/
Image

PS I've always been interested in weird rabbit-hole optical effects. Here's one that's pretty odd as the result of a tilted single element lens:
Image
another example with tilted fisheye:
http://www.flickr.com/photos/edgehill/3234551842/
and the old 28/3.5 Nikkor which was recently highlighted here as a good performer reversed. This one's tilted in closeup not reversed for a full blown worm-hole extravaganza at full size: http://www.flickr.com/photos/edgehill/2 ... 5/sizes/l/

PaulFurman
Posts: 595
Joined: Sat Oct 24, 2009 3:14 pm
Location: SF, CA, USA
Contact:

Post by PaulFurman »

rjlittlefield wrote:Another way of finding the required point is to try using the lens as a simple magnifying glass. Put your eye close to the lens and move something closer and closer behind the lens until it just barely focuses. (Of course this is just using your eye as an "infinity detector", which it's pretty good at if your eyes are "normal" or you're wearing distance glasses or contacts.)
I like this approach. It makes the idea of a focus point clear and is easy to test with a pencil tip. I also like the method for finding the entrance pupil by focusing on the edges of the aperture blades with a fast or long lens on camera pointed at the front of the un-mounted lens. Focus on the aperture edges then see what else in the context is in focus. This solidifies the idea that there is a real place where the aperture 'appears to be' which can be measured precisely (using an appropriate flat field lens). It's not just a mirage, it's real.

rjlittlefield
Site Admin
Posts: 23608
Joined: Tue Aug 01, 2006 8:34 am
Location: Richland, Washington State, USA
Contact:

Post by rjlittlefield »

I like that rabbit-hole image! Apertures can certainly do some strange things to OOF parts of the subject. I ran into an odd one the other day in Kingslake's "Optics in Photography", page 119, where he says that "At intermediate points the aperture becomes H-shaped (Fig.6.7), but this does not seem to be objectionable in practice." Google Books has the illustration of the mechanism, HERE. I haven't seen an illustration of the images produced with the H-shaped aperture.

This issue of things getting weird in the vignetting region is why I eventually decided that the added-lens approach would probably work better in most cases. In that case, the diameter of the telecentric field is mostly determined by the diameter of the added lens, which can be quite a bit bigger than the main imaging lens because it sits way out near the subject and can have a relatively long focal length.

--Rik

PaulFurman
Posts: 595
Joined: Sat Oct 24, 2009 3:14 pm
Location: SF, CA, USA
Contact:

Post by PaulFurman »

Thanks for pointing to the added lens discussion, my initial post in this thread mixed up some ideas from that.

rjlittlefield
Site Admin
Posts: 23608
Joined: Tue Aug 01, 2006 8:34 am
Location: Richland, Washington State, USA
Contact:

Post by rjlittlefield »

The added lens approach is really the only way to make telecentric optics with a wide field and a short focal length.

As an example, suppose that you want to image a 50 mm field width onto an APS sensor, using a 75 mm focal length lens. 50 mm field width gives 60 mm diagonal, and there's no way you're going to get 60 mm of usable diameter glass packed into a 75 mm lens of ordinary design.

But think about the bigger picture. 50 mm field width onto an APS sensor means about 0.5X, so that 75 mm lens will give a front-side distance of about 225 mm. Assuming the entrance pupil of the 75 by itself appears to be in the middle of the lens, then the added lens needs to be around 200 mm focal length. Achromats of 200 mm FL and 60 mm diameter are not exactly cheap, but they are easy to get -- in stock at Edmund Optics for example.

The combination of the 75 mm main lens and the 200 mm added achromat is an example of optics with a very restricted range of uses. It works great as a telecentric combination at 0.5X. But try running it at any higher magnification and it fails because the subject would need to move behind the achromat. Or try running it at much lower magnification, or on a larger sensor, and it fails because of vignetting -- the edges of the added achromat move into the field of view. So it's really good at what it does, but it only does one thing!

BTW, there's a good illustration of using the added lens approach in Theodore M. Clarke's "Brightfield Illumination of Large Field Sizes". See HERE, especially figures 17 and 18.

--Rik

PaulFurman
Posts: 595
Joined: Sat Oct 24, 2009 3:14 pm
Location: SF, CA, USA
Contact:

Post by PaulFurman »

Rik, I'll reply over there in the front element thread: http://www.photomacrography.net/forum/v ... php?t=1472

DQE
Posts: 1653
Joined: Tue Jul 08, 2008 1:33 pm
Location: near Portland, Maine, USA

FYI - Kingslake lecture slides, PDF file

Post by DQE »

I came across this from a link at books.google.com, the page that Rik posted to connect us to their online version of Kingslake's optics book.

http://www.mpi-inf.mpg.de/departments/d ... optics.pdf

It's a very brief set of lecture notes but their content is, predictably, very well written. Hopefully it will be helpful to others.

I wonder if someone has posted a scan or other PDF copy of other lecture notes by Professor Kingslake?

Perhaps this post belongs somewhere else, or perhaps just the link to the lecture notes should be added to someone else's page of optics links (Rik's page of links???)
-Phil

"Diffraction never sleeps"

Post Reply Previous topicNext topic