Cremaster of Monarch butterfly pupa

Images taken in a controlled environment or with a posed subject. All subject types.

Moderators: rjlittlefield, ChrisR, Chris S., Pau

rjlittlefield
Site Admin
Posts: 23600
Joined: Tue Aug 01, 2006 8:34 am
Location: Richland, Washington State, USA
Contact:

Cremaster of Monarch butterfly pupa

Post by rjlittlefield »

Image

This is how the chrysalis of a Monarch butterfly stays attached to whatever it pupated on.

Illumination for this shot was dual fiber with a couple of layers of thin bubble-wrap for diffusion. That's worked out OK for other jobs, but I'm not really happy with what it did here. The silk mat looks OK, but the cremaster itself is extremely shiny even at this scale and I think it's picking up a bunch of small bright spots through the foam -- sort of like those caustics you see on the bottom of a pool of water, caused by ripples on the surface.

--Rik

Technical: Canon 300D, Nikon CF N Plan Achro 10X NA 0.30 objective at nominal 150 mm extension, 132 frames stacked at 0.0002". The width of the cremaster is approximately 0.9 mm.

augusthouse
Posts: 1195
Joined: Sat Sep 16, 2006 1:39 am
Location: New South Wales Australia

Post by augusthouse »

It is certainly securely attached and very interesting to look at.

How opaque is the subject? I'm wondering what we would see if some back light was sent through the cremaster?

I see what you mean about the bubble-wrap. If you had not explained the setup I would have been wondering what caused that particular effect in the lower half of the image.

0.9mm at 0.0002". Are you using something differently in your setup?

Craig
To use a classic quote from 'Antz' - "I almost know exactly what I'm doing!"

rjlittlefield
Site Admin
Posts: 23600
Joined: Tue Aug 01, 2006 8:34 am
Location: Richland, Washington State, USA
Contact:

Post by rjlittlefield »

Image

Followup, with pingpong ball illumination. This is a classic half-ball, with the objective sticking through a central hole, and the edges of the ball not quite reaching as far as the subject.

--Rik

rjlittlefield
Site Admin
Posts: 23600
Joined: Tue Aug 01, 2006 8:34 am
Location: Richland, Washington State, USA
Contact:

Post by rjlittlefield »

augusthouse wrote:How opaque is the subject? I'm wondering what we would see if some back light was sent through the cremaster?
This portion of the cremaster appears to be opaque black.
0.9mm at 0.0002". Are you using something differently in your setup
Don't think so. The 0.9 mm is about a 40% crop from a 22.7 mm sensor at 10X, and 0.0002" is one-fifth of a tick mark on a screw table dial calibrated in 0.001" ticks. This is pretty traditional for my high-mag stuff.

I could get by with a little coarser spacing.

But MicroscopyU lists the DOF of that objective as only about 7 microns, and 0.0002" is 5 microns, so there's not a lot going to waste.

--Rik

augusthouse
Posts: 1195
Joined: Sat Sep 16, 2006 1:39 am
Location: New South Wales Australia

Post by augusthouse »

Interesting.

You can see the pingpong ball and objective in the second image; but the bubble-wrap is not discernable in the first image. The shadow areas are much deeper and more detailed in the second image; but not so much among the silk mat where some detail is lost.

Quote from another thread.
This is 1/5 of one tick mark on the dial, 100 tick marks per full turn
*our posts overlapped

Craig
To use a classic quote from 'Antz' - "I almost know exactly what I'm doing!"

Harold Gough
Posts: 5786
Joined: Sun Mar 09, 2008 2:17 am
Location: Reading, Berkshire, England

Post by Harold Gough »

This would seem to be a problem akin to that of photographing highly polished metal, such as the brass on fire engines. In such a case the surface is temporarily dulled by spraying with fine droplets of water. The scale here would preclude an identical procedure.

Harold
My images are a medium for sharing some of my experiences: they are not me.

Charles Krebs
Posts: 5865
Joined: Tue Aug 01, 2006 8:02 pm
Location: Issaquah, WA USA
Contact:

Post by Charles Krebs »

Wow! Natural Velcro! Fascinating.
Great shot Rik.

Bing Huey
Posts: 11
Joined: Thu Dec 13, 2007 1:29 pm

Post by Bing Huey »

Fantastically revealing image, Rik. How do you rig up the extension for the 10X? Is it on a bellows?

Bing

rjlittlefield
Site Admin
Posts: 23600
Joined: Tue Aug 01, 2006 8:34 am
Location: Richland, Washington State, USA
Contact:

Post by rjlittlefield »

Thanks for the comments, guys!

Harold, that's a great analogy. I've actually had discussions with colleagues about how to coat surfaces like this with a very fine matte texture. The goal there was to allow determining 3D shape by scanning. But as you say, applying those coatings is not easy, certainly not easy enough to do in an evening in my home workshop.

Diffuse lighting accomplishes much the same effect. Instead of making the mirror a little bit matte so that it would reflect incoming uni-directional light in all directions, we simply arrange for light to come from all directions to begin with, and let the mirror propagate that. The problem, as Craig points out, is that no light comes out of the objective, so the mirror shows a black hole there. I believe it could be a smaller black hole, though, with some reworking of the diffuser design.

Charles, yes indeed, natural Velcro, and in a truly life-and-death situation!

But the really fascinating part of this story is not shown in these photos. Perhaps you can imagine it.

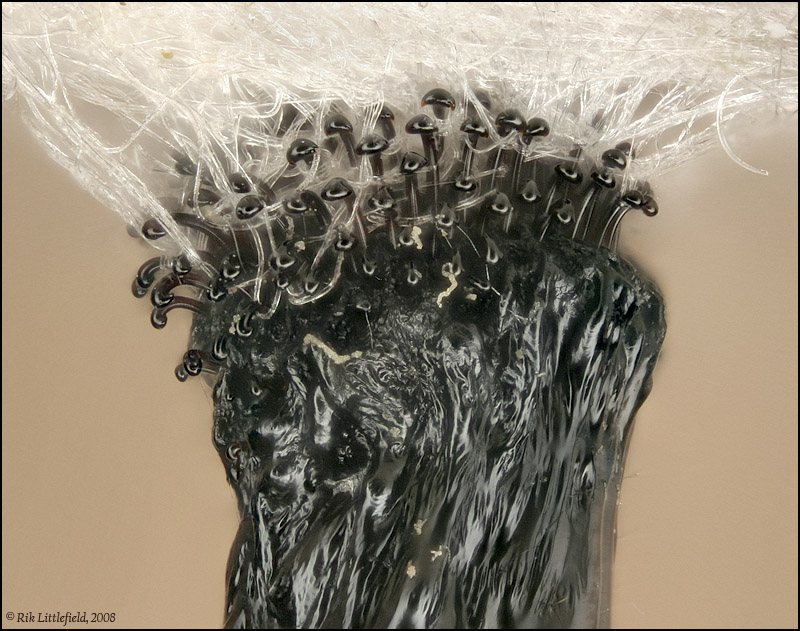
Here's the situation. The caterpillar spins this silk mat. Then it works the hooks on its hind feet into the silk mat. It lets go with everything else and hangs there while the pupa develops inside the caterpillar's skin. The hooks that you see here are part of that pupa, and they form entirely inside the old skin. Hold that thought.

Now, don't blink.

Oops, you blinked!

While you were blinking, the pupa emerged from the old skin, and while hanging without obvious support, worked its cremaster hooks into the silk mat, then knocked the old skin onto the ground underneath. How did it do that??!!

The problem is roughly akin to taking off your pants while wearing a straitjacket and hanging by your knees from an overhead bar. I've been able to watch the process only a couple of times. Getting good video of it is still way up on my list of lifetime goals.

Bing, yes, it's just stuck on the end of bellows. I have a set of largely DIY adapters to do that, but there are commercial equivalents also. For an illustration of the setup, see here.

--Rik

Harold Gough
Posts: 5786
Joined: Sun Mar 09, 2008 2:17 am
Location: Reading, Berkshire, England

Post by Harold Gough »

Rik,

Re coatings.

Something akin to the plating of specimens for scanning electron microscopes might work but those involve metals. (At least they did when I was aware of them, in the early days). That could be self-defeating.

Acid etching is another possibility, not a healthy option for a live specimen!

This is outside my area of expertise.

Forensic investigators deposit a fine powder (for fingerprint capture) onto solid surfaces by vapourising superglue in a sealed box. That could help you to get a grip on the situation! :D

Harold
My images are a medium for sharing some of my experiences: they are not me.

rjlittlefield
Site Admin
Posts: 23600
Joined: Tue Aug 01, 2006 8:34 am
Location: Richland, Washington State, USA
Contact:

Post by rjlittlefield »

... The caterpillar spins this silk mat. Then it works the hooks on its hind feet into the silk mat. It lets go with everything else and hangs there while the pupa develops inside the caterpillar's skin. The hooks that you see here are part of that pupa, and they form entirely inside the old skin. Hold that thought.

Now, don't blink.

Oops, you blinked!

While you were blinking, the pupa emerged from the old skin, and while hanging without obvious support, worked its cremaster hooks into the silk mat, then knocked the old skin onto the ground underneath. How did it do that??!!

The problem is roughly akin to taking off your pants while wearing a straitjacket and hanging by your knees from an overhead bar.
To help imagine how striking this process is, see NikonUser's excellent pictures of the entire Monarch pupa, HERE.

The cremaster shown above is just that little black prong at the top end of the pupa.

Somehow that large, smooth no-appendages pupa manages to hang onto the remains of the old caterpillar skin, while moving its cremaster from inside the skin, to outside the skin, then working it around to be thoroughly entangled in the silk mat.

How does it do that? It's magic!

--Rik

augusthouse
Posts: 1195
Joined: Sat Sep 16, 2006 1:39 am
Location: New South Wales Australia

Post by augusthouse »

Rik,

This is a magical mystery!

There is some info at the links below; but I have no doubt you are already aware of them. I'm looking for more...

http://www.learner.org/jnorth/tm/monarc ... onLPB.html

http://www.altapassfoundation.org/rearing_monarchs.htm


Craig
To use a classic quote from 'Antz' - "I almost know exactly what I'm doing!"

rjlittlefield
Site Admin
Posts: 23600
Joined: Tue Aug 01, 2006 8:34 am
Location: Richland, Washington State, USA
Contact:

Post by rjlittlefield »

:lol: :lol: Ah, this is great fun! :lol: :lol:

From my own observations, the process isn't quite as mysterious as these sites make it out to be...but I'm not gonna tell how I think it works!

--Rik

Tom Stack
Posts: 61
Joined: Sun Aug 10, 2008 4:50 am
Location: Florida Keys, USA

Post by Tom Stack »

How wonderful it this!?!

Nice job, a great revelation, thank you!

Tom

Ken Ramos
Posts: 7208
Joined: Thu Jul 27, 2006 2:12 pm
Location: lat=35.4005&lon=-81.9841

Post by Ken Ramos »

Reminds me of a sack of golf clubs. Both images look really good to me Rik :D Though the second is much more improved I think, for some reason I really like the first one better. I have odd tastes I guess. :roll:

Post Reply Previous topicNext topic