A close shave

Images taken in a controlled environment or with a posed subject. All subject types.

Moderators: rjlittlefield, ChrisR, Chris S., Pau

BugEZ
Posts: 850
Joined: Sat Mar 26, 2011 7:15 pm
Location: Loves Park Illinois

A close shave

Post by BugEZ »

I have been trying to photograph a longlegged fly with "damaged" eye stripes that shows how the color originates from thin interference filters incorporated into the outer surface of corneal lenses. I have tried a variety of means of compromising the interference filters, but it turns out that Mother Nature has engineered a very tough and durable material for the corneal lenses.

The flies I have tested resist chemical attack from Draino (KOH) and from another enzyme based drain cleaner. Though those chemicals attack soft insect tissues, they are slow to dissolve fly corneas. NikonUser suggested another enzyme based agent that is engineered to attack chitin, the strong stuff in insect's exoskeleton. While promising, it was expensive and since it was not guaranteed to work I kept my money in my pocket.

I also tried sand paper, but that (or I?) was rather clumsy and it just mangled the eye. Someone else suggested a Dremel tool (high speed hand grinder) and I have one of those, so I gave it a try. Instant headless horseman...

My Dremel is rather old (35 years or so) and it makes a racket and the bearings chatter a bit, so I decided to make a small precise rotary cutter. I used a small DC motor from a CD drive (the motor that ejects the CD) and found that it ran very smoothly and reasonably fast when connected to a standard 9V battery. I glued the motor to the end of an old 35mm film canister and soldered a switch to the motor leads and battery clip. Elegantly packaged together with electric tape, I was in business.
Image


For a trial subject I chose an vintage longlegged fly from the freezer. I glued the legs to a stick and headed to my dissection scope for the delicate surgery.

Image

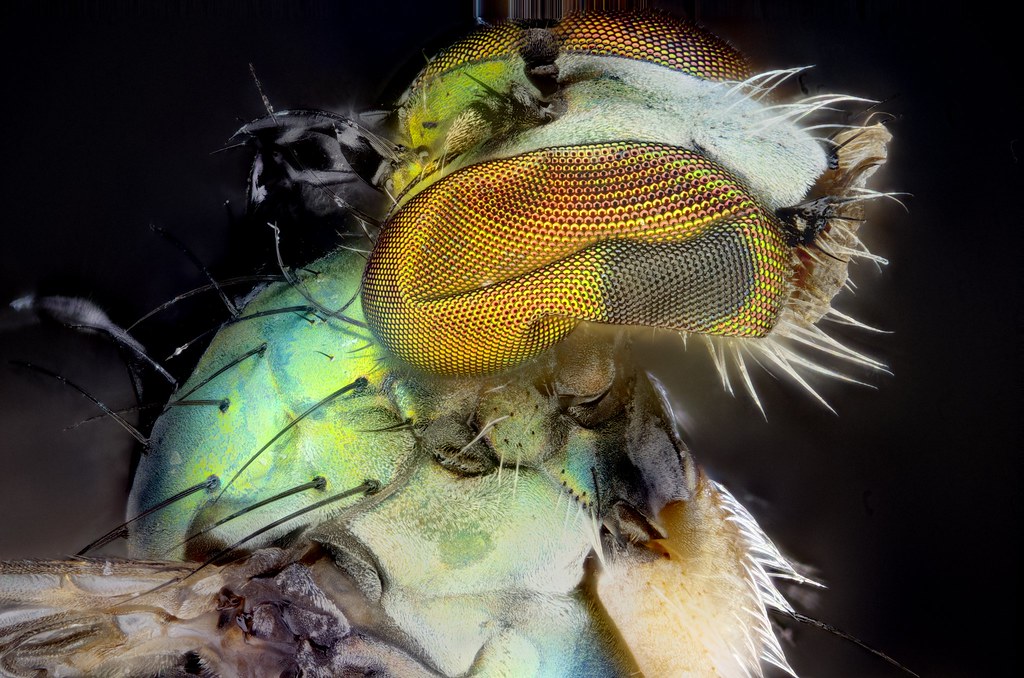
My initial test of the "shaver" used the pulley that came with the shaft. It felt slightly rough (scratchy) when I touched the rotating OD so I hoped it was abrasive enough to attach the eye. I focused the microscope on the edge of the pulley, pushed the go button and carefully brought the bug's eye to the wheel. The head twitched a bit as the wheel attacked the eye, but the motion was not violent and the head remained on the bug's shoulders. I inspected the results and was quite pleased. The cornea was abraded, the eye color changed and the bug was reasonably intact. I made two stacks of the results. The first shows the change in the eye color. Several of the ommatidia have turned white.
PMAX, 10X Oly, 200MM telephoto tube lens, Pentax K5 LED lighting.
Image
The second shows the shaved area in profile. Note how the hairs on the eye have been trimmed by the tool. Not a bad trick to shave the eye of a tiny fly!
Crop PMAX, 10X Oly, 200MM telephoto tube lens, Pentax K5 LED lighting.
Image

NikonUser
Posts: 2693
Joined: Thu Sep 04, 2008 2:03 am
Location: southern New Brunswick, Canada

Post by NikonUser »

A nice control would be to work in reverse. Remove everything from the inside (chemically) so as to be left with only the corneal lens to see if the bands are still present.
Moulting insects do a good job of removing everything except the lenses, exuvia of a dragonfly shows this nicely.
Image
NU.
student of entomology
Quote – Holmes on ‘Entomology’
” I suppose you are an entomologist ? “
” Not quite so ambitious as that, sir. I should like to put my eyes on the individual entitled to that name.
No man can be truly called an entomologist,
sir; the subject is too vast for any single human intelligence to grasp.”
Oliver Wendell Holmes, Sr
The Poet at the Breakfast Table.

Nikon camera, lenses and objectives
Olympus microscope and objectives

BugEZ
Posts: 850
Joined: Sat Mar 26, 2011 7:15 pm
Location: Loves Park Illinois

Post by BugEZ »

NikonUser wrote:
A nice control would be to work in reverse. Remove everything from the inside (chemically) so as to be left with only the corneal lens to see if the bands are still present.
Moulting insects do a good job of removing everything except the lenses, exuvia of a dragonfly shows this nicely.
My attempt to chemically remove the innards did not turn out well. Rather, my plan will be to dissect the eye of a cadaver fly and see how easy it is to clean the cornea with a tiny spatula or something similar. We shall see how that goes. My pals at NYU's fruit fly lab say it can be done with care.

My first image of a shaved Condylostylus caudatus with proper stripes is below. This specimen was shaved with my rotary tool by pressing the plastic pulley gently to the eyeball. (160 photos stacked with Zerene PMax, 10X Oly .3NA lens, 200mm Pentax, Pentax K5
Image
In examining the image carefully I became convinced that my shaver may have created more of a friction burn on the subject than a proper scraping away of the corneal filters. So I mounted a small snippet of very fine sandpaper to the end of my tool making a sort of disc sander. I then went after the eye of a different subject. This required only the lightest touch as the disc sander was much more aggressive in attacking the cornea than the plastic pulley. This time there was much less chance for the tool to heat the subject. I'll post some images of the second subject after I finish stacking them. The appearance of the sanded portion of the eye is very similar to the eye pictured above.

In general I think I can safely confirm that the color in the eye stripes results from a very thin layer on the surface of the eye exactly as described in scientific papers from the '60s.

BugEZ
Posts: 850
Joined: Sat Mar 26, 2011 7:15 pm
Location: Loves Park Illinois

Post by BugEZ »

And a different fly this time the eye was shaved with the "disc sander".

Image

rjlittlefield
Site Admin
Posts: 23597
Joined: Tue Aug 01, 2006 8:34 am
Location: Richland, Washington State, USA
Contact:

Post by rjlittlefield »

I've been following this thread with interest.

In this last image, I'm struck with an impression of "too good to be true".

Typically when I look at sanded surfaces what I see is a bunch of tiny scratches, each the result of one abrasive particle scraping across the surface.

But in the image shown here, I don't see any trace of scratches. I also notice that whatever the effect is on each ommatidium, it seems to affect the whole ommatidium uniformly even though the adjacent ommatidium may have been affected much differently.

So I'm puzzled.

I'm wondering if instead of a surface effect, you're actually seeing a subsurface effect due to transiently deforming or heating the ommatidium during what's intended to be a sanding operation.

Do you have any high magnification images that might bear on this issue?

--Rik

BugEZ
Posts: 850
Joined: Sat Mar 26, 2011 7:15 pm
Location: Loves Park Illinois

Post by BugEZ »

Rik wrote
I'm wondering if instead of a surface effect, you're actually seeing a subsurface effect due to transiently deforming or heating the ommatidium during what's intended to be a sanding operation.
Those are good possibilities (bruising and subsurface heating) I had wondered the same. I'll attach some crops this evening that look a bit more closely at the surfaces.

I can test heating with a soldering iron tip (temperature dialed way down!). Mechanical bruising can be checked with some sort of non abrasive probe hooked to my sonic tooth brush.

What I see when I examine the crops and raw stacks is that each ommatidium that gets a serious scratch changes color. The more profound the scratching, the greater the color change. That could certainly be attributed to bruises and abrasive heating. But, if there is color change in an ommatidium, I can see some alteration on the surface.

Heating could dry out the cornea and consequently change the frequency of the interference filter as dry layers might pack more closely shifting the frequency toward the blue/purple side of the spectrum. Bruising is a more difficult phenomena to explain. I don't have a good explaination of how bruising would change the filter performance.


K

BugEZ
Posts: 850
Joined: Sat Mar 26, 2011 7:15 pm
Location: Loves Park Illinois

Post by BugEZ »

A 100% crop of the eye attacked by the "disk sander" This was from the image posted above and was the first stack I gathered of this fly.

Image

I gathered another stack 30 minutes after the first to allow me to make sure I caught the whiskers around the mouth. As the bug's position shifted slightly, the stack may show something a bit better than in the first, so here it is.
Image

And a crop from the second stack.

Image

elf
Posts: 1416
Joined: Sun Nov 18, 2007 12:10 pm

Post by elf »

A more controlled sander could be made similar to a lapidary lap using a brass disc and a suitably fine grit diamond paste.

BugEZ
Posts: 850
Joined: Sat Mar 26, 2011 7:15 pm
Location: Loves Park Illinois

Post by BugEZ »

elf wrote:
...sander could be made similar to a lapidary lap using a brass disc and a suitably fine grit diamond paste
Yes. I have used lapidary equipment. The cutting, grinding and polishing are usually done with a coolant (often water) to keep the workpiece from overheating locally and to protect the tool.

I think any standard abrasive polish (garnet, rouge or aluminum oxide) would work just fine. Fly cornea though tough is relatively soft. Perhaps some calcium carbonate (the abrasive usually used in toothpaste) would work. The key would be the coolant. A finer abrasive might produce a less jagged surface.

I chose not to use a coolant to avoid the mess (the mineral oil streaks on the basement ceiling from my dad's rock saws were there for 25 years!) and to avoid having to clean up the bug afterward. I had some concern about throwing coolant, cornea chunks and abrasive up onto the objective lens of my dissecting scope. With water for the coolant and a horizontal orientation "cool polishing" may be doable. You definitely want to keep the lenses out of the spin plane.

K

BugEZ
Posts: 850
Joined: Sat Mar 26, 2011 7:15 pm
Location: Loves Park Illinois

Post by BugEZ »

"On further review"... *

* Common prelude to US NFL referee announcing a change to a ruling on the field caused by a review of the video tape...

Yesterday evening I photographed the sanded eye fly again after it had some time to dry. The image is below. The eyes had essentially turned dark purple. The unsanded eye (right side of image) appears slightly striped.
Image


I then placed the fly in DI water with a tiny amount of detergent and allowed it to soak overnight. My goal was to re-hydrate the eye. Previous experience has show that soaks in warm water with some soap added can restore eye color temporarily to some degree. This AM I inspected the fly with my dissecting scope and took another photo. When viewed obliquely, the stripes had re-appeared. When viewed from a more direct angle they had nearly disappeared. The purple patch was nearly gone. The photo below shows the results, photographed from a moderately oblique angle. Image

The color in rehydrated flies fades quickly. I have the fly back in the DI water bath to get it ready for an additional image with the optical axis of the camera normal to the sanded surface.

So, what do the images above suggest? I think the "surface heating" effect is quite strong in the images I posted previously with the dark blue sanded spots on the cornea. Abrasives are an inefficient cutting tool and heat the work part. The purple spot is probably the result of the friction burn more than cornea removal. A high speed cutter with an incredibly sharp edge would probably be a better approach. Some machine shops used by my employer for special processes use very sharp and high speed cutters to remove metal with less heating of the work part. But on this tiny scale, the tool would have to be incredibly sharp. I don't think I can sharpen steel to such a fine edge. Wet abrasion (sanding with a coolant) may still be the best approach.

Images above are taken with my 10X Oly, 200mm Pentax tube lens, LED lighting, Stacked with Zerene Pmax.

rjlittlefield
Site Admin
Posts: 23597
Joined: Tue Aug 01, 2006 8:34 am
Location: Richland, Washington State, USA
Contact:

Post by rjlittlefield »

An excellent test/demonstration!

And while I suspect this aspect is unintended, that last image is also a very interesting view of the mouthparts.

--Rik

BugEZ
Posts: 850
Joined: Sat Mar 26, 2011 7:15 pm
Location: Loves Park Illinois

Post by BugEZ »

Rik wrote:
a very interesting view of the mouthparts
Yes the black can-openers that jut to the side are quite visible in this view. The spear in the middle of the mouth is less so. Perhaps a result of the re-hydration.

K

elf
Posts: 1416
Joined: Sun Nov 18, 2007 12:10 pm

Post by elf »

BugEZ wrote:. A high speed cutter with an incredibly sharp edge would probably be a better approach. Some machine shops used by my employer for special processes use very sharp and high speed cutters to remove metal with less heating of the work part. But on this tiny scale, the tool would have to be incredibly sharp. I don't think I can sharpen steel to such a fine edge. Wet abrasion (sanding with a coolant) may still be the best approach.
It sounds like you need a piece of Obsidian and some flint knapping lessons :roll:

BugEZ
Posts: 850
Joined: Sat Mar 26, 2011 7:15 pm
Location: Loves Park Illinois

Post by BugEZ »

Hmmm... No doubt a very sharp edge is produced. Still my wife has just gotten used to my fly passion, and though she occasionally complains about mystery vials on the kitchen counter, we have achieved detente regarding bugs in the freezer. Flint knapping would require a whole new round of negotiations. Not sure I am ready for that! :wink:

K

BugEZ
Posts: 850
Joined: Sat Mar 26, 2011 7:15 pm
Location: Loves Park Illinois

Post by BugEZ »

Crop of a more direct view of the rehydrated eye. The eye is pretty far gone at this point. Looks like a football with no air. Perhaps I should peddle it in Boston...

K


Image

Image
by Keith Short, on Flickr
Aloha

Post Reply Previous topicNext topic