Rainbow rings (the secret revealed)
Moderators: rjlittlefield, ChrisR, Chris S., Pau
Rik, maybe two keywords: Fresnel and Fraunhofer? Did you, as a second modification, decrease the aperture-sensor distance? Physics says, you'll get Airy-disk patterns if the distance between sensor and aperture is large (compared to the aperture size). As the sensor is brought closer to the aperture (entering the 'near-field') the diffraction patterns are described by Fresnel diffration. See this demo; taken from http://en.wikipedia.org/wiki/Diffraction.
---
Steffen
---
Steffen
-
rjlittlefield

- Site Admin
- Posts: 23606
- Joined: Tue Aug 01, 2006 8:34 am
- Location: Richland, Washington State, USA
- Contact:
When I looked at the images, I thought you had it nailed.nernelly wrote:Rik, maybe two keywords: Fresnel and Fraunhofer?
However, on reading carefully I find that I can't give full credit for the answer as written, because by my understanding of the terms all of the images that I've shown were clearly shot in the far field. On the other hand, as far as I can see the math is identical or at least very similar.
So it's a quandary, what to say, what to say??
Remember that I'm using a lens. How does that change things, compared to using an empty aperture?
--Rik
I had implicitly considered the lens+sensor combination as one system that images the diffraction pattern produced by the aperture. The phrasing "decreasing aperture-sensor distance" was very simplistic and thus probably misleading as it suggests a direct capturing of the diffraction pattern on the sensor. I'm envisioning a setup where the aperture produces a 'diffraction field'; the imaging system (lens+camera) is then used to capture different 'slices' of the field. Those slices would show Fresnel or Fraunhofer patterns when imaging 'nearfield' or 'farfield' slices, respectively.Remember that I'm using a lens.
I think you'd probably get the effect I am thinking of by increasing the lens to camera distance in your particular setup, Rik (given a fixed aperture-lens distance). Does that make things better, or am I messing something up now?
-
rjlittlefield
- Site Admin
- Posts: 23606
- Joined: Tue Aug 01, 2006 8:34 am
- Location: Richland, Washington State, USA
- Contact:
Tony, welcome to the discussion.tonygt19 wrote:Looks like you've separated the blue and yellow components of a white LED spectrum alternating from the center of a small aperature.
It's certainly true that the colors have been separated and that an aperture is involved.
However, the aperture is not very small (2.5 mm diameter), and it's oversimplified to speak of the blue and yellow components of the LED spectrum.
Here is a spectrum of the pinhole, as reflected in a CD serving as a diffraction grating:
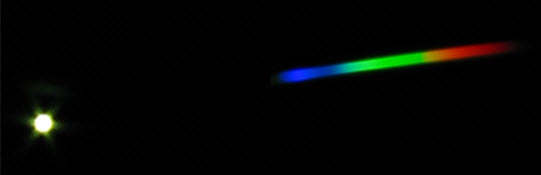
We can see the usual valley between blue and everything else, but other than that the spectrum seems to be pretty well populated at least at the lousy resolution captured here. And the spectral ordering is as usual, your basic ROYGBIV rainbow.
In comparison, here is the center of that simulation result again, this time blown up to make it look more impressive. (Actually I reran it with a larger image array.)
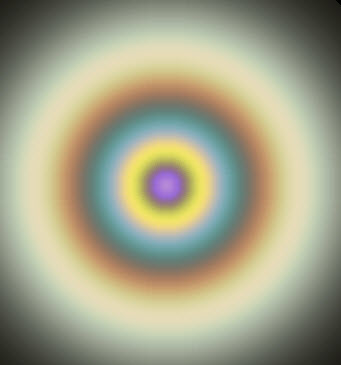
I'm sure we can find some ordinary rainbows in there if we look hard enough, but just personally I find that magenta center to be pretty weird. What's up with that, anyway?
--Rik
-
rjlittlefield
- Site Admin
- Posts: 23606
- Joined: Tue Aug 01, 2006 8:34 am
- Location: Richland, Washington State, USA
- Contact:
Steffen, thank you for taking this discussion in a direction I had completely not anticipated.nernelly wrote:I had implicitly considered the lens+sensor combination as one system that images the diffraction pattern produced by the aperture. The phrasing "decreasing aperture-sensor distance" was very simplistic and thus probably misleading as it suggests a direct capturing of the diffraction pattern on the sensor. I'm envisioning a setup where the aperture produces a 'diffraction field'; the imaging system (lens+camera) is then used to capture different 'slices' of the field. Those slices would show Fresnel or Fraunhofer patterns when imaging 'nearfield' or 'farfield' slices, respectively.Remember that I'm using a lens.
I think you'd probably get the effect I am thinking of by increasing the lens to camera distance in your particular setup, Rik (given a fixed aperture-lens distance). Does that make things better, or am I messing something up now?
Responding to your question, I ran another experiment just now to check my own understanding.
The experiment was simple. First I reversed the order of lens and aperture, so that the entire optics chain became this:
1. LED with pinhole touching it
2. about 10 feet of air
3. Mitutoyo MT-1 lens
4. aperture
5. empty bellows
6. camera sensor
Then I played with those two adjustments I mentioned. As I expected, the same odd patterns of rings appeared, despite that there is now nothing except air between the aperture and the sensor. So in this modified setup, the sensor is in fact directly capturing the diffraction pattern formed in free space behind the aperture.
I will now add a fact that I've not mentioned before. By changing just one of the adjustments, leaving the other fixed, I can produce all the patterns shown in the original post. Furthermore, it's not just "adjust A with B fixed". The same set of patterns can be produced by "fix A and adjust B".
Now, let's review...
We have a distant bright pinhole, an aperture and a lens (in either order!), and two adjustments that control the patterns. Both adjustments would surely be mentioned in an introductory class on photography, and both of them have already been mentioned in this thread.
What are the two adjustments??
--Rik
-
rjlittlefield
- Site Admin
- Posts: 23606
- Joined: Tue Aug 01, 2006 8:34 am
- Location: Richland, Washington State, USA
- Contact:
In some recent email discussions with a colleague, I realized that the preceding statement is so misleading that we might as well just call it "wrong".rjlittlefield wrote:by my understanding of the terms all of the images that I've shown were clearly shot in the far field.
To clarify...
We're talking about patterns that are formed roughly 200 mm behind a 2.5 mm aperture illuminated by wavelengths of 0.0004-0.0007 mm. Without the lens, that would be extremely near field, and the pattern at that distance would have so many rings so jumbled together that it would look like just a uniform disk of light formed by a mask with a round hole in it. I'm not sure the rings ever would form, even in the far field, though that's certainly an interesting question.
Anyway, the presence of the lens changes the situation dramatically, allowing these diffraction patterns to be easily observed in a tabletop setup using incoherent light.
Come to think of it, this might make a neat "Amateur Scientist" experiment. Hmm...perhaps it's already there? <rummage rummage> Nope, checked my Amateur Scientist CD for all articles indexed under "diffraction". Didn't see anything like it. Of course the Amateur Scientist column shut down in 2001, shortly before interchangeable lens digital cameras became commonly available and reasonable cost. Maybe someplace else?
--Rik
-
rjlittlefield
- Site Admin
- Posts: 23606
- Joined: Tue Aug 01, 2006 8:34 am
- Location: Richland, Washington State, USA
- Contact:
OK, so I've been having great fun and learning lots, by following up on leads provided by other posters in this thread.
This post is to provide some upgraded and corrected information.
First, in response to Fred (canonian), I wrote that:
But it turns out that the part about "never make...dark centers" is emphatically not true. All that's necessary to get a dark center is to have the proper ratio of aperture size and distance to sensor. Very small pinholes produce wide Airy disks, somewhat larger pinholes produce narrower Airy disks, and beyond a certain point the pattern evolves to concentric rings which increase in number and decrease in spacing as the pinhole gets bigger.
So indeed, all the patterns shown in this thread, including the weird colors, could have been produced by just a pinhole camera. I did not know this, and I offer thanks to everyone for the nudges to investigate!
In response to Steffen (nernelly), I wrote that:
Predicted: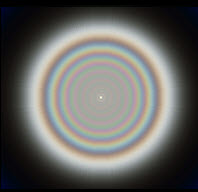 . . . . . . . . . . . . . . . Observed:
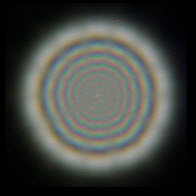
Then by carefully reducing the aperture size I was able to shoot the following picture, complete with that intense magenta center. (What's up with that, anyway??)
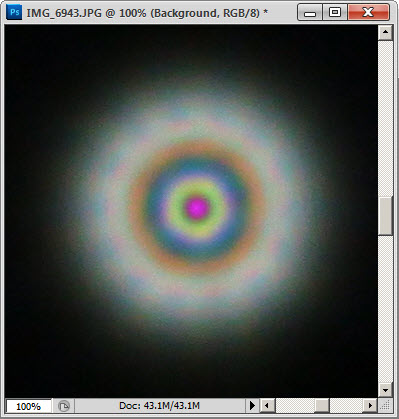
I have to mention that this last image was a bit tedious to adjust. Because my virtual star is not very bright and there's no lens to concentrate the light, I can't see anything through the optical viewfinder and live view doesn't work. These pinhole shots required pretty long exposures: 30 seconds at ISO 400. So, even knowing how the patterns would be sequenced, it still took me several tries to get that nice clean magenta center.
Just to be clear... So far, only the images in this one post have been shot with no lens, just an aperture. All the other images were shot with a lens. The presence of the lens changes the conditions under which the rings appear, but once they do appear, the pattern of the rings themselves is the same with or without the lens.
I know that Steffen will be away from the forum for a while, but I hope that other people will continue to ponder and post.
This really is a fascinating problem (well, for me anyway), which turns out to tie together a lot of apparently unrelated issues.
Further thoughts? Going back to the setups where I'm using a lens, what are the two adjustments that control the rings? (They're common words -- you say them every day.)
--Rik
This post is to provide some upgraded and corrected information.
First, in response to Fred (canonian), I wrote that:
Well, the first part is true -- I had never played much with pinhole cameras, and I was under the impression that they would never make star images with dark centers.I've never played much with pinhole cameras, but I am under the impression that they would never produce star images with dark centers like some of what we see here. Is that not correct?
But it turns out that the part about "never make...dark centers" is emphatically not true. All that's necessary to get a dark center is to have the proper ratio of aperture size and distance to sensor. Very small pinholes produce wide Airy disks, somewhat larger pinholes produce narrower Airy disks, and beyond a certain point the pattern evolves to concentric rings which increase in number and decrease in spacing as the pinhole gets bigger.
So indeed, all the patterns shown in this thread, including the weird colors, could have been produced by just a pinhole camera. I did not know this, and I offer thanks to everyone for the nudges to investigate!
In response to Steffen (nernelly), I wrote that:
My response was a failure of intuition. When I actually did the calculation, I discovered that the number of rings would be only about 7, with the outer ones separated enough to be easily visible. Of course I could not resist running an experimental test of that prediction. Here are the results (reduced from actual pixels):We're talking about patterns that are formed roughly 200 mm behind a 2.5 mm aperture illuminated by wavelengths of 0.0004-0.0007 mm. Without the lens, that would be extremely near field, and the pattern at that distance would have so many rings so jumbled together that it would look like just a uniform disk of light formed by a mask with a round hole in it. I'm not sure the rings ever would form, even in the far field, though that's certainly an interesting question.
Predicted:
. . . . . . . . . . . . . . . Observed: Then by carefully reducing the aperture size I was able to shoot the following picture, complete with that intense magenta center. (What's up with that, anyway??)
I have to mention that this last image was a bit tedious to adjust. Because my virtual star is not very bright and there's no lens to concentrate the light, I can't see anything through the optical viewfinder and live view doesn't work. These pinhole shots required pretty long exposures: 30 seconds at ISO 400. So, even knowing how the patterns would be sequenced, it still took me several tries to get that nice clean magenta center.
Just to be clear... So far, only the images in this one post have been shot with no lens, just an aperture. All the other images were shot with a lens. The presence of the lens changes the conditions under which the rings appear, but once they do appear, the pattern of the rings themselves is the same with or without the lens.
I know that Steffen will be away from the forum for a while, but I hope that other people will continue to ponder and post.
This really is a fascinating problem (well, for me anyway), which turns out to tie together a lot of apparently unrelated issues.
Further thoughts? Going back to the setups where I'm using a lens, what are the two adjustments that control the rings? (They're common words -- you say them every day.)
--Rik
-
rjlittlefield
- Site Admin
- Posts: 23606
- Joined: Tue Aug 01, 2006 8:34 am
- Location: Richland, Washington State, USA
- Contact:
Oops! I see I've let this thread hang rather longer than I had intended. Sorry about that -- I got caught up trying to finish another piece of work.
But now I'm close to divulging the secret about these rainbow rings. Before I do that, one last chance...
Earlier, I wrote:
With this added info, anybody want to try again?
In the setups where I'm using a lens, what are the two adjustments that control the rings? They're common words -- you say them every day.
--Rik
But now I'm close to divulging the secret about these rainbow rings. Before I do that, one last chance...
Earlier, I wrote:
Adding some information to this hint, let me explain that a single unidirectional sweep of one of the adjustments will change the pattern from many concentric rings to a few concentric rings, to one ring, to a simple Airy disk, then continuing the pattern in reverse order to produce one ring, a few concentric rings, and many concentric rings. The other adjustment, however, takes the pattern only from many concentric rings to a few, to one, then to something close to an Airy disk but not quite identical.I will now add a fact that I've not mentioned before. By changing just one of the adjustments, leaving the other fixed, I can produce all the patterns shown in the original post. Furthermore, it's not just "adjust A with B fixed". The same set of patterns can be produced by "fix A and adjust B".
With this added info, anybody want to try again?
In the setups where I'm using a lens, what are the two adjustments that control the rings? They're common words -- you say them every day.
--Rik

Turn left/turn right? (rotate CW/CCW)rjlittlefield wrote:what are the two adjustments that control the rings? They're common words -- you say them every day.
Fred
Canonian@Flickr
Canonian@Flickr
-
rjlittlefield
- Site Admin
- Posts: 23606
- Joined: Tue Aug 01, 2006 8:34 am
- Location: Richland, Washington State, USA
- Contact:
And the answer is...
The "Rainbow Rings" are blur circles !
Sort of...
More precisely, the rainbow rings are what you see if you look closely at what you think is going to be the "blur circle" that is created by an out-of-focus lens imaging a tiny bright spot of light. The two adjustments are aperture and focus (bellows extension).
Suppose you fix the aperture size and sweep the bellows extension from behind focus to in front of it. At extreme defocus, you will see something very much like the uniformly bright circle of light predicted by geometric optics. As you approach focus, the "blur circle" will resolve to a set of many concentric rings, then progressively fewer rings, then a single ring with a dark center, then something much like an Airy disk with a dim ring around its peak, then a real Airy disk, then an Airy disk with the ring again, and so on, repeating the pattern which is basically symmetric in front and behind focus. This is "fix A and adjust B".
On the other hand, you can open the aperture full wide, fix the bellows extension at a point slightly away from focus, then gradually close the aperture. If you have chosen the extension correctly, then at wide aperture you will see many rings and as the aperture closes you will see fewer rings, until finally with the aperture at its smallest setting you will see a single ring with a dark center, or perhaps even something close to a perfect Airy disk. This is "adjust A with fixed B".
The spacing of the rings depends on the aperture setting. For purposes of this thread I've stopped down quite a bit so the rings were wide and easily seen.
Perhaps it will help if I put some of the rings in context.
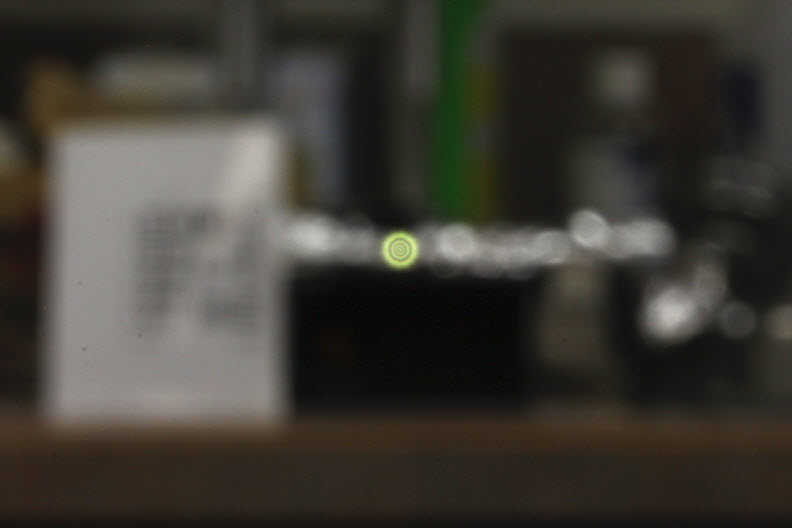
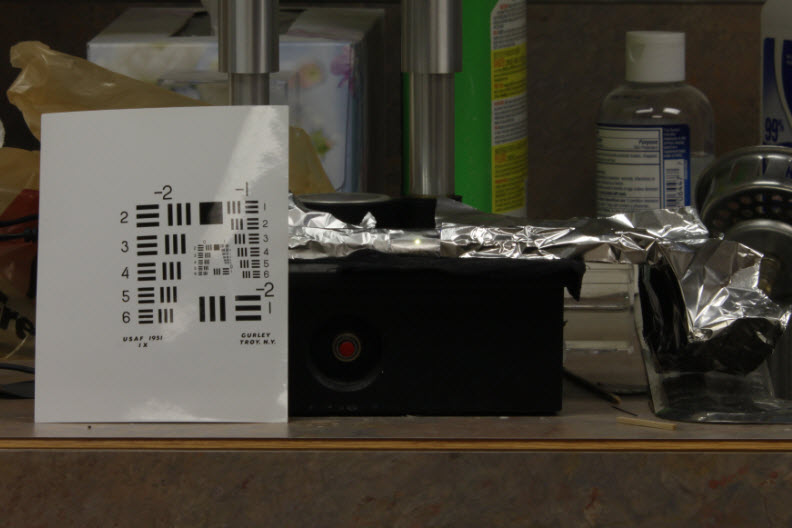
The above rings were shot with a Mitutoyo MT-1 lens stopped down to f/50 or so with a near-circular iris.
But you can get vaguely similar and in some sense more interesting rings with much less elaborate equipment. This is using my 18-55 mm kit lens stopped down to f/29. I've color-balanced the inset for the LED, so you can see the color separations better. The odd shape and radial spokes occur because the aperture on that lens is essentially hexagonal when it's stopped down that far.

To explain the rainbow rings, let me start by noting that "blur circles" are a myth predicted by ray optics. They're a handy and usually quite good enough myth, but a myth nonetheless.
According to ray optics, the out-of-focus image of a point source is a more-or-less uniformly illuminated disk of light that has the shape of the aperture. If you push a little farther and allow for things like spherical aberration, then according to ray optics the disk becomes nonuniform and gets either brighter or darker on its edge. All this is as explained by Harold M. Merklinger in his classic Understanding Boke.
However, when you look close enough, diffraction starts to make things more interesting.
How interesting? Well, here's an observation surrounded by two predictions.
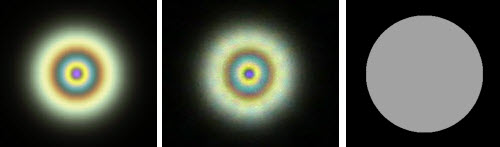
The prediction on the right comes straight from ray optics ignoring diffraction. That's a blur circle. The prediction on the left was computed for the same geometry but using wave optics with a pretty good model of diffraction. The observation in the middle is one of the rainbow rings we saw earlier in the thread, shot with a 200 mm lens stopped down with a near-circular aperture.
I assume it's obvious which model I'll be trusting in the future, whenever I have occasion to work in this regime.
And therein lies the story of how I got interested in these rainbow rings at all.
I've been looking again at the question of how and why image quality changes when you defocus a microscope objective. There's a lot of literature, easily found, that addresses the question in terms of MTF curves, basically contrast versus lines/mm. But to maybe get some better intuition, I also wanted to see what happened to the point spread function as the lens got dragged away from focus.
I wasn't able to find what I wanted regarding PSF, so finally I got frustrated and just wrote a more or less brute force numerical integration code to compute the PSF by finding optical path lengths and adding up the appropriately phase-shifted contributions from all paths. Of course I first tested it at perfect focus and (after some debugging) I was pleased to see an Airy disk. Then I defocused the model a little bit, repeated the computation, and saw the peak of the Airy disk drop a little. Excellent, excellent. Defocus some more, see some spreading, also excellent. Throw in a massive defocus, see crazy rings with lots of wiggles. OK, maybe not so excellent.
But in fact the crazy rings with lots of wiggles was exactly right. I just hadn't ever looked at that part of the physics before.
Earlier in the thread, Steffen suggested two keywords, "Fresnel and Fraunhofer". Those are very appropriate, and in an interesting way.
As I understand it, Fresnel and Fraunhofer described diffraction behind an empty aperture. The key parameter is difference in distance from the imaging plane to points in the center and edge of the aperture. When you get far enough away from the aperture that the difference drops to only a few wavelengths of light, then you see rings. This is Fresnel diffraction. As you move farther away from the aperture, the difference becomes smaller and the rings become fewer. When the difference becomes a small fraction of one wavelength, something close to the single-peaked Airy disk pattern forms, and in the limit of great distance you get the perfect Airy disk of Fraunhofer diffraction.
However, as noted by Wikipedia, Fraunhofer diffraction also occurs in the focal plane of an imaging lens. The imaging lens, regardless of whether it's in front or behind the aperture, changes the phase relationship along various paths so as to produce a spherical wavefront that converges on the focus point. Exactly at the focus point, the optical path lengths are the same all across the aperture, just as they would be "at infinity" with no lens.
Similarly, at distances in front and in back of the focal plane of an imaging lens, you get slight shifts in optical path length across the aperture. That's what causes the contrast loss of defocusing, and it's also what causes Fresnel rings with a point source.
The key thing to realize is that regardless of whether there is a lens or not, the rings become clear when the total wavefront error across the aperture drops to only a few lambda. As the wavefront error becomes smaller, you get fewer rings. When the error drops to only a fraction of one wavelength lambda, you get a central peak, and when finally it falls to zero, you get the perfect Airy disk.
In the case of an empty aperture illuminated by a plane wave, the wavefront error starts at many lambda near the aperture, gradually reduces to a fraction of lambda in the far field, and approaches zero only at infinity.
The addition of the lens, either in front or behind the aperture, changes the situation so that instead of a plane wave, you now have a spherical wavefront that converges onto the focus point. The interference patterns still depend only on the wavefront error, but now that error drops all the way to zero at the focus point, then rises again beyond focus. In the vicinity of focus, where the wavefront error is a few lambda or less, the rings form for exactly the same reason that they do with the empty aperture.
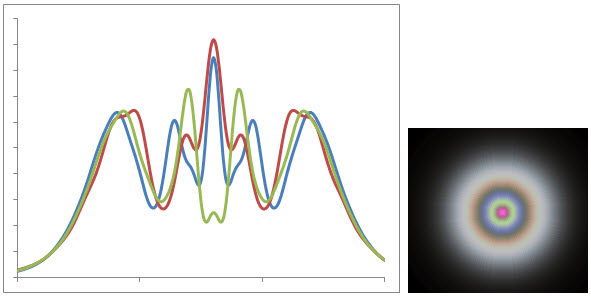
Once we understand about the rings, then explaining the odd colors is simple. The nature of the ring pattern changes depending on wavelength. If green happens to be at a ring pattern that has a dark center, while red and blue are bright, then hey presto you get magenta!
Here's the picture for that situation, showing the intensity profiles as seen by the red, green, and blue sensors in my simulation. This is defocused at 2 lambda for the center wavelength of the green band, which causes it to have a significant low in the middle of the pattern.
If you're interested in playing with some of these ring-like patterns yourself, it turns out that there's an online calculator that's pretty simple to use. My notes say http://wyant.optics.arizona.edu/fresnel ... lZones.htm and the corresponding document at http://wyant.optics.arizona.edu/webMath ... action.pdf, but at the moment my browser can't reach those sites to confirm.
Anyway, I hope you find this even a fraction as interesting as I did!
--Rik
The "Rainbow Rings" are blur circles !
Sort of...
More precisely, the rainbow rings are what you see if you look closely at what you think is going to be the "blur circle" that is created by an out-of-focus lens imaging a tiny bright spot of light. The two adjustments are aperture and focus (bellows extension).
Suppose you fix the aperture size and sweep the bellows extension from behind focus to in front of it. At extreme defocus, you will see something very much like the uniformly bright circle of light predicted by geometric optics. As you approach focus, the "blur circle" will resolve to a set of many concentric rings, then progressively fewer rings, then a single ring with a dark center, then something much like an Airy disk with a dim ring around its peak, then a real Airy disk, then an Airy disk with the ring again, and so on, repeating the pattern which is basically symmetric in front and behind focus. This is "fix A and adjust B".
On the other hand, you can open the aperture full wide, fix the bellows extension at a point slightly away from focus, then gradually close the aperture. If you have chosen the extension correctly, then at wide aperture you will see many rings and as the aperture closes you will see fewer rings, until finally with the aperture at its smallest setting you will see a single ring with a dark center, or perhaps even something close to a perfect Airy disk. This is "adjust A with fixed B".
The spacing of the rings depends on the aperture setting. For purposes of this thread I've stopped down quite a bit so the rings were wide and easily seen.
Perhaps it will help if I put some of the rings in context.
The above rings were shot with a Mitutoyo MT-1 lens stopped down to f/50 or so with a near-circular iris.
But you can get vaguely similar and in some sense more interesting rings with much less elaborate equipment. This is using my 18-55 mm kit lens stopped down to f/29. I've color-balanced the inset for the LED, so you can see the color separations better. The odd shape and radial spokes occur because the aperture on that lens is essentially hexagonal when it's stopped down that far.
To explain the rainbow rings, let me start by noting that "blur circles" are a myth predicted by ray optics. They're a handy and usually quite good enough myth, but a myth nonetheless.
According to ray optics, the out-of-focus image of a point source is a more-or-less uniformly illuminated disk of light that has the shape of the aperture. If you push a little farther and allow for things like spherical aberration, then according to ray optics the disk becomes nonuniform and gets either brighter or darker on its edge. All this is as explained by Harold M. Merklinger in his classic Understanding Boke.
However, when you look close enough, diffraction starts to make things more interesting.
How interesting? Well, here's an observation surrounded by two predictions.
The prediction on the right comes straight from ray optics ignoring diffraction. That's a blur circle. The prediction on the left was computed for the same geometry but using wave optics with a pretty good model of diffraction. The observation in the middle is one of the rainbow rings we saw earlier in the thread, shot with a 200 mm lens stopped down with a near-circular aperture.
I assume it's obvious which model I'll be trusting in the future, whenever I have occasion to work in this regime.
And therein lies the story of how I got interested in these rainbow rings at all.
I've been looking again at the question of how and why image quality changes when you defocus a microscope objective. There's a lot of literature, easily found, that addresses the question in terms of MTF curves, basically contrast versus lines/mm. But to maybe get some better intuition, I also wanted to see what happened to the point spread function as the lens got dragged away from focus.
I wasn't able to find what I wanted regarding PSF, so finally I got frustrated and just wrote a more or less brute force numerical integration code to compute the PSF by finding optical path lengths and adding up the appropriately phase-shifted contributions from all paths. Of course I first tested it at perfect focus and (after some debugging) I was pleased to see an Airy disk. Then I defocused the model a little bit, repeated the computation, and saw the peak of the Airy disk drop a little. Excellent, excellent. Defocus some more, see some spreading, also excellent. Throw in a massive defocus, see crazy rings with lots of wiggles. OK, maybe not so excellent.
But in fact the crazy rings with lots of wiggles was exactly right. I just hadn't ever looked at that part of the physics before.
Earlier in the thread, Steffen suggested two keywords, "Fresnel and Fraunhofer". Those are very appropriate, and in an interesting way.
As I understand it, Fresnel and Fraunhofer described diffraction behind an empty aperture. The key parameter is difference in distance from the imaging plane to points in the center and edge of the aperture. When you get far enough away from the aperture that the difference drops to only a few wavelengths of light, then you see rings. This is Fresnel diffraction. As you move farther away from the aperture, the difference becomes smaller and the rings become fewer. When the difference becomes a small fraction of one wavelength, something close to the single-peaked Airy disk pattern forms, and in the limit of great distance you get the perfect Airy disk of Fraunhofer diffraction.
However, as noted by Wikipedia, Fraunhofer diffraction also occurs in the focal plane of an imaging lens. The imaging lens, regardless of whether it's in front or behind the aperture, changes the phase relationship along various paths so as to produce a spherical wavefront that converges on the focus point. Exactly at the focus point, the optical path lengths are the same all across the aperture, just as they would be "at infinity" with no lens.
Similarly, at distances in front and in back of the focal plane of an imaging lens, you get slight shifts in optical path length across the aperture. That's what causes the contrast loss of defocusing, and it's also what causes Fresnel rings with a point source.
The key thing to realize is that regardless of whether there is a lens or not, the rings become clear when the total wavefront error across the aperture drops to only a few lambda. As the wavefront error becomes smaller, you get fewer rings. When the error drops to only a fraction of one wavelength lambda, you get a central peak, and when finally it falls to zero, you get the perfect Airy disk.
In the case of an empty aperture illuminated by a plane wave, the wavefront error starts at many lambda near the aperture, gradually reduces to a fraction of lambda in the far field, and approaches zero only at infinity.
The addition of the lens, either in front or behind the aperture, changes the situation so that instead of a plane wave, you now have a spherical wavefront that converges onto the focus point. The interference patterns still depend only on the wavefront error, but now that error drops all the way to zero at the focus point, then rises again beyond focus. In the vicinity of focus, where the wavefront error is a few lambda or less, the rings form for exactly the same reason that they do with the empty aperture.
Once we understand about the rings, then explaining the odd colors is simple. The nature of the ring pattern changes depending on wavelength. If green happens to be at a ring pattern that has a dark center, while red and blue are bright, then hey presto you get magenta!
Here's the picture for that situation, showing the intensity profiles as seen by the red, green, and blue sensors in my simulation. This is defocused at 2 lambda for the center wavelength of the green band, which causes it to have a significant low in the middle of the pattern.
If you're interested in playing with some of these ring-like patterns yourself, it turns out that there's an online calculator that's pretty simple to use. My notes say http://wyant.optics.arizona.edu/fresnel ... lZones.htm and the corresponding document at http://wyant.optics.arizona.edu/webMath ... action.pdf, but at the moment my browser can't reach those sites to confirm.
Anyway, I hope you find this even a fraction as interesting as I did!
--Rik
Finally the answer. I'd been checking on this from time to time and was wondering how long you'd make us suffer. The colored rings are interesting to me. I'm familiar with PSF only in fluorescence imaging. There is a technique where small fluorescent beads are photographed to determine PSF. That data can then be plugged into certain deconvolution programs to enhance images.
Your colored rings remind me of phase contrast. If you're viewing a very small phase object(bacterium for instance) and focus from above to below the object you'll see colored rings that will cycle through various colors. I believe this is due to interference or perhaps both interference and diffraction.
Anyway, thanks for the experiment. Very interesting
-
rjlittlefield
- Site Admin
- Posts: 23606
- Joined: Tue Aug 01, 2006 8:34 am
- Location: Richland, Washington State, USA
- Contact:
Yeah, I apologize for that. The long delay was not my original intention. Instead, this thread got left hanging while I struggled with trying to get something coherent written about the problem that originally motivated all this: what happens with defocus. That took way longer than I had hoped, expected, or even feared.curt0909 wrote:I'd been checking on this from time to time and was wondering how long you'd make us suffer.
--Rik