Snail's egg - Stacking problem

A forum to ask questions, post setups, and generally discuss anything having to do with photomacrography and photomicroscopy.

Moderators: rjlittlefield, ChrisR, Chris S., Pau

Bruce Williams
Posts: 1120
Joined: Mon Oct 30, 2006 1:41 pm
Location: Northamptonshire, England
Contact:

Snail's egg - Stacking problem

Post by Bruce Williams »

Hi folks,

This problem (read on) was originally highlighted by Rik in my posting "Plate tectonics - a snail's perspective" in the Microscope Forum. Rik asked to see the best "broken egg shell" frames to compare with the mushy results in my stacked image. At that time I had thought that the original frames had been permanently deleted, however (fortunately) they had only gone as far as the Recycle Bin. I suggest you read Riks comments on the broken egg shell at this point.

I have run the stack again using the CombineZ5 default settings with 19 (out of camera) frames. The results are as follows:

Pic A is a full size crop (from the 19 frame stack) of just the piece of broken egg shell with no other processing.

Pic B is a full size crop from a separate stack of just the two best "egg shell" frames.

Pics E and F are Pics A and B after going through similar CS2 processing to the image in the original Microscope Forum posting.

I plan to (identically) pre-process each of the 19 frames before running CombineZ5. To do this I will create a Photoshop "action" to bring each frame to approx. equivalent to Pics C and D. I will post the result tomorrow evening.

Bruce

Note: Each crop is approximately 1mm on X axis.
Image

Image

Copy of original posting:
Image

rjlittlefield
Site Admin
Posts: 23603
Joined: Tue Aug 01, 2006 8:34 am
Location: Richland, Washington State, USA
Contact:

Post by rjlittlefield »

Bruce,

Thanks for following up on this. We certainly have a lot of mush turning up recently!

In CombineZ5, there is one specific parameter that can often affect this sort of problem. Go into Edit Macros, open up Do Stack, and locate the line that says Find Detail(<some number>).

With the default macro set, that number is probably 25 -- Find Detail(25). Try changing it to a much smaller number, like Find Detail(5). The editing sequence is to highlight that line, click Edit, change the number in the text field at the bottom of the dialog, then click Update. Click OK, close the Edit Macro dialog, and you're ready to test.

What the number in the Find Detail command does, is to set a threshold for how strong detail must be before the software decides that depth is known at a particular pixel position. If the detail in some region is not very intense, it can slip under the default threshold of 25. In that case, CombineZ5 guesses depth by interpolating from neighboring areas where there was strong enough detail to establish depth. If the guess is wrong, the composite ends up fuzzy.

Reducing the threshold for Find Detail allows depth to be determined by less intense detail. In many cases, that's a good thing.

But if you make the value too small, say Find Detail(1), then pixel noise can be mistaken for detail, and again the stack gets messed up.

The best setting depends on how much pixel noise your camera produces.

Unfortunately I don't know any substitute for experimenting.

--Rik

Bruce Williams
Posts: 1120
Joined: Mon Oct 30, 2006 1:41 pm
Location: Northamptonshire, England
Contact:

Post by Bruce Williams »

Rik - Thanks for the advice on experimenting with the CombineZ5 Macro parameters (btw I'm now using CombineZM). I did as you suggested and experimented a bit. Unfortunately non of the FIND DETAIL (FD) settings that I tried (ie: 5, 15, 25 and 40) produced the hoped for result, however it was a very useful learning process.

FYI, I ran the same tests with the CS2 preprocessed frames, however the results were if anything worse than using the "out of camera" frames.

The images below show results for FD=5, 25 and 40, and FD=40 with the stack order reversed. FD=15 was similar to FD=25.

Bruce

Image

Image

rjlittlefield
Site Admin
Posts: 23603
Joined: Tue Aug 01, 2006 8:34 am
Location: Richland, Washington State, USA
Contact:

Post by rjlittlefield »

Bruce,

Thanks for sending me your stack and giving permission to post results from working with it.

This has turned out to be a very interesting problem indeed. I ended up testing with CombineZ5, Helicon Focus 4.03, and PTgui 5.8.4 with my extended depth-of-field hack (pano12.dll, FileVersion: 2.8.0). I did not test with CombineZM. As far as I know, it's equivalent to CombineZ5 for this application.

I think the essence of the problem is very similar to what phero66 ran into.

In the area of that detached chunk of shell, the actual visible detail is fairly low contrast and is not very sharp. The software, unfortunately, is looking for pixel-level detail. It thinks it finds some, but what it finds is actually noise, not detail. Of course there is no correlation between the frame of most noise and the frame of sharpest focus, so the depth map is nonsense. It's really quite dramatic nonsense. If you step through the CombineZ5 processing and look at the depth map right after it has done its Fill Gaps, you can see that the depth map is slewing from first frame to last frame and everything in between.

I tried running the stack through Helicon Focus with default parameters R=8, S=4, and it had very similar problems to CombineZ5. There's no way to look into the workings of Helicon Focus, but I speculate that it's doing the same thing (getting distracted by noise).

I played around with resizing the images before running CombineZ5 and Helicon Focus. I was hopeful that reducing by 4X (to around 800 pixels) before processing would take care of the problem, both by reducing noise and by shrinking the detail to be pixel-sized. That helped with CombineZ5, but not with Helicon Focus, and I was not happy with the CombineZ5 result at that resolution. Reducing by 2X did not seem to help with either software.

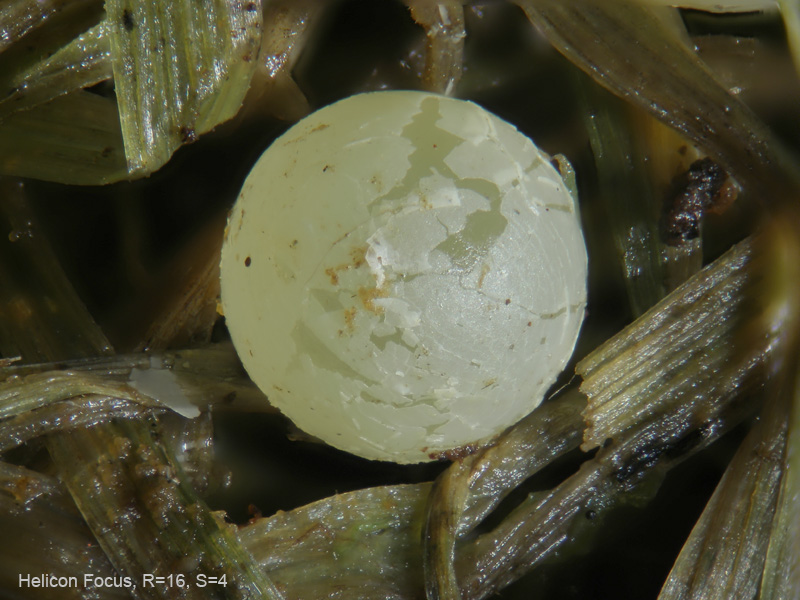
On the other hand, leaving the images at full size, it did help to set Helicon Focus R=16, leaving S=4 as default. But R=16, S=8 was a disaster -- fuzzy all over. I don't completely understand how R and S play together in HF. S in particular seems to be pretty sensitive -- when I turn it very far up or down, things get worse.

Normally I work with just CombineZ5 (or CombineZM) and with Helicon Focus. But this time, just to cover the bases, I also backed up and tried my Panorama Tools hack (PT, described here).

To my considerable surprise, the PT image came out looking better than both CombineZ5 and Helicon Focus. It exposed more detail, particularly in dark, low contrast areas.

Here are some images. These are all straight out of the software, no preprocessing of the stack, no retouching or filtering of the output. Images have been cropped and resized for display, and the full-frame images have been level-adjusted to match your earlier CombineZ post.

I hope that these results are useful, though I am afraid that they do not make life any simpler.

--Rik

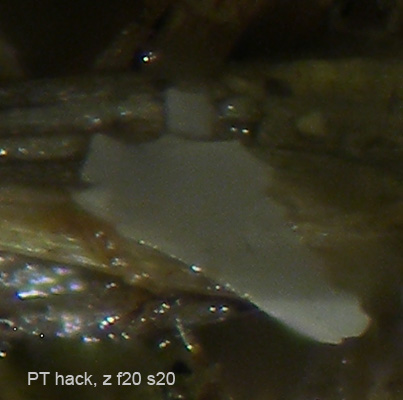
The following image is equivalent to an actual pixels crop of full size images (e.g 3264x2448) processed with z f20 s20. The cropping here was mostly done in PTgui to make the processing faster. This is a full stack, all 18 frames.
Image

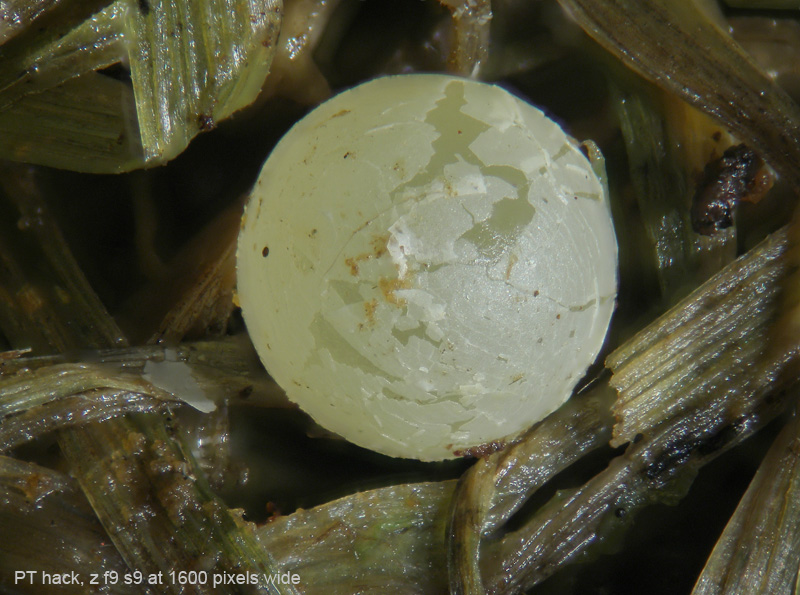
The following image was generated using a PTgui "panorama size" of 1600 pixels wide. This means that the 3264-pixel input images were resized on the fly to 1600 pixels wide. The z f9 s9 parameters were applied to those, generating a 1600 pixels output image, which was resized to 800 for display here.
Image

And finally, Helicon Focus with the R parameter adjusted.
Image

Bruce Williams
Posts: 1120
Joined: Mon Oct 30, 2006 1:41 pm
Location: Northamptonshire, England
Contact:

Post by Bruce Williams »

Rik,

Thank you for putting so much effort into investigating and resolving this problem. Your results are a great improvement on my CombineZM stack and a strong arguement for having more than one weapon in your stacking arsenal ...and the need for experimenting with the stacking parameters.

To be honest I hadn't noticed the soft eggshell fragment until you raised it in my original posting, so for me a valuable lesson in observation. My attention had been focussed mainly on the egg itself and although I had noticed the halo effect around the circumference of the egg, I had not realised just how much detail had been lost in the low contrast background areas.

Bruce

Post Reply Previous topicNext topic